# 👉 Introduction

Welcome to SwiftXR, your all in one no-code 3D, Augmented Reality and Virtual Reality platform

## What is SwiftXR

At first glance, one might think this is just another webXR builder, but it's something more. SwiftXR is a lightweight webXR builder framework, which means it allows you to easily drag & drop predefined [`components`](/components) to create a webXR application. By [components,](/components) we mean anything with HTML and WebXR structure. We use [components](/components) everywhere which allows you to create complex webXR applications without any knowledge of coding.

## Why SwiftXR

SwiftXR was designed primarily to create simple light-weight webXR applications as quickly as possible with a one-click deploy button and with an affordable pricing plan. Instead of worrying and learning a 3D editor, we introduced draggable set of [components](/components) and a design canvas that is easily customizable.

## ⚡️ Quick Start&#x20;

To showcase the power of SwiftXR we have created some `templates`.

* 🎨 Artwork Templates
* 📱 Product Showcase
* 📚 Educational E-learning Content
* 🎂 Birthday Experience

You can use them as starting point on your editor.


# 🍭 Creating a Project

Learn how to easily create SwiftXR projects

## Starting a Project <a href="#creating-a-project" id="creating-a-project"></a>

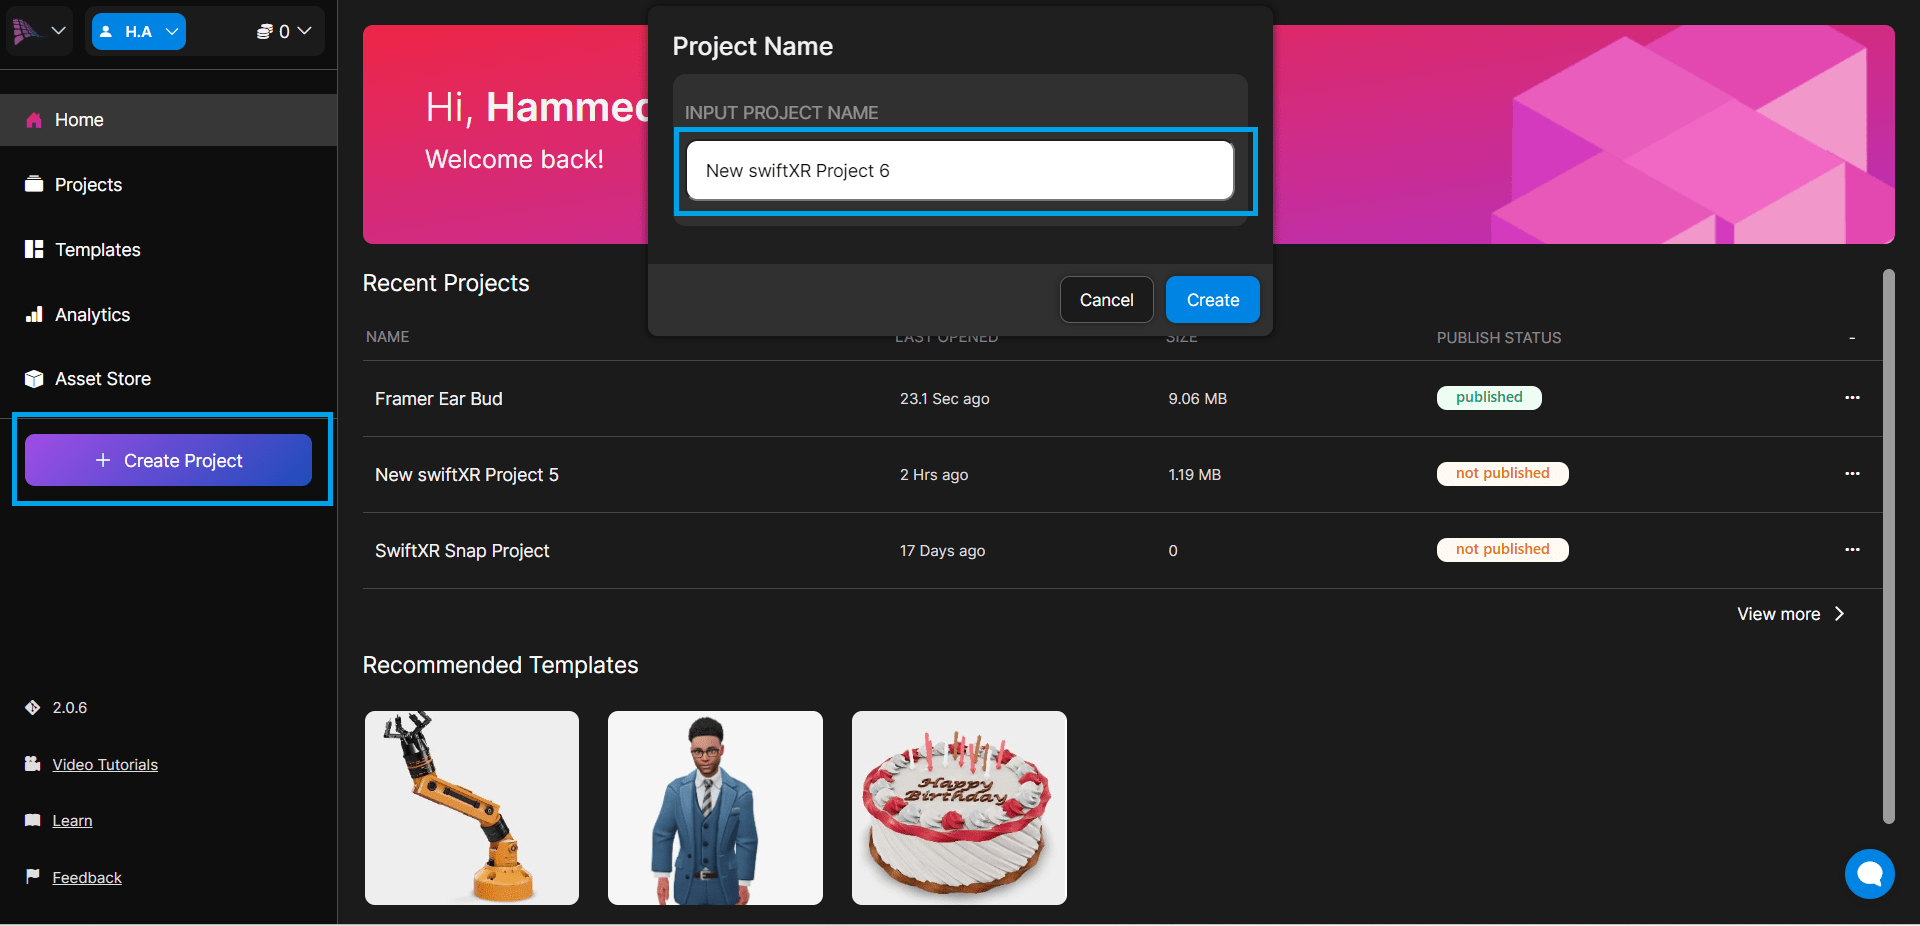
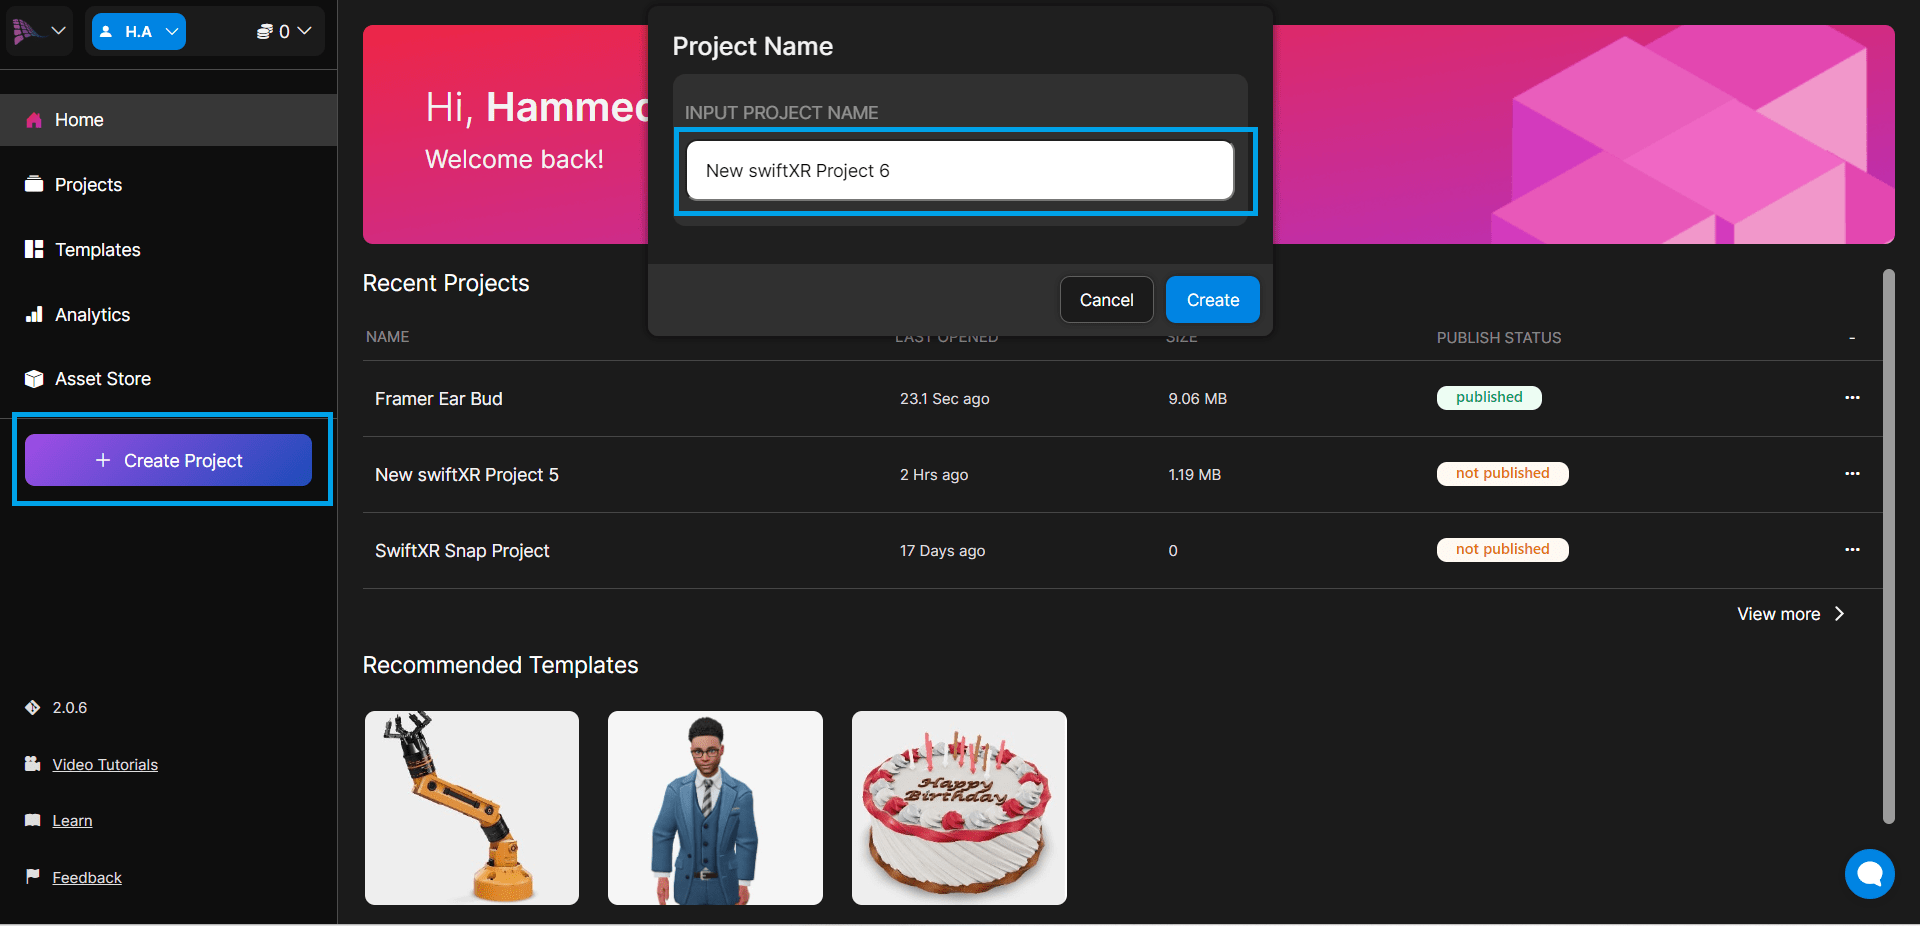
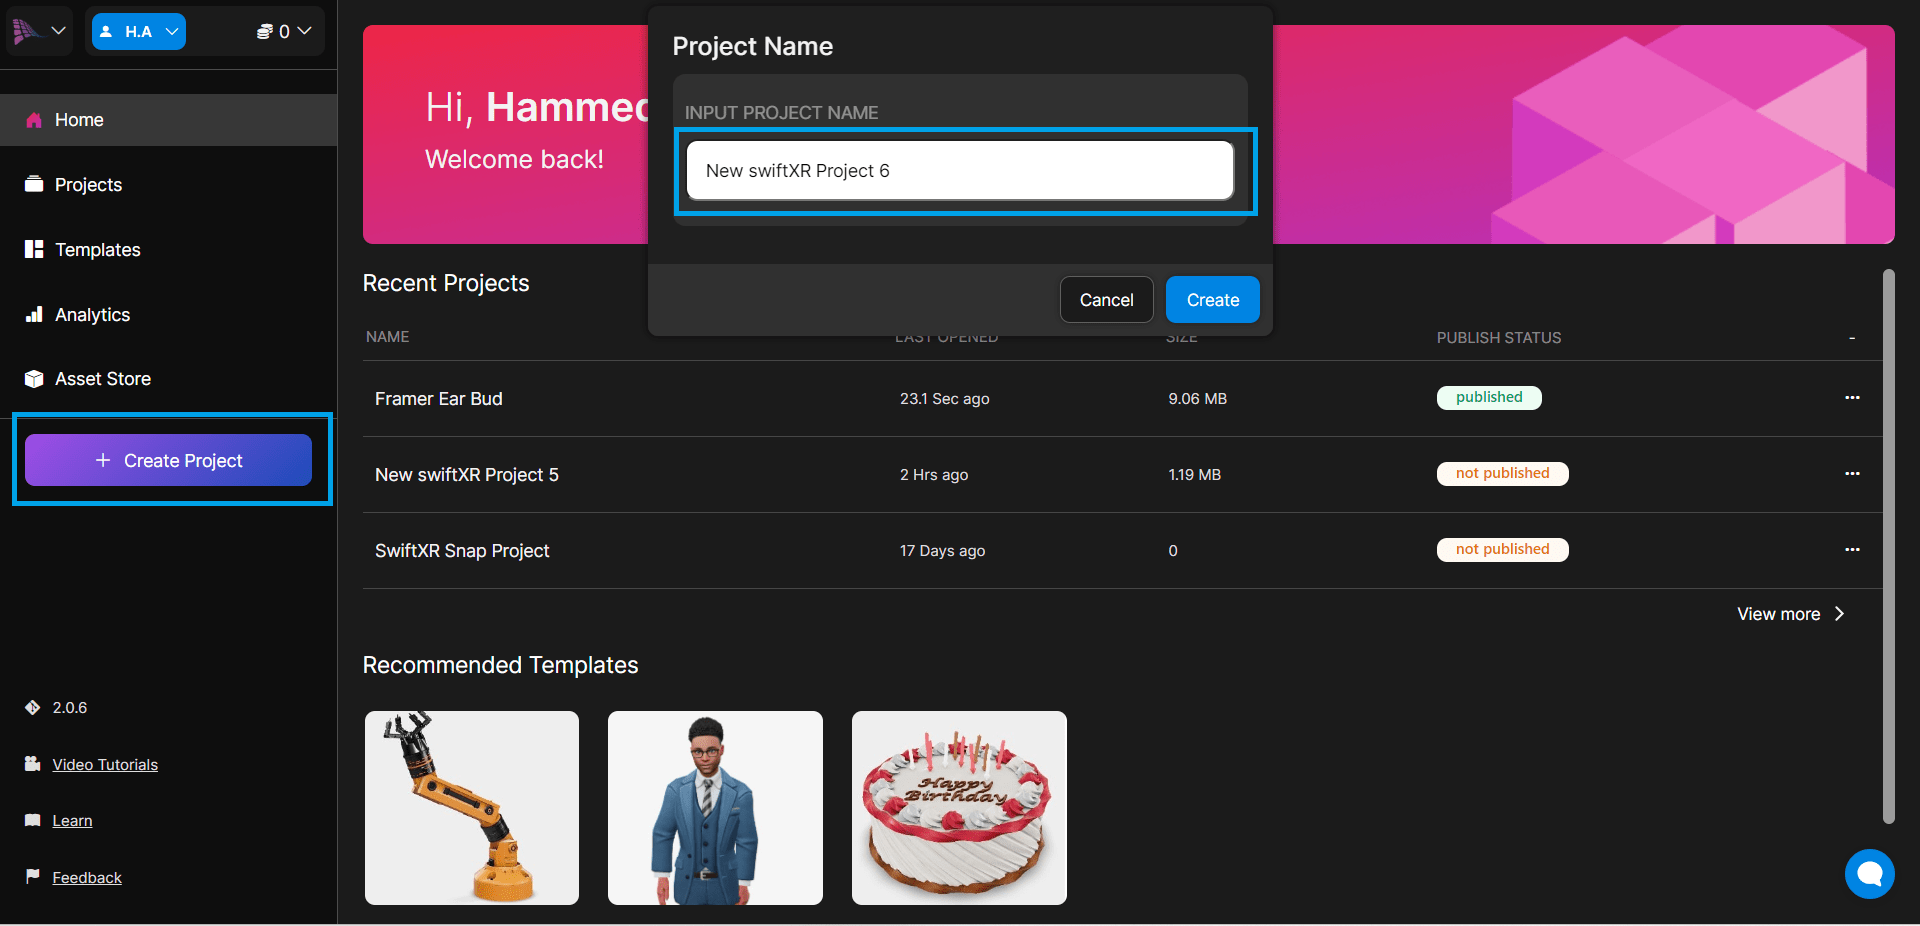
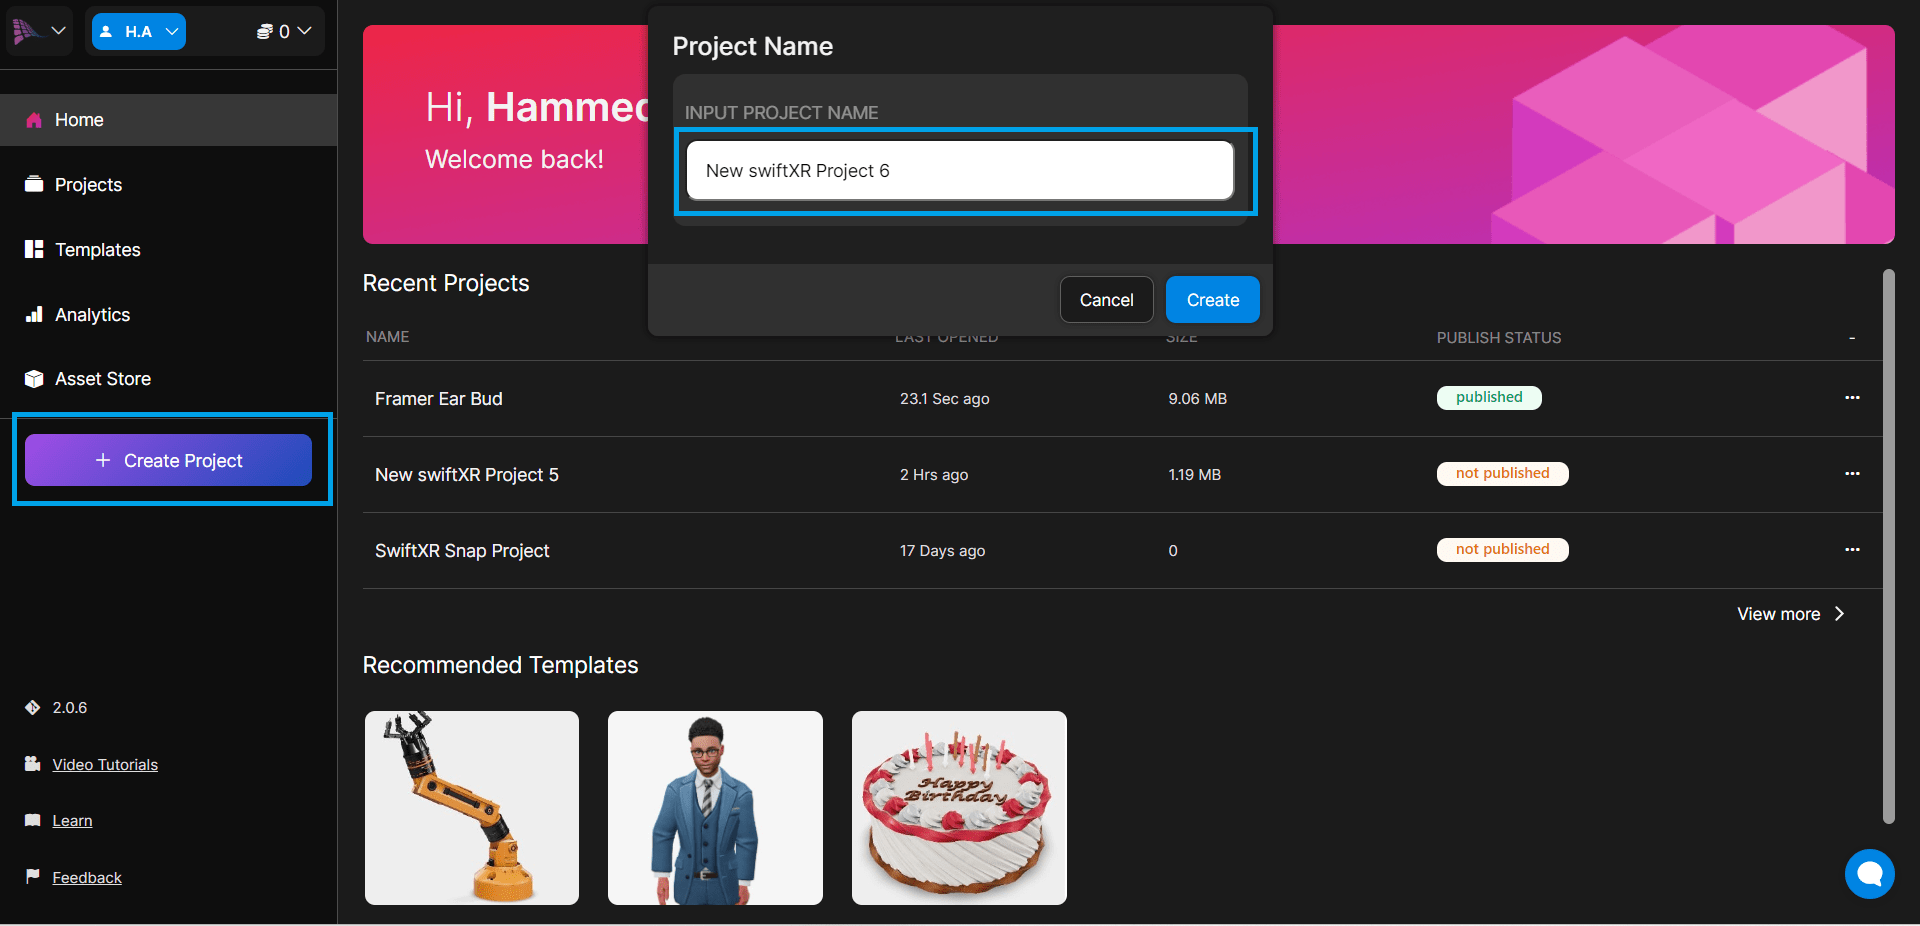
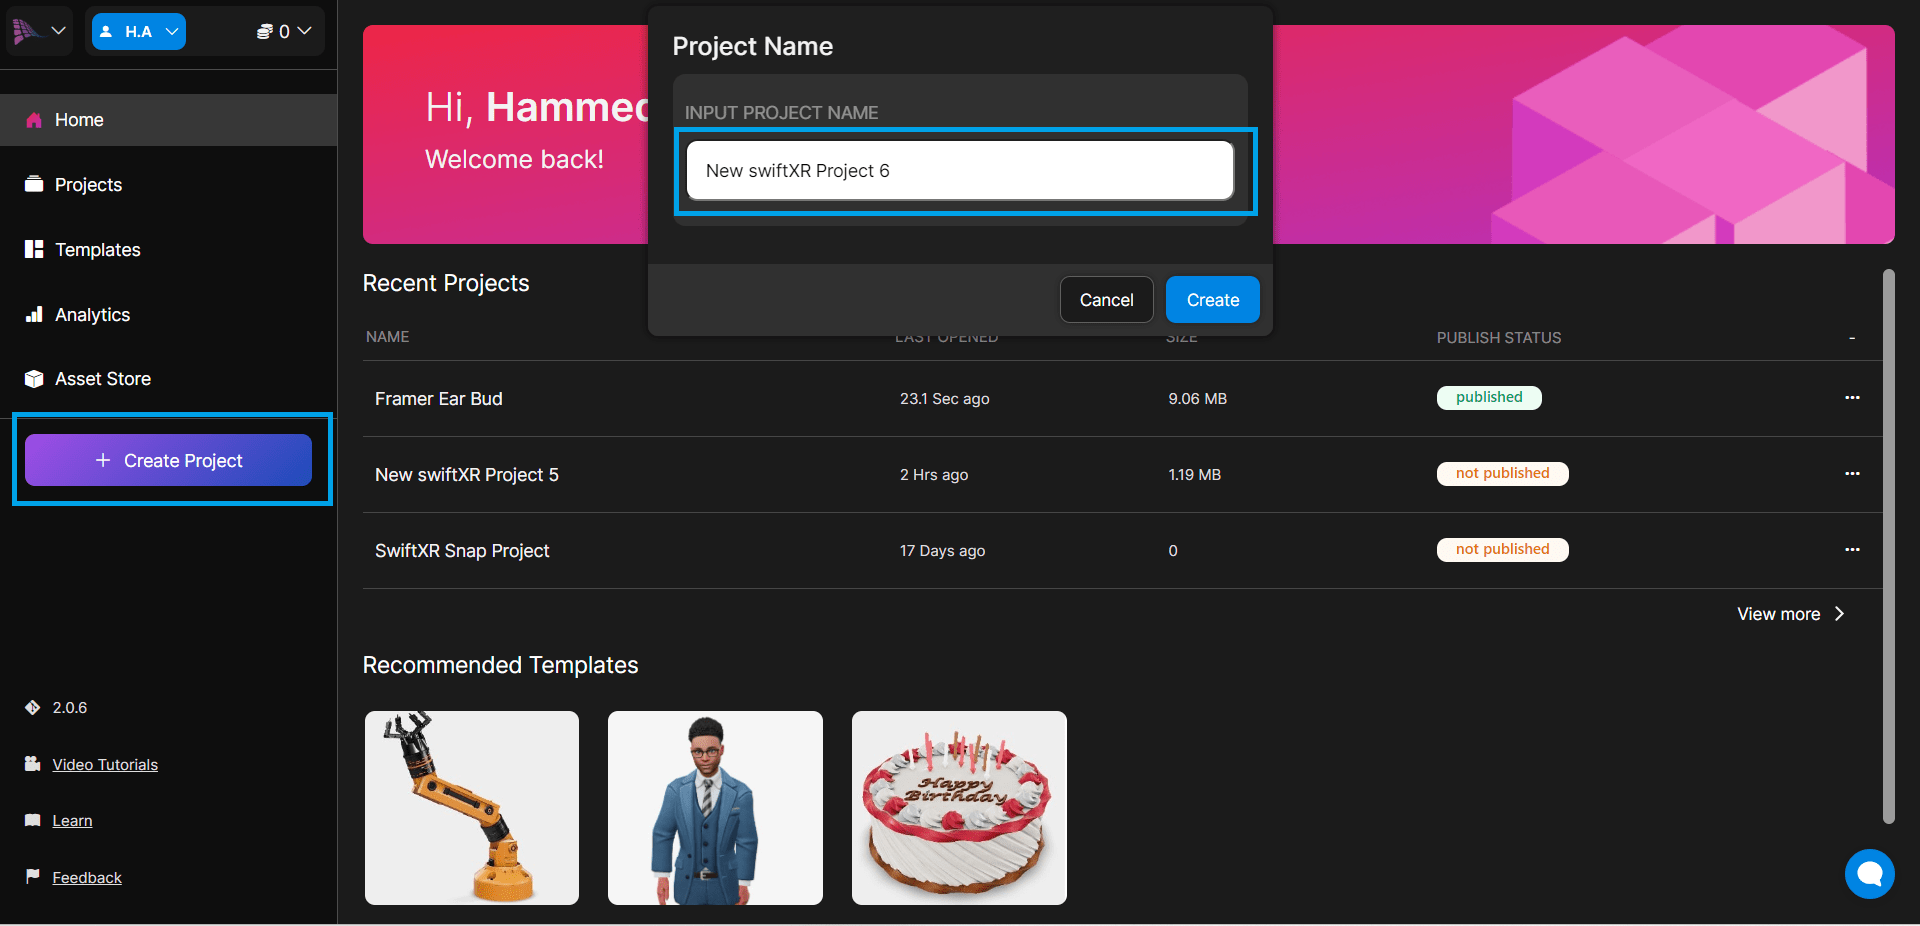
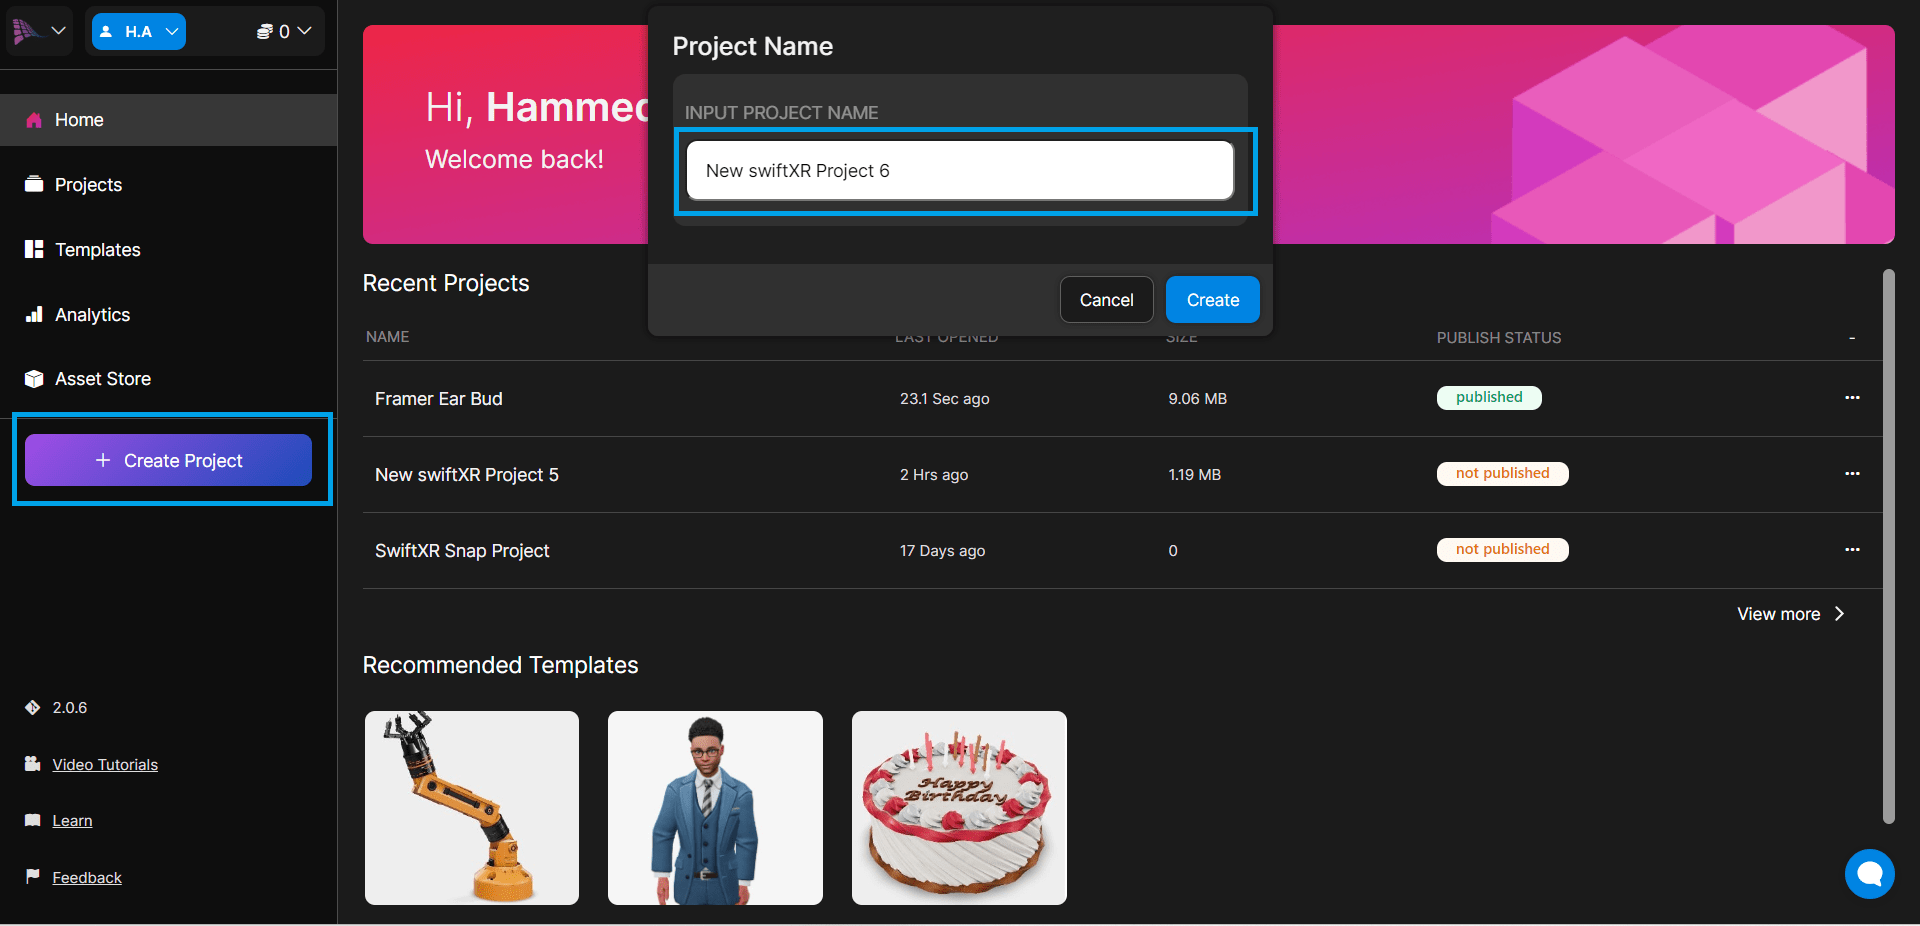
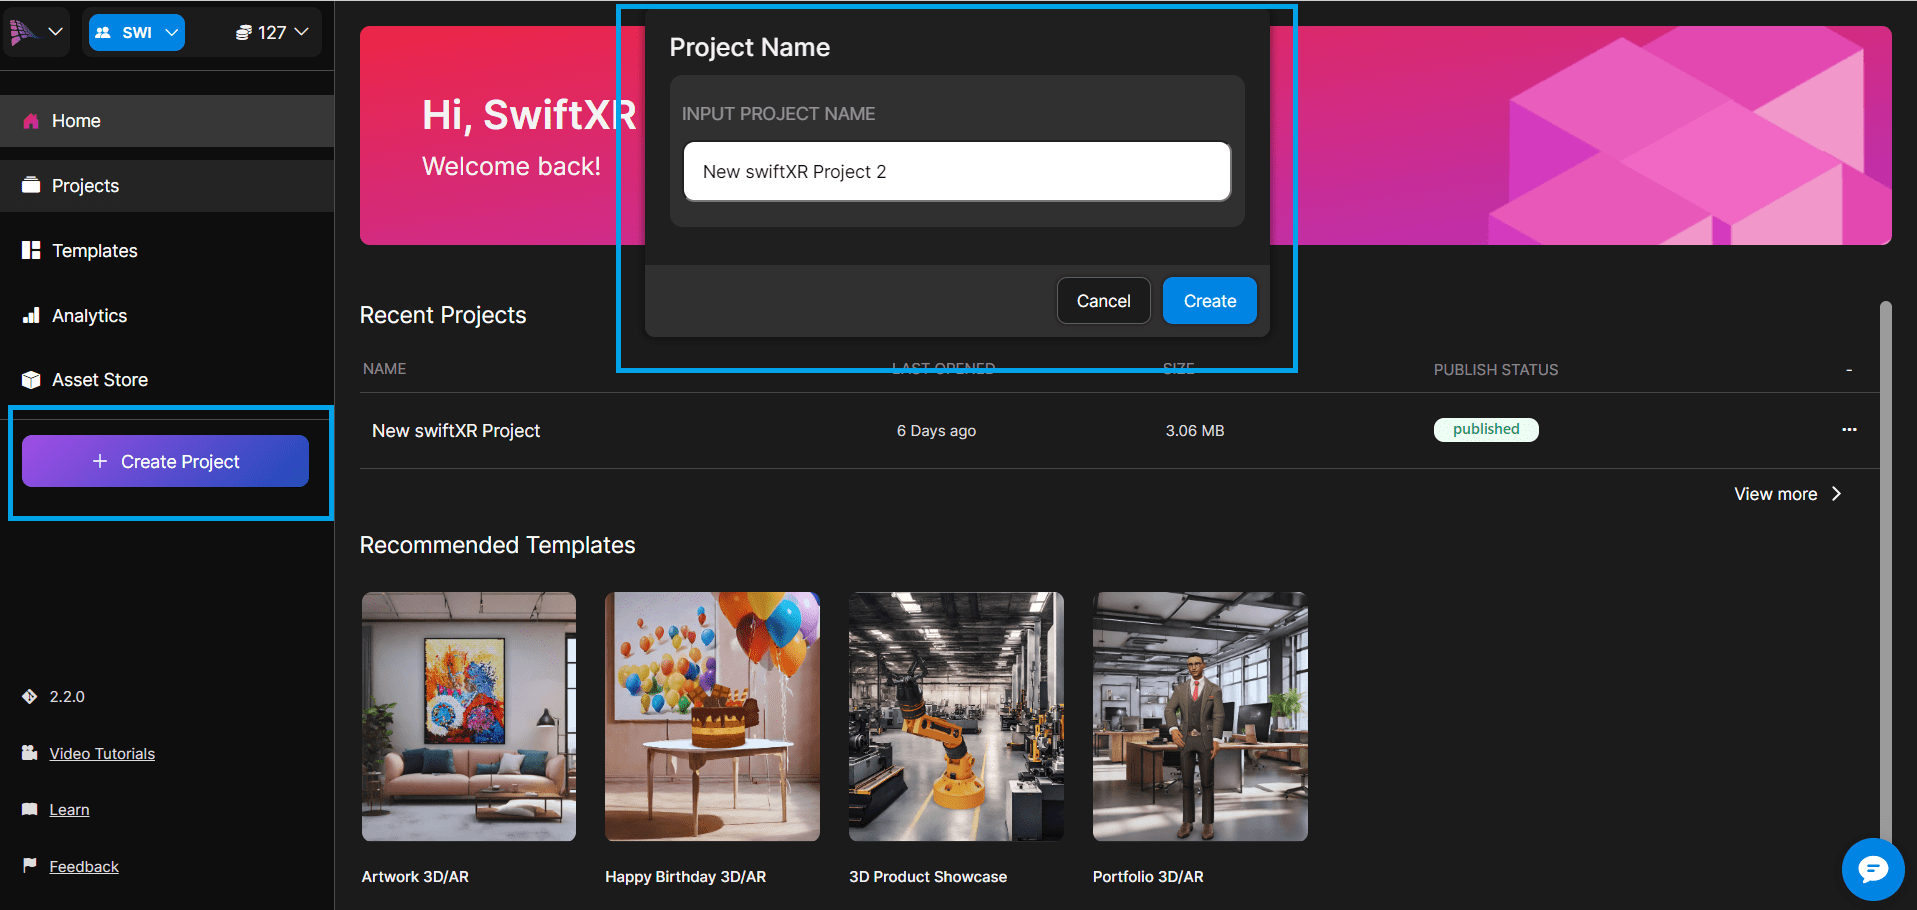
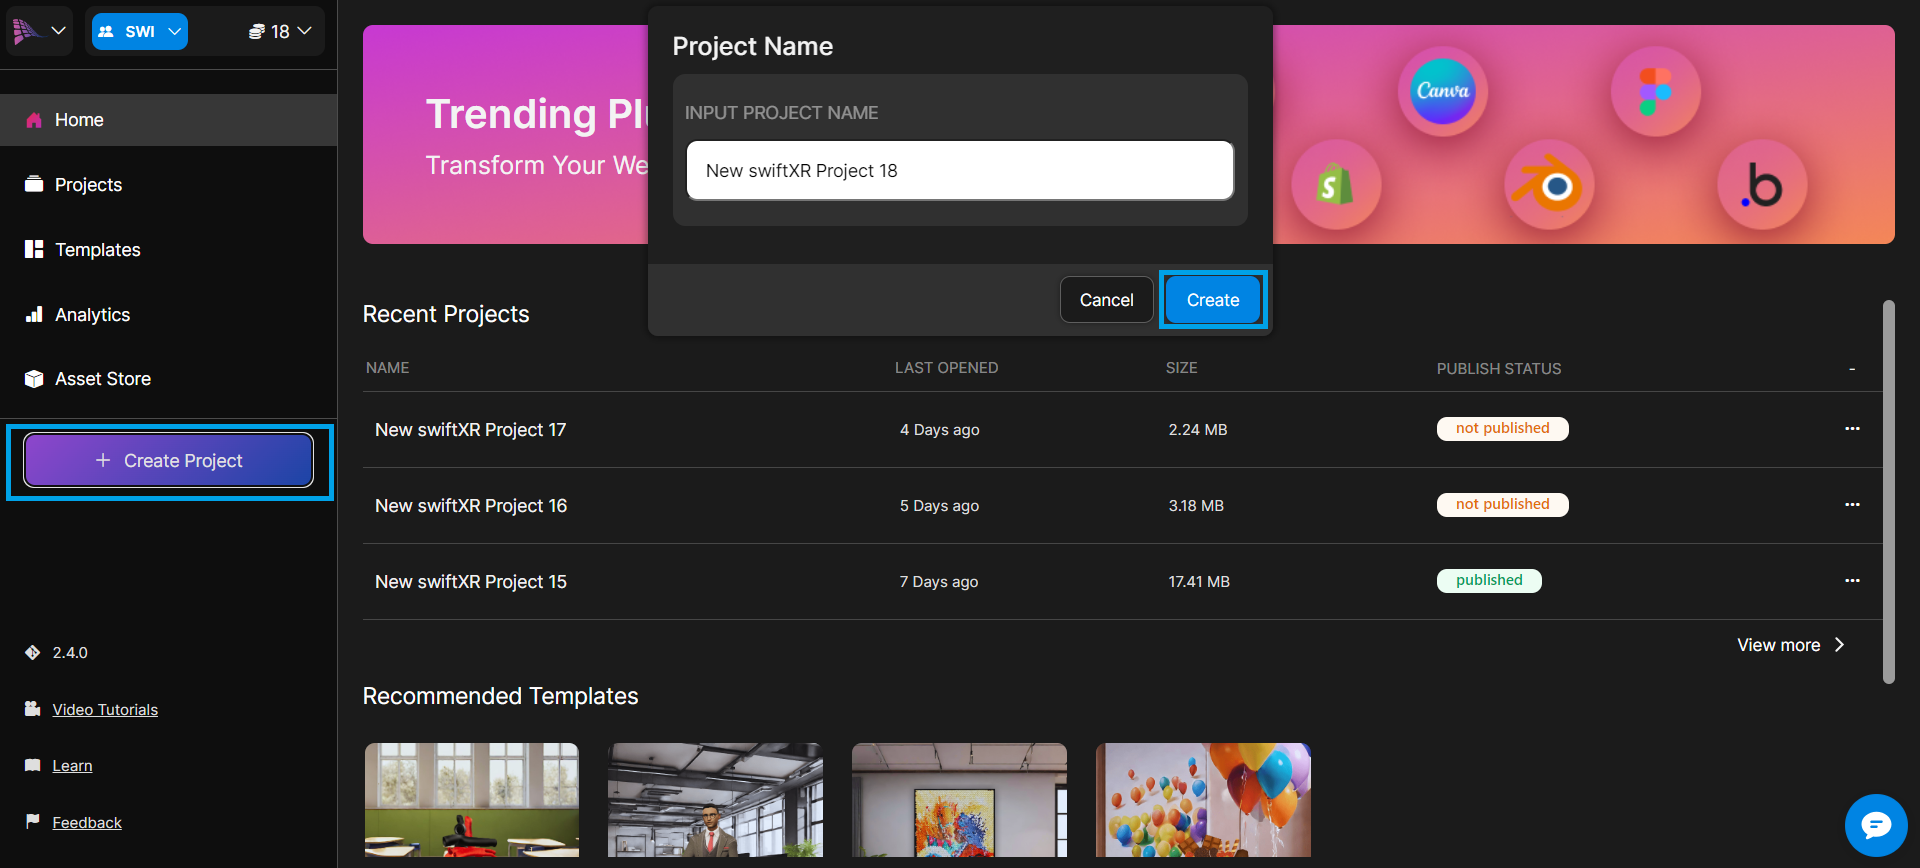
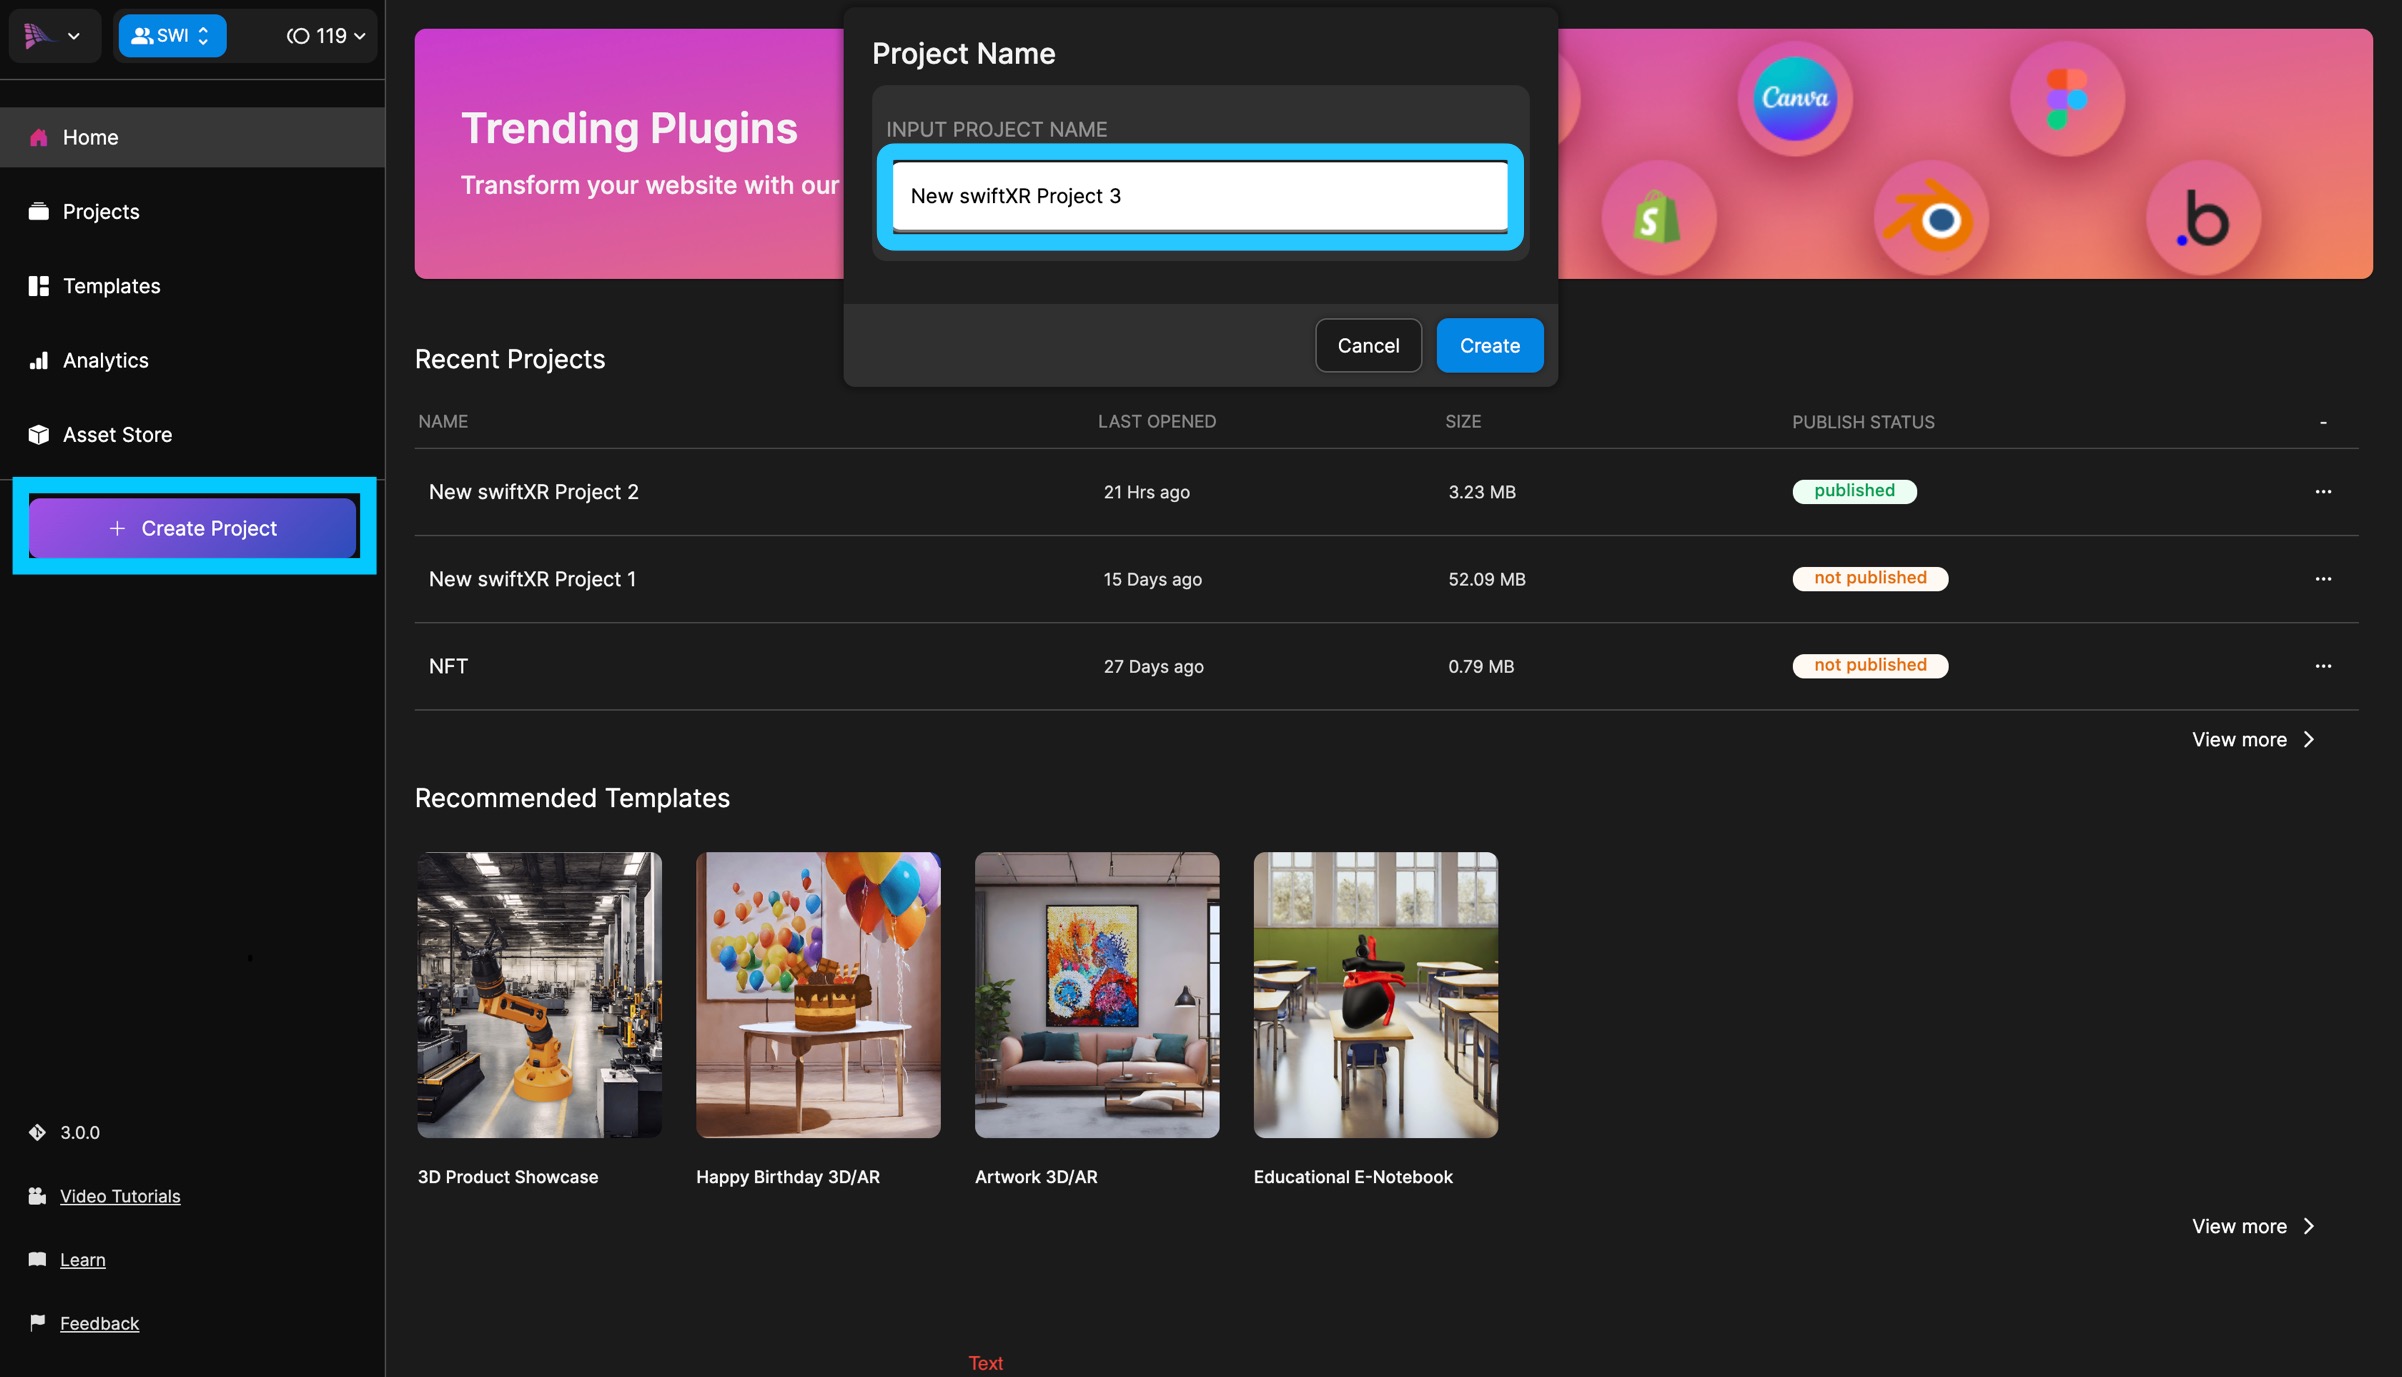
To get started with creating a project in [SwiftXR](https://home.swiftxr.io), click on the Create Project button and give your project a name. Hit the Create button when ready to launch the editor and get started with creating your AR/VR experience.

<figure><img src="https://564713456-files.gitbook.io/~/files/v0/b/gitbook-x-prod.appspot.com/o/spaces%2FKNcXDcNRYHUBsVw12Dii%2Fuploads%2F45n92DNSEFItXPwWcaGp%2FScreenshot%202024-10-01%20at%2009.58.53.png?alt=media&amp;token=47fbcaf6-e7ef-4eb2-8a0f-8fa9325d8574" alt=""><figcaption></figcaption></figure>

### Templates <a href="#templates" id="templates"></a>

[Templates](#templates) are complete projects that help you get started without based on the AR/VR experience you are trying to build. [Click here to view our Templates](/templates)

<figure><img src="https://564713456-files.gitbook.io/~/files/v0/b/gitbook-x-prod.appspot.com/o/spaces%2FKNcXDcNRYHUBsVw12Dii%2Fuploads%2Fgaf270ox625mYxWxhvtU%2FScreenshot%202024-10-01%20at%2008.38.24.png?alt=media&amp;token=2b933a51-ffc6-4d64-acbb-55cc08ce53a6" alt=""><figcaption></figcaption></figure>

### &#x20;Projects <a href="#projects" id="projects"></a>

The Projects tab highlights the various SwiftXR projects you have **`published,`** and in your **`browser`**. Click on the new project button to create a new project. You can also open recent projects, delete projects from the hub, and also open up the learn tab to view tutorials on how to use swiftXR.

<figure><img src="https://564713456-files.gitbook.io/~/files/v0/b/gitbook-x-prod.appspot.com/o/spaces%2FKNcXDcNRYHUBsVw12Dii%2Fuploads%2FX2WA328XUUQYUzOly6bF%2FScreenshot%202024-10-01%20at%2010.08.19.png?alt=media&amp;token=de97be95-ae51-44ad-b822-4197f17dbd0f" alt=""><figcaption></figcaption></figure>

Next [Navigate the Interface](https://docs.swiftxr.io/#/docs/navigate-the-interface?id=navigate-the-interface).


# 🧭 Navigate the Interface

The SwiftXR editor consists of various components and tools that help you create custom 3D, Augmented Reality (AR) and Virtual Reality (VR) experiences.


# Left Panel

<figure><img src="https://564713456-files.gitbook.io/~/files/v0/b/gitbook-x-prod.appspot.com/o/spaces%2FKNcXDcNRYHUBsVw12Dii%2Fuploads%2FA6KTeOKniQABNjfHSah4%2FScreenshot%202024-09-30%20at%2017.38.42.png?alt=media&amp;token=d25c3969-4304-42e6-a08b-89d46bd10174" alt=""><figcaption></figcaption></figure>

| Areas            | Description                                                                                                                                                                                              |
| ---------------- | -------------------------------------------------------------------------------------------------------------------------------------------------------------------------------------------------------- |
| Layers Panel     | The layers panel shows you a list of all objects added to your canvas. The layers panel uses a parent-child relationship to organize your objects which means a change in the parent object would affect |
| File Manager     | The File Manager window shows all of the files in your project and is the main way you can navigate, search and also find imported assets.                                                               |
| Project Settings | The page settings provides you with options to help customize your project name, descriptions and so much more.                                                                                          |
| Video Tutorials  | Quickly access how to use videos on different components directly in the Editor.                                                                                                                         |


# Layers Panel

The layers panel shows you a list of all objects added to your canvas. The layers panel uses a parent-child relationship to organize your objects which means a change in the parent object would affect

<figure><img src="https://564713456-files.gitbook.io/~/files/v0/b/gitbook-x-prod.appspot.com/o/spaces%2FKNcXDcNRYHUBsVw12Dii%2Fuploads%2FDvJAAuzpK8qkW1oo2wtm%2FScreenshot%202024-09-30%20at%2015.38.55.png?alt=media&amp;token=34274e61-2d83-4297-87fc-e3296e3fcd00" alt=""><figcaption></figcaption></figure>


# File Manager (Files)

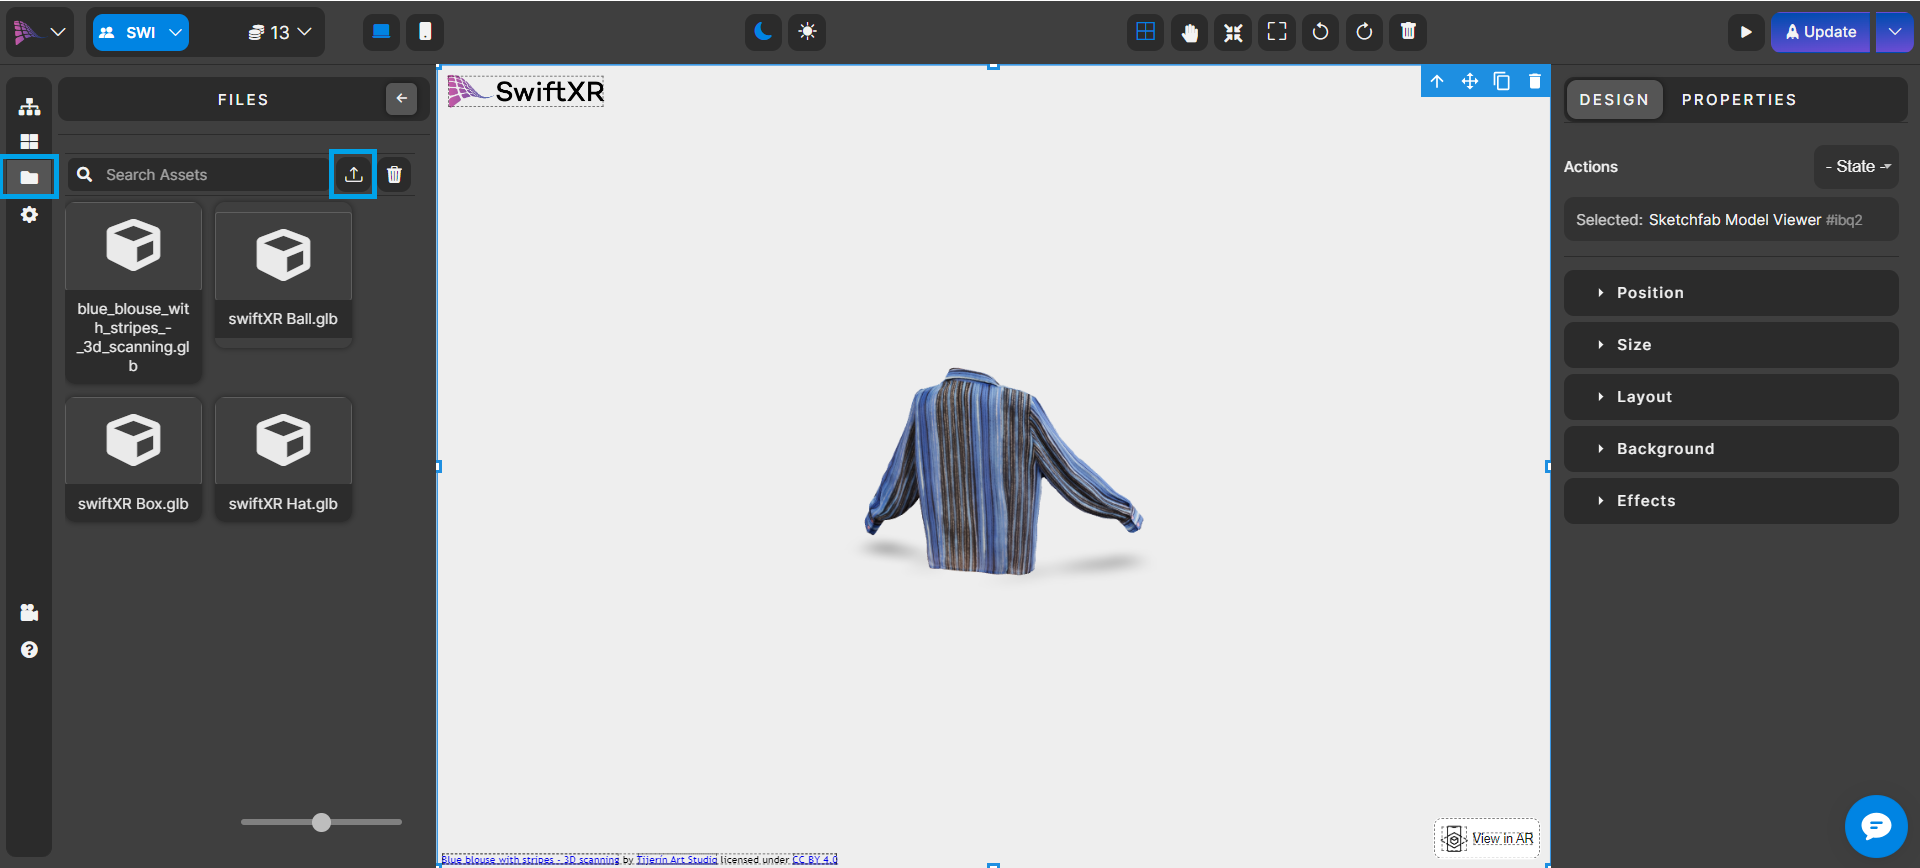
The File Manager window shows all of the files in your project and is the main way you can navigate, search and also find imported assets.

<figure><img src="https://564713456-files.gitbook.io/~/files/v0/b/gitbook-x-prod.appspot.com/o/spaces%2FKNcXDcNRYHUBsVw12Dii%2Fuploads%2F9TRSyDhWH29rAAI38Hsx%2FScreenshot%202024-09-30%20at%2015.38.16.png?alt=media&amp;token=7e229759-f35e-4c61-8427-b88658bf1d98" alt=""><figcaption></figcaption></figure>

<table><thead><tr><th width="224">Feature</th><th>Description</th></tr></thead><tbody><tr><td>Search Bar</td><td>Use the search bar to search for a file within your project or filter through your assets based on your search query.</td></tr><tr><td>Upload</td><td>You can use the upload button in the asset manager to bring in various files into your project.</td></tr><tr><td>Add to Canvas</td><td>Add the selected file to the canvas</td></tr><tr><td>Download </td><td>You can use this submenu to download the object locally</td></tr><tr><td>Delete</td><td>This would delete the object from your asset manager</td></tr></tbody></table>


# Project Settings

The page settings provides you with options to help customize your project name, descriptions and so much more.

<figure><img src="https://564713456-files.gitbook.io/~/files/v0/b/gitbook-x-prod.appspot.com/o/spaces%2FKNcXDcNRYHUBsVw12Dii%2Fuploads%2FmcCW8yRFEkXbpSJRIXnC%2FScreenshot%202024-09-30%20at%2015.51.36.png?alt=media&amp;token=dea63be1-6af9-4d51-ba8a-767fe559068a" alt=""><figcaption></figcaption></figure>

<table><thead><tr><th width="224">Feature</th><th>Description</th></tr></thead><tbody><tr><td>Project Name</td><td>This represents the name that would be shown when you share your project after publishing. You can always edit the name of your project via this field.</td></tr><tr><td>Project Description</td><td>This represents the description given that would be shown when you share your project after publishing. You can always edit the description of your project via this field.</td></tr><tr><td>Project Icon</td><td>This represents the icon used when sharing your project. You can change the project icon by typing in a URL link to the icon.</td></tr><tr><td>Icon Preview</td><td>This shows a preview of the icon with the URL link provided in the project icon.</td></tr></tbody></table>


# Video Tutorials

Quickly access how to use videos on different components directly in the Editor.

<figure><img src="https://564713456-files.gitbook.io/~/files/v0/b/gitbook-x-prod.appspot.com/o/spaces%2FKNcXDcNRYHUBsVw12Dii%2Fuploads%2Fv9Z5fskzIkDT2lMk8DCW%2FScreenshot%202024-09-30%20at%2015.56.06.png?alt=media&amp;token=fe229c28-9153-4980-935e-cefe007966ca" alt=""><figcaption></figcaption></figure>


# Working Area

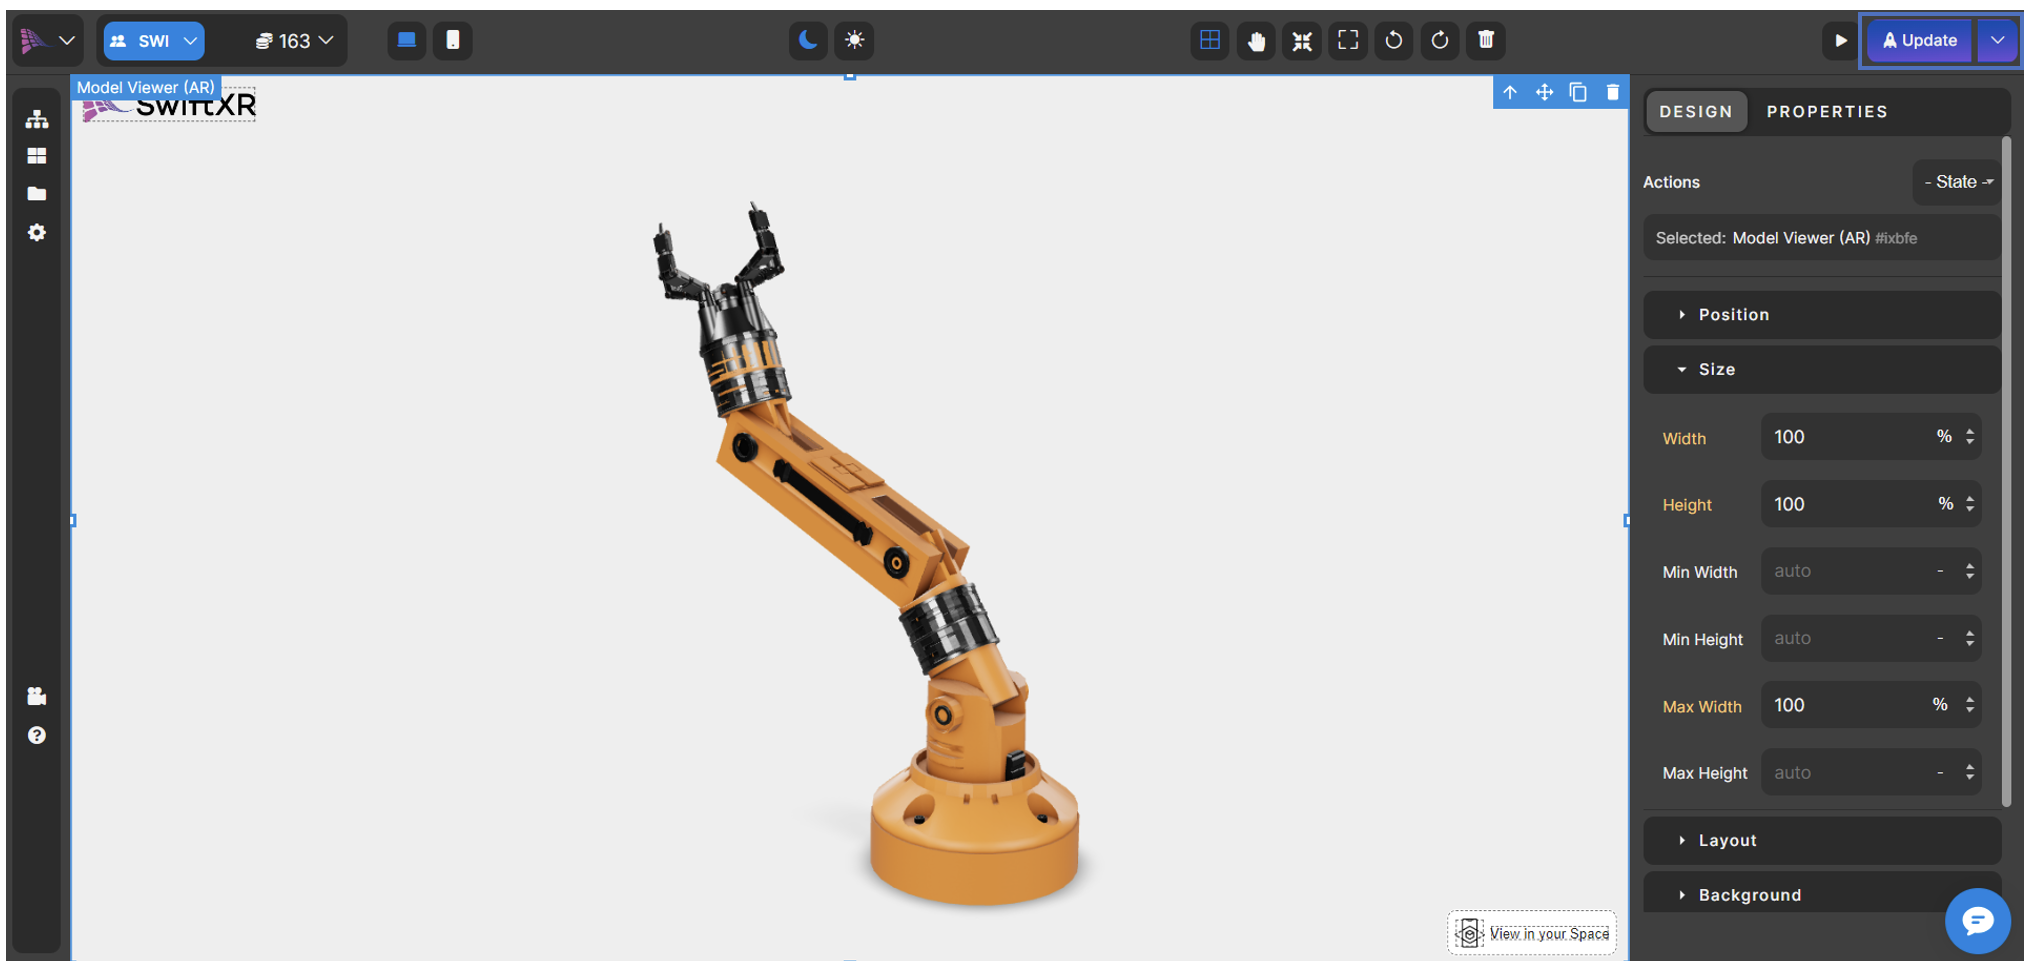
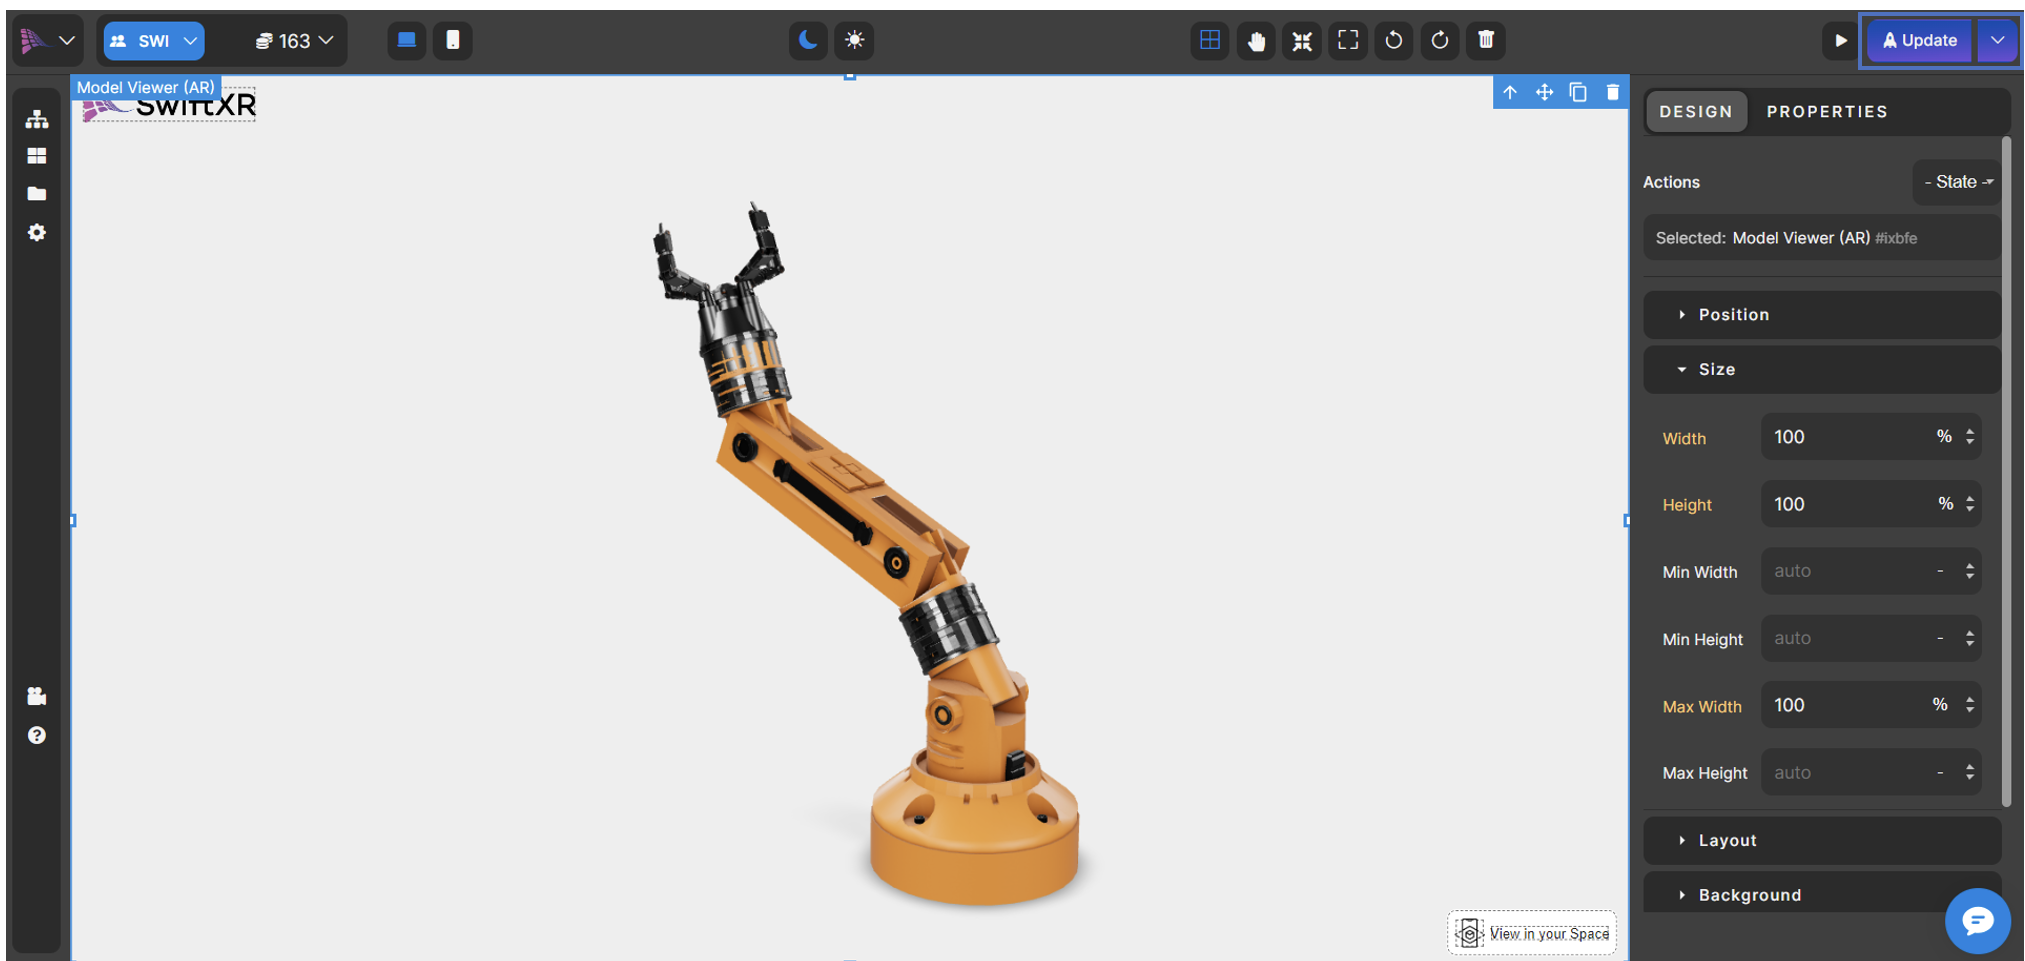
The workspace can be found in the middle of the SwiftXR editor. It houses the canvas used for designing and viewing your project.

<figure><img src="https://564713456-files.gitbook.io/~/files/v0/b/gitbook-x-prod.appspot.com/o/spaces%2FKNcXDcNRYHUBsVw12Dii%2Fuploads%2FQfEZ9FyMkFdZWFNRZAg0%2FScreenshot%202024-09-30%20at%2016.23.29.png?alt=media&amp;token=0b03d40c-1dbd-4706-bbc0-185e58af0ee0" alt=""><figcaption></figcaption></figure>

| Areas                                            | Description                                                                                                                          |
| ------------------------------------------------ | ------------------------------------------------------------------------------------------------------------------------------------ |
| [Left Panel](/navigate-the-interface/left-panel) | This consist of Layer panel, file manager and others that allows to setup your project.                                              |
| Canvas/3D Viewer                                 | This is where your object and changes made would be.                                                                                 |
| Right Panel                                      | This contains Design and Properties customization for the canvas and 3D objects [Click here to view](/components/3d-carousel#design) |


# 🎨 Templates

This section provides an overview of the available templates in SwiftXR, grouped by functionality. Each template includes key features, supported use cases, and customization options.


# 3D

The 3D templates are designed for rendering and interacting with 3D models on web pages, providing customizable controls for rotating, zooming, and interacting with objects.

<table><thead><tr><th>Template Name	</th><th width="213">Features</th><th>Use Case	</th></tr></thead><tbody><tr><td>Immersive Experience Collection</td><td>Basic 3D object rendering, together with AR and VR experiences</td><td>Interactive 3D experiences</td></tr></tbody></table>


# Augmented Reality

These templates allow users to overlay 3D objects onto the real world through AR-enabled devices. They are ideal for interactive experiences like trying products in AR or visualizing 3D models in real-life settings.

| Template Name                    | Features                                                      | Use Case                                |
| -------------------------------- | ------------------------------------------------------------- | --------------------------------------- |
| 3D Product Showcase              | Place a 3D product in AR                                      | Retail, e-commerce, demos               |
| Product Customization            | Customizable products in AR                                   | Retail, marketing campaigns             |
| Dimension Viewer                 | Display product dimensions in 3D and AR                       | Retail, furniture, appliances           |
| Birthday Celebration             | Interactive AR experience for events                          | Social media, birthday greetings        |
| Artwork Exhibit                  | Display 3D artwork in AR                                      | Art galleries, exhibitions              |
| Art Gallery Exhibit              | Showcase multiple artworks in AR                              | Virtual galleries, artist portfolios    |
| Professional Portfolio           | 3D models in professional portfolios                          | Career presentations, artist portfolios |
| Education E-Notebook             | Educational content in AR                                     | Educational apps, e-learning            |
| Multiple Product Showcase        | Display multiple products in AR                               | Retail, exhibitions                     |
| Immersive Experience Collections | Create full immersive AR experiences, together with 3D and VR | Virtual showrooms, experiences          |


# Virtual Reality

**These templates** provide immersive experiences where users can interact with 3D environments through VR headsets. These templates are used for applications like virtual showrooms, tours, and product experiences.

<table><thead><tr><th>Template Name	</th><th width="213">Features</th><th>Use Case	</th></tr></thead><tbody><tr><td>Virtual Building Walkthrough</td><td>Explore virtual buildings in VR</td><td>Real estate, architecture</td></tr><tr><td>VR Immersive Experience Collections</td><td>Create immersive VR experiences, together with 3D and AR</td><td>Virtual showrooms, product demos</td></tr></tbody></table>


# Face Tracking

**These templates** enable interactive 3D models or AR filters to be applied to the user's face in real time. These templates are commonly used in filters, virtual makeup try-ons, and face-based interactions.

<table><thead><tr><th>Template Name	</th><th width="213">Features</th><th>Use Case	</th></tr></thead><tbody><tr><td>Glasses Try-on</td><td>Virtual glasses try-on using face tracking</td><td>Fashion, retail, e-commerce</td></tr><tr><td>Hat Try-on</td><td>Virtual hat try-on using face tracking</td><td>Fashion, retail, e-commerce</td></tr><tr><td>Face Mask Effect</td><td>Apply 3D face mask effects</td><td>Social media, AR filters</td></tr></tbody></table>


# Image Tracking

**These templates** allow users to track physical images in the real world and overlay digital content (like 3D models or animations) on top of them in AR environments.

<table><thead><tr><th>Template Name	</th><th width="213">Features</th><th>Use Case	</th></tr></thead><tbody><tr><td>Image Tracking 3D</td><td>Track an image and overlay 3D models</td><td>AR marketing, product packaging</td></tr><tr><td>Image Tracking Video</td><td>Track an image and overlay video content</td><td>AR posters, video ads</td></tr></tbody></table>


# 🗃️ Components

This section provides an overview of the key components available in SwiftXR for designing and developing immersive experiences. Each component is designed to simplify the creation process and enhance the interactivity of your projects.


# 3D Viewer

Add interactive 3D content to your applications

<figure><img src="https://564713456-files.gitbook.io/~/files/v0/b/gitbook-x-prod.appspot.com/o/spaces%2FKNcXDcNRYHUBsVw12Dii%2Fuploads%2Fnvm5hNgkOb3UlXz3ZbCw%2FScreenshot%202024-07-13%20095217.png?alt=media&amp;token=514e904e-b64e-4581-a9db-3bdcaeb9bc79" alt=""><figcaption></figcaption></figure>

## Introduction

The 3D Viewer component in SwiftXR allows you to seamlessly display and interact with 3D models directly within your applications. This components supports a wide range of 3D file formats and provides intuitive controls for users to rotate, zoom, and pan models, offering a detailed exploration of 3D content. Additionally, the 3D Viewer offers customizable backgrounds and lighting options to enhance the visual presentation of your models.\
\
All components in SwiftXR are extended from the 3D Model Viewer.

<figure><img src="https://564713456-files.gitbook.io/~/files/v0/b/gitbook-x-prod.appspot.com/o/spaces%2FKNcXDcNRYHUBsVw12Dii%2Fuploads%2FKUx8Dg8yNiORbm3xyT0H%2FScreenshot%202024-07-13%20091846.png?alt=media&amp;token=c9141b39-d5bc-4feb-b49f-6a486ede075c" alt=""><figcaption></figcaption></figure>

## Design

<table data-full-width="true"><thead><tr><th width="161.5">Topic</th><th>Description</th></tr></thead><tbody><tr><td><a href="/components/3d-viewer/actions">Actions</a></td><td>Customize design options based on selected state</td></tr><tr><td><a href="/components/3d-viewer/postion">Position</a></td><td>Set the position of the selected component in relation to the canvas</td></tr><tr><td><a href="/components/3d-viewer/size">Size</a></td><td>Set the width and height properties of the selected component</td></tr><tr><td><a href="/components/3d-viewer/layout">Layout</a></td><td>Set the layout of the selected component</td></tr><tr><td><a href="/components/3d-viewer/background">Background</a></td><td>Set the background properties of the selected component</td></tr><tr><td><a href="/components/3d-viewer/effects">Effects</a></td><td>Add additional effects such as transitions to selected component</td></tr></tbody></table>

## Properties

<table data-full-width="true"><thead><tr><th>Topic</th><th>Description</th></tr></thead><tbody><tr><td>Upload 3D Object</td><td>Add 3D Object to be used</td></tr><tr><td>General Settings</td><td>Configure general user interaction and animation settings with the 3D model</td></tr><tr><td>3D Object Dimensions</td><td>Configure specified units of measurement for the 3D model</td></tr><tr><td>Customization Options</td><td>Configure multiple variants of a 3D model by changing the colour and textures of its assigned materials</td></tr><tr><td>Lighting Settings</td><td>Configure lighting and shadow settings. Additional option for custom HDR backgrounds for the 3D model</td></tr><tr><td>Camera Settings</td><td>Adjust camera field of view, zoom level, position and orientation.</td></tr><tr><td>Hotspot Labels</td><td>Add multiple labels o various parts of the 3D model</td></tr><tr><td>Advanced Settings</td><td>More options to customize user experience</td></tr></tbody></table>


# Actions

Customize design options based on selected state

<figure><img src="https://564713456-files.gitbook.io/~/files/v0/b/gitbook-x-prod.appspot.com/o/spaces%2FKNcXDcNRYHUBsVw12Dii%2Fuploads%2Fqgvw6PTgthF9RUokvmFX%2FScreenshot%202024-07-17%20171511.png?alt=media&amp;token=f5605562-2b20-477a-9a90-1ebc05019b61" alt=""><figcaption></figcaption></figure>

<table data-full-width="true"><thead><tr><th>Topic</th><th>Description</th></tr></thead><tbody><tr><td>Select</td><td>Set state to select to configure the design properties when the user clicks on the selected component</td></tr><tr><td>Hover</td><td>Set state to hover to configure the design properties when the user hovers on the selected component</td></tr></tbody></table>


# Postion

Customize the position of your 3D object

<figure><img src="https://564713456-files.gitbook.io/~/files/v0/b/gitbook-x-prod.appspot.com/o/spaces%2FKNcXDcNRYHUBsVw12Dii%2Fuploads%2FEvrDwe3SM3LKJAP4YaOo%2FScreenshot%202024-09-29%20at%2000.07.09.png?alt=media&amp;token=3dfdd08c-b9e5-4ac6-ad92-123dbd8b9052" alt=""><figcaption></figcaption></figure>

<table data-full-width="true"><thead><tr><th>Topic</th><th>Description</th></tr></thead><tbody><tr><td>Type</td><td>This sets the position of the Item in relation to the parent container.<br><br>-Relative<br>-Absolute<br>-Fixed<br>-Sticky</td></tr></tbody></table>


# Size

Customize the size of your design

<figure><img src="https://564713456-files.gitbook.io/~/files/v0/b/gitbook-x-prod.appspot.com/o/spaces%2FKNcXDcNRYHUBsVw12Dii%2Fuploads%2FC0fwbbBUoyDg1FsMqzRm%2FScreenshot%202024-09-29%20at%2000.07.19.png?alt=media&amp;token=ec17837c-a002-446a-8c1e-f2306f255e3d" alt=""><figcaption></figcaption></figure>

<table data-full-width="true"><thead><tr><th>Topic</th><th>Description</th></tr></thead><tbody><tr><td>Width</td><td>This adjusts the width of the container in relation to the canvas. it is available in percentage, pixel and view width.</td></tr><tr><td>Height</td><td>This adjusts the Height of the container in relation to the canvas. it is available in percentage, pixel and view width.</td></tr><tr><td>Min Width</td><td>This is the minimum width the object container should have  in relation to the canvas. it is available in percentage, pixel and view width, view height, em, rem.</td></tr><tr><td>Min Height</td><td>This is the minimum width the object container should have  in relation to the canvas. it is available in percentage, pixel and view width, view height, em, rem.</td></tr><tr><td>Max Width</td><td>This is the maximum width the object container should have  in relation to the canvas. it is available in percentage, pixel and view width, view height, em, rem.</td></tr><tr><td>Max Height</td><td>This is the maximum height the object container should have  in relation to the canvas. it is available in percentage, pixel and view width, view height, em, rem.</td></tr></tbody></table>


# Layout

Customize your 3D Layout to fit your purpose.

<figure><img src="https://564713456-files.gitbook.io/~/files/v0/b/gitbook-x-prod.appspot.com/o/spaces%2FKNcXDcNRYHUBsVw12Dii%2Fuploads%2FSvs3S9ZI8zEyB3Ms91SD%2FScreenshot%202024-09-29%20at%2000.07.29.png?alt=media&amp;token=ffdcf7ca-9d87-4919-85ab-95ea6a46c1ad" alt=""><figcaption></figcaption></figure>

<table data-full-width="true"><thead><tr><th>Topic</th><th>Description</th></tr></thead><tbody><tr><td>Direction</td><td>Set state to select to configure the design properties when the user clicks on the selected component</td></tr><tr><td>Distribute</td><td>Set state to hover to configure the design properties when the user hovers on the selected component</td></tr><tr><td>Align</td><td></td></tr><tr><td>Spacing</td><td></td></tr><tr><td>Padding</td><td></td></tr><tr><td>Margin</td><td></td></tr></tbody></table>


# Background

Customize your own backgroud.

<figure><img src="https://564713456-files.gitbook.io/~/files/v0/b/gitbook-x-prod.appspot.com/o/spaces%2FKNcXDcNRYHUBsVw12Dii%2Fuploads%2Fp3HiDZhA2QYmRBkbS1fz%2FScreenshot%202024-09-27%20at%2015.11.52.png?alt=media&amp;token=2ac98f18-d1bf-4996-9c5a-ef67fea3774b" alt=""><figcaption></figcaption></figure>

<table data-full-width="true"><thead><tr><th>Topic</th><th>Description</th></tr></thead><tbody><tr><td>Color</td><td>Allows you to choose your background color</td></tr><tr><td>Border Radius</td><td>Allows you to add border radius to the exported 3D item.</td></tr><tr><td>Opacity</td><td>This allows you to adjust the transparency of the background</td></tr><tr><td>Border</td><td>This adds border to the </td></tr><tr><td>Box Shadow</td><td></td></tr><tr><td>Image</td><td></td></tr></tbody></table>


# Background Image

Customize your own backgroud.

<figure><img src="https://564713456-files.gitbook.io/~/files/v0/b/gitbook-x-prod.appspot.com/o/spaces%2FKNcXDcNRYHUBsVw12Dii%2Fuploads%2Fp3HiDZhA2QYmRBkbS1fz%2FScreenshot%202024-09-27%20at%2015.11.52.png?alt=media&amp;token=2ac98f18-d1bf-4996-9c5a-ef67fea3774b" alt=""><figcaption></figcaption></figure>

<table data-full-width="true"><thead><tr><th>Topic</th><th>Description</th></tr></thead><tbody><tr><td>Color</td><td>Allows you to choose your background color</td></tr><tr><td>Border Radius</td><td>Allows you to add border radius to the exported 3D item.</td></tr><tr><td>Opacity</td><td>This allows you to adjust the transparency of the background</td></tr><tr><td>Border</td><td>This adds border to the </td></tr><tr><td>Box Shadow</td><td></td></tr><tr><td>Image</td><td></td></tr></tbody></table>


# Effects

Customize design options based on selected state

<figure><img src="https://564713456-files.gitbook.io/~/files/v0/b/gitbook-x-prod.appspot.com/o/spaces%2FKNcXDcNRYHUBsVw12Dii%2Fuploads%2FDTaxuHLxCS2IMxtvArZM%2FScreenshot%202024-09-27%20at%2015.12.07.png?alt=media&amp;token=5001fd22-b341-404c-bda4-f2a24676f17c" alt=""><figcaption></figcaption></figure>

<table data-full-width="true"><thead><tr><th>Topic</th><th>Description</th></tr></thead><tbody><tr><td>Transition</td><td>Set state to select to configure the design properties when the user clicks on the selected component</td></tr><tr><td>Transform</td><td>Set state to hover to configure the design properties when the user hovers on the selected component</td></tr></tbody></table>


# Augmented Reality (AR)

Add interactive 3D content to your applications

<figure><img src="https://564713456-files.gitbook.io/~/files/v0/b/gitbook-x-prod.appspot.com/o/spaces%2FKNcXDcNRYHUBsVw12Dii%2Fuploads%2FKpLtevWjbfNOKDjUQYg2%2Fimmersive-experience-collection.png?alt=media&amp;token=b8e28558-8e8c-4768-8f77-a55d24f81b13" alt="" width="300"><figcaption></figcaption></figure>

## Introduction

The AR Viewer component extends the 3D viewer component but with added functionality. That is it allows for users to view your project in their space. \
\
All components in SwiftXR are extended from the 3D Model Viewer.

<figure><img src="https://564713456-files.gitbook.io/~/files/v0/b/gitbook-x-prod.appspot.com/o/spaces%2FKNcXDcNRYHUBsVw12Dii%2Fuploads%2FG7sjdPsw96qZ7h3D1YSy%2FGuide%20Screenshots%20(8).png?alt=media&amp;token=d28abc72-53ee-4b95-8506-6e872cc1512a" alt=""><figcaption></figcaption></figure>

## Design

This extends the 3D Viewer Designs [Click here to View](/components/3d-viewer#design)

## Properties

This extends some properties from the 3D Viewer [Click here to View](/components/3d-viewer#properties),  unique properties are listed below

<table data-full-width="true"><thead><tr><th>Topic</th><th>Description</th></tr></thead><tbody><tr><td><a href="/components/augmented-reality-ar/properties-ar">Augmented Reality (AR)</a></td><td>This provides customization to how you want your product to be viewed in their space</td></tr></tbody></table>


# Properties (AR)

Customize how your viewers see the 3D object in their space.

<figure><img src="https://564713456-files.gitbook.io/~/files/v0/b/gitbook-x-prod.appspot.com/o/spaces%2FKNcXDcNRYHUBsVw12Dii%2Fuploads%2F29S4oOkuI8S8qJ4RYt2i%2FAugmentted%20realityy.PNG?alt=media&amp;token=9a79a035-2540-4bbd-b576-4ece302bf555" alt=""><figcaption></figcaption></figure>

<table data-full-width="true"><thead><tr><th width="207">Features</th><th>Description</th></tr></thead><tbody><tr><td>Detection</td><td>Select the surface type where the AR content will be placed. Choose 'Floor' for horizontal surfaces or 'Wall' for vertical surfaces.</td></tr><tr><td>Launcher</td><td>Choose how to launch AR content. 'Native' uses the device's built-in AR capabilities, while 'WebXR' uses web-based AR.</td></tr><tr><td>Size Control</td><td>Select how the size of the AR content should be controlled. 'Adjustable' allows resizing, while 'Fixed Size' keeps it constant.</td></tr><tr><td>Custom QR Code</td><td>Select if you want your model to have QR code added</td></tr><tr><td>QR Code Header</td><td>Enter the title of the QR code</td></tr><tr><td>QR Code Content</td><td>Enter the content you want to be displayed when your users scan the code<br><br>This feature is only available on mobile or tablet devices. Scan QR code to open the project on your device, then tap on the AR icon.</td></tr></tbody></table>


# Image Tracking

Image tracking is a technology used to identify and follow specific images or objects in real-time, often utilizing computer vision techniques. It’s commonly employed in applications that supports augmented reality (AR), where digital content is overlaid onto the real world based on the detected images.

<figure><img src="https://564713456-files.gitbook.io/~/files/v0/b/gitbook-x-prod.appspot.com/o/spaces%2FKNcXDcNRYHUBsVw12Dii%2Fuploads%2FOOAVt2doolxu8tckYJGJ%2Flanding.jpg?alt=media&amp;token=c566aa49-5d37-4011-9edc-d06ff06a0fd6" alt=""><figcaption></figcaption></figure>

## To create Image Tracking

To create image tracking on SwiftXR, click on [components](/components), select 3D then click on image tracking feature in the editor.

<figure><img src="https://564713456-files.gitbook.io/~/files/v0/b/gitbook-x-prod.appspot.com/o/spaces%2FKNcXDcNRYHUBsVw12Dii%2Fuploads%2FkjQmpQJOU2izQ9SjtNB8%2FGuide%20Screenshots%20(9).png?alt=media&amp;token=eb9acb7a-3468-4899-b240-68b5e7bf8387" alt=""><figcaption></figcaption></figure>

## Upload your 3D Model

This is the part where you upload 3D model of the object you want to make appear in real time. You can upload your custom 3D model from your device, search Sketchfab 3D store or request a custom [3D model from SwiftXR](/3d-content-creation).

<figure><img src="https://564713456-files.gitbook.io/~/files/v0/b/gitbook-x-prod.appspot.com/o/spaces%2FKNcXDcNRYHUBsVw12Dii%2Fuploads%2FPFkEnjKg3Qapk8xEtc0N%2Fadd%203d%20model.PNG?alt=media&amp;token=2a533c5a-80e2-473e-ad49-e0878fc886db" alt=""><figcaption></figcaption></figure>

## Upload your Target Image

This is where you add your target image. This will enable your model to appear in real world once detected by your mobile device visual elements and if it supports AR, you can then view in [Augmented reality. ](/components/augmented-reality-ar)

To upload your Target image, go over to the Properties, select Image tracking, click on add image. Upload your image from your device.

<figure><img src="https://564713456-files.gitbook.io/~/files/v0/b/gitbook-x-prod.appspot.com/o/spaces%2FKNcXDcNRYHUBsVw12Dii%2Fuploads%2FgUTCaEeMtFfDwVHB7dOU%2Fimageee%20tracking.PNG?alt=media&amp;token=bb134c2f-8a2f-4c8c-a533-acea81892c08" alt=""><figcaption></figcaption></figure>

## Adjust 3D object on Image

This allows you to properly position your 3D model on your image. Click on adjust 3D object on image. In the editor, use the XYZ tabs to move your object forward or backward, downward and upwards and sideways. Click on All to adjust the size of the object. Click on save to save your changes.

<figure><img src="https://564713456-files.gitbook.io/~/files/v0/b/gitbook-x-prod.appspot.com/o/spaces%2FKNcXDcNRYHUBsVw12Dii%2Fuploads%2Fq2NF5WlYfyzkPq8pdPyi%2Fadjust.jpg?alt=media&amp;token=eee1b312-26de-4fd5-a190-b3be35dc4c44" alt=""><figcaption></figcaption></figure>

## Preview and Publish your Project

Click on the drop down icon beside the publish tab to preview your project and view in AR. Place your camera on the image and your model should appear. Once you are satisfied with your placement and position. Go ahead to publish your project.

<figure><img src="https://564713456-files.gitbook.io/~/files/v0/b/gitbook-x-prod.appspot.com/o/spaces%2FKNcXDcNRYHUBsVw12Dii%2Fuploads%2FrRU8qnBIP0lwDQc2OUd4%2Fpreview.jpg?alt=media&amp;token=080b8c4a-31ec-41c5-8720-a351df91c735" alt=""><figcaption></figcaption></figure>


# Virtual Reality (VR)

Add interactive 3D content to your applications

<figure><img src="https://564713456-files.gitbook.io/~/files/v0/b/gitbook-x-prod.appspot.com/o/spaces%2FKNcXDcNRYHUBsVw12Dii%2Fuploads%2FM6K5uGjUgIdLnjroq6qX%2Fvirtual-walkthrough.png?alt=media&amp;token=3ede49dc-980f-4740-9782-81a63a375e28" alt="" width="300"><figcaption></figcaption></figure>

## Introduction

The VR Viewer component extends the 3D viewer component but with added functionality. That is it allows for users to view your project in their space. \
\
All components in SwiftXR are extended from the 3D Model Viewer.

<figure><img src="https://564713456-files.gitbook.io/~/files/v0/b/gitbook-x-prod.appspot.com/o/spaces%2FKNcXDcNRYHUBsVw12Dii%2Fuploads%2Fo5ZDqwCl9By0bkn5KQha%2FGuide%20Screenshots%20(7).png?alt=media&amp;token=7ddfbf0d-b1db-464e-88a6-48f54b639150" alt=""><figcaption></figcaption></figure>

## Design

This extends the 3D Viewer Designs [**Click here to View,**](/components/3d-viewer#design)

## Properties

This extends some properties from the 3D Viewer [Click here to View](/components/3d-viewer#properties),  unique properties are listed below

<table data-full-width="true"><thead><tr><th>Topic</th><th>Description</th></tr></thead><tbody><tr><td><a href="/components/virtual-reality-vr/properties-vr">Properties (VR)</a></td><td>This provides customization to how you want your product to be viewed in their space</td></tr></tbody></table>


# Properties (VR)

Customize how your viewers see the 3D object in their space.

<figure><img src="https://564713456-files.gitbook.io/~/files/v0/b/gitbook-x-prod.appspot.com/o/spaces%2FKNcXDcNRYHUBsVw12Dii%2Fuploads%2FToKk1bUuylchqqL3aKnA%2Fpropeeties%20of%20virtual%20reality.PNG?alt=media&amp;token=85abd9d7-f67f-48a7-b886-530ed1cc3907" alt=""><figcaption></figcaption></figure>

<table data-full-width="true"><thead><tr><th width="207">Features</th><th>Description</th></tr></thead><tbody><tr><td><a href="/components/virtual-reality-vr/vr-editor">VR Editor</a></td><td>Opens an Editor so you can adjust how the 3D Object would look in the 3D space, this affects size, position and rotation.</td></tr><tr><td>Launch Button</td><td>Choose how to launch AR content. 'Native' uses the device's built-in AR capabilities, while 'WebXR' uses web-based AR.</td></tr><tr><td>Hand Model</td><td>Select how the size of the AR content should be controlled. 'Adjustable' allows resizing, while 'Fixed Size' keeps it constant.</td></tr><tr><td>VR Camera</td><td>Select if you want your model to have QR code added</td></tr></tbody></table>


# VR Editor

Customize how your viewers see the 3D object in their space.

<figure><img src="https://564713456-files.gitbook.io/~/files/v0/b/gitbook-x-prod.appspot.com/o/spaces%2FKNcXDcNRYHUBsVw12Dii%2Fuploads%2FopJQixnO90BG7CI5UnMf%2FScreenshot%202024-09-26%20at%2015.15.29.png?alt=media&amp;token=83cbebc8-54d3-459e-b85e-be00f9330b1d" alt=""><figcaption></figcaption></figure>

<table data-full-width="true"><thead><tr><th width="207">Features</th><th>Description</th></tr></thead><tbody><tr><td>Size</td><td>Adjust how you want the size of  your 3D object to be in the VR Space.</td></tr><tr><td>Position</td><td>Adjust the position of your Object along the X, Y and X axis.</td></tr><tr><td>Rotation</td><td>Rotate  your 3D object along the X, Y and Z axis.</td></tr></tbody></table>


# 3D Carousel

Add interactive 3D content to your applications

<figure><img src="https://564713456-files.gitbook.io/~/files/v0/b/gitbook-x-prod.appspot.com/o/spaces%2FKNcXDcNRYHUBsVw12Dii%2Fuploads%2FEP9FmvM6QW5RzSmun3SS%2Fproduct-collection.png?alt=media&amp;token=f20bdec9-1eb5-4406-9284-4a4767ff755f" alt="" width="300"><figcaption></figcaption></figure>

## Introduction

The 3D Carousel component extends the 3D viewer component but with added functionality.&#x20;

The 3D carousel as the name implies allows for you to generate carousel of 3D items. \
\
All components in SwiftXR are extended from the 3D Model Viewer.

## Design

This extends the 3D Viewer Designs [Click here to View,](/components/3d-viewer#design)

<figure><img src="https://564713456-files.gitbook.io/~/files/v0/b/gitbook-x-prod.appspot.com/o/spaces%2FKNcXDcNRYHUBsVw12Dii%2Fuploads%2Flus4kaxa1BKzNwH1ei0O%2FGuide%20Screenshots%20(10).png?alt=media&amp;token=21c2fce5-84a8-47dc-a813-a0a70f35c77e" alt=""><figcaption></figcaption></figure>

## Properties

This extends some properties from the 3D Viewer [Click here to View](/components/3d-viewer#properties),  unique properties are listed below

<table data-full-width="true"><thead><tr><th>Topic</th><th>Description</th></tr></thead><tbody><tr><td><a href="/components/3d-carousel/carousel-options">Carousel Options</a></td><td>This properties allows you to add items to your carousel and also customize  your carousel Items</td></tr></tbody></table>


# Carousel Options

Customize how your viewers see the 3D object in their space.

<figure><img src="https://564713456-files.gitbook.io/~/files/v0/b/gitbook-x-prod.appspot.com/o/spaces%2FKNcXDcNRYHUBsVw12Dii%2Fuploads%2FmBKQFnvF6WhkVqvEQKOi%2FCAROUSEL.PNG?alt=media&amp;token=9829e644-c1ee-494f-8dfa-b523dd2c8807" alt=""><figcaption></figcaption></figure>

<table data-full-width="true"><thead><tr><th width="207">Features</th><th>Description</th></tr></thead><tbody><tr><td>Display</td><td>Select how product variants are displayed in the carousel.<br>options:<br>- Left and Right Handles: This allows the carousel to changed by left and right items.<br>- Color Variants: This allows the carousel to be changed based on color variants of the entries.</td></tr><tr><td>Loop</td><td>Enable this option to loop the gallery in a continuous carousel.</td></tr><tr><td>Add New Entry</td><td>Allows you to add a new 3D object to the carousel</td></tr></tbody></table>


# Image Tracking

Add interactive 3D content to your applications

<figure><img src="https://564713456-files.gitbook.io/~/files/v0/b/gitbook-x-prod.appspot.com/o/spaces%2FKNcXDcNRYHUBsVw12Dii%2Fuploads%2F3c0WBjyDgBZHygipuRAn%2Fimage-tracking-3d.png?alt=media&amp;token=e6520e23-fe1c-4ad9-85ff-a947699ffe3d" alt="" width="300"><figcaption></figcaption></figure>

## Introduction

The Image Tracking component extends the 3D viewer component but with added functionality.&#x20;

That Image Tracking allows for you to attach your 3D object to an image so it tracks it and displays on the image when the Object is pointed on the image\
\
All components in SwiftXR are extended from the 3D Model Viewer.

<figure><img src="https://564713456-files.gitbook.io/~/files/v0/b/gitbook-x-prod.appspot.com/o/spaces%2FKNcXDcNRYHUBsVw12Dii%2Fuploads%2F8ugLrcG4XlrCr80mM84i%2FGuide%20Screenshots%20(9).png?alt=media&amp;token=78c17376-79bf-4c2d-8cbb-0f9619fc3ef3" alt=""><figcaption></figcaption></figure>

## Design

This extends the 3D Viewer Designs [Click here to View,](/components/3d-viewer#design)

## Properties

This extends some properties from the 3D Viewer [Click here to View](/components/3d-viewer#properties),  unique properties are listed below

<table data-full-width="true"><thead><tr><th>Topic</th><th>Description</th></tr></thead><tbody><tr><td><a href="/components/image-tracking-1/image-tracking">Image Tracking</a></td><td>Allows for you manage the image to track and other customizations. </td></tr></tbody></table>


# Image Tracking

Customize how your viewers see the 3D object in their space.

<figure><img src="https://564713456-files.gitbook.io/~/files/v0/b/gitbook-x-prod.appspot.com/o/spaces%2FKNcXDcNRYHUBsVw12Dii%2Fuploads%2FzlUTgnAcxAYm4gHlZElc%2FIMAGE%20TRACKINGGG.PNG?alt=media&amp;token=1b4f62e1-41c4-46ec-9fdf-c46035215d64" alt=""><figcaption></figcaption></figure>

<table data-full-width="true"><thead><tr><th width="207">Features</th><th>Description</th></tr></thead><tbody><tr><td>Add Image</td><td>Upload the image that would be tracked</td></tr><tr><td>Tracking Speed</td><td>Set the speed at which the system processes image tracking. Higher values may improve responsiveness.</td></tr><tr><td>Auto Launch</td><td>Enable this option to automatically start image tracking when the application loads.</td></tr><tr><td>Audio/Video Options</td><td>Enable to add audio or video that plays when the image marker is detected.</td></tr></tbody></table>


# Face Tracking

Add interactive 3D content to your applications

<figure><img src="https://564713456-files.gitbook.io/~/files/v0/b/gitbook-x-prod.appspot.com/o/spaces%2FKNcXDcNRYHUBsVw12Dii%2Fuploads%2FNteAf31sHcbDf8fsinoD%2Fface-effect.png?alt=media&amp;token=98e87fc2-4e87-449e-84bb-22e553fbd37b" alt="" width="300"><figcaption></figcaption></figure>

## Introduction

The Face Tracking component extends the 3D viewer component but with added functionality. That is it allows for users to view your project in their space. \
\
All components in SwiftXR are extended from the 3D Model Viewer.

<figure><img src="https://564713456-files.gitbook.io/~/files/v0/b/gitbook-x-prod.appspot.com/o/spaces%2FKNcXDcNRYHUBsVw12Dii%2Fuploads%2F0uOQ2nBpvGGFxqfRzA1o%2FGuide%20Screenshots%20(11).png?alt=media&amp;token=8bc4ef66-5a72-4961-b204-a77a09d24980" alt=""><figcaption></figcaption></figure>

## Design

This extends the 3D Viewer Designs [Click here to View,](/components/3d-viewer#design)

## Properties

This extends some properties from the 3D Viewer [Click here to View](/components/3d-viewer#properties),  unique properties are listed below

<table data-full-width="true"><thead><tr><th>Topic</th><th>Description</th></tr></thead><tbody><tr><td><a href="/components/face-tracking/face-tracking">Face Tracking</a></td><td>Allows you to set how the face tracking would work. </td></tr></tbody></table>


# Face Tracking&#x20;

Customize how your viewers see the 3D object in their space.

<figure><img src="https://564713456-files.gitbook.io/~/files/v0/b/gitbook-x-prod.appspot.com/o/spaces%2FKNcXDcNRYHUBsVw12Dii%2Fuploads%2Fun2AGtHBkOx9nR3Rt7Hp%2Ffacee%20tracking.PNG?alt=media&amp;token=f80d087f-79f0-4e1c-b0b6-fff78a908039" alt=""><figcaption></figcaption></figure>

<table data-full-width="true"><thead><tr><th width="207">Features</th><th>Description</th></tr></thead><tbody><tr><td><a href="/components/face-tracking/face-tracking-editor">Face Tracking Editor</a></td><td>Opens an Editor so you can adjust how the 3D Object would look in relation to the face/occlusion, this affects size, position and rotation.</td></tr><tr><td>Occlusion Type</td><td>Choose the type of occlusion for face tracking. 'Head' occludes only the head, while 'Human' occludes the entire body.</td></tr><tr><td>Adjust 3D Object on Face</td><td>This opens  the <a href="/components/face-tracking/face-tracking-editor">Face Tracking Editor</a></td></tr></tbody></table>


# Face Tracking Editor

Customize how the 3D object is tracked on the face.

<figure><img src="https://564713456-files.gitbook.io/~/files/v0/b/gitbook-x-prod.appspot.com/o/spaces%2FKNcXDcNRYHUBsVw12Dii%2Fuploads%2FVSsacQQZzvCX0HDLbcK9%2FScreenshot%202024-09-27%20at%2015.00.15.png?alt=media&amp;token=d0c949e6-7327-4a99-b24a-fbf34c58da62" alt=""><figcaption></figcaption></figure>

<table data-full-width="true"><thead><tr><th width="207">Features</th><th>Description</th></tr></thead><tbody><tr><td>Size</td><td>Adjust how you want the size of  your 3D object to be in relation to the face.</td></tr><tr><td>Position</td><td>Adjust the position of your Object along the X, Y and X axis.</td></tr><tr><td>Rotation</td><td>Rotate  your 3D object along the X, Y and Z axis.</td></tr></tbody></table>


# Customizable 3D Viewer

Add interactive 3D content to your applications

<figure><img src="https://564713456-files.gitbook.io/~/files/v0/b/gitbook-x-prod.appspot.com/o/spaces%2FKNcXDcNRYHUBsVw12Dii%2Fuploads%2F7HEOAK3GKKV61AebhtqP%2Fproduct-customisation.png?alt=media&amp;token=13c39225-6170-4ff4-975c-63761d5d2d32" alt="" width="300"><figcaption></figcaption></figure>

## Introduction

The Customizable 3D Viewer component extends the 3D viewer component but with added functionality.&#x20;

The Customizable 3D viewer allows you to add personalized elements to your  3D objects e.g adding variants to your 3D Object and also editing the Material and Texture\
\
All components in SwiftXR are extended from the 3D Model Viewer.

<figure><img src="https://564713456-files.gitbook.io/~/files/v0/b/gitbook-x-prod.appspot.com/o/spaces%2FKNcXDcNRYHUBsVw12Dii%2Fuploads%2FGsPiLnMaA33VtPFxzc1z%2FScreenshot%202024-09-27%20at%2015.08.58.png?alt=media&amp;token=1599da4d-d2ac-43e7-9aff-fcc8c970cd55" alt=""><figcaption></figcaption></figure>

## Design

This extends the 3D Viewer Designs [Click here to View,](/components/3d-viewer#design)

## Properties

This extends some properties from the 3D Viewer [Click here to View](/components/3d-viewer#properties),  unique properties are listed below

<table data-full-width="true"><thead><tr><th>Topic</th><th>Description</th></tr></thead><tbody><tr><td>C<a href="/components/customizable-3d-viewer/customization-options">ustomization Options</a></td><td>This provides customization to how you want your product to look like</td></tr></tbody></table>


# Customization Options

Customize how your viewers see the 3D object in their space.

<figure><img src="https://564713456-files.gitbook.io/~/files/v0/b/gitbook-x-prod.appspot.com/o/spaces%2FKNcXDcNRYHUBsVw12Dii%2Fuploads%2FHbg8x3HjtpLbbHMNNlL8%2FCUSTOMIZATION%20FEATURE.PNG?alt=media&amp;token=d2779626-7c53-412c-af57-ba5d5a87ae4b" alt=""><figcaption></figcaption></figure>

<table data-full-width="true"><thead><tr><th width="207">Features</th><th>Description</th></tr></thead><tbody><tr><td>Enable</td><td>Toggles the Customization option.</td></tr><tr><td>Show Dropdown</td><td>Toggles the Dropdown on the  3D Scene.</td></tr><tr><td>Material</td><td>Allows you switch between materials available to the 3D object.</td></tr><tr><td>Label</td><td>Edit the Label of the 3D Object.</td></tr><tr><td><a href="/components/customizable-3d-viewer/variants">Add New Variant</a></td><td>Allows you to create multiple variants of the same 3D object. </td></tr></tbody></table>


# Variants

Customize how your viewers see the 3D object in their space.

<figure><img src="https://564713456-files.gitbook.io/~/files/v0/b/gitbook-x-prod.appspot.com/o/spaces%2FKNcXDcNRYHUBsVw12Dii%2Fuploads%2F8PTB4oWUF1pLwYgSPP7B%2FVARIANT%201.PNG?alt=media&amp;token=05842766-1b54-483e-adde-cd5ccb393c5f" alt=""><figcaption></figcaption></figure>

<table data-full-width="true"><thead><tr><th width="207">Features</th><th>Description</th></tr></thead><tbody><tr><td>Material Color</td><td>Allows you select and customize the color of your 3D object.</td></tr><tr><td>Texture Settings (Tiling)</td><td>Adjust the tiling of the texture on the material.</td></tr><tr><td>Add Base Texture Image</td><td>Upload Base Texture Image (Supported formats include JPEG, PNG, GIF, WEBP and SVG.)</td></tr><tr><td>Add Normal Map Image</td><td>Upload Image Map for the 3D object.</td></tr></tbody></table>


# 3D Text

Create 3D Text with SwiftXR

<figure><img src="https://564713456-files.gitbook.io/~/files/v0/b/gitbook-x-prod.appspot.com/o/spaces%2FKNcXDcNRYHUBsVw12Dii%2Fuploads%2FilleVov3mE9sywwrZxIn%2FScreenshot%202024-09-27%20at%2016.06.10.png?alt=media&amp;token=adccba23-ed4c-4b41-94ff-02ef732a1a8f" alt=""><figcaption></figcaption></figure>

## Introduction

The 3D Text  component extends the 3D viewer component but with added functionality.&#x20;

The 3D Text allows you to create 3D Text and add it to your scene.\
\
All components  in SwiftXR are extended from the 3D Model Viewer.

<figure><img src="https://564713456-files.gitbook.io/~/files/v0/b/gitbook-x-prod.appspot.com/o/spaces%2FKNcXDcNRYHUBsVw12Dii%2Fuploads%2FyJs1lIO9LLkjkisazDMq%2FGuide%20Screenshots%20(12).png?alt=media&amp;token=6b5e6369-5909-4d16-b626-b0ec3508cedb" alt=""><figcaption></figcaption></figure>

## Design

This extends the 3D Viewer Designs [Click here to View,](/components/3d-viewer#design)

## Properties

This extends some properties from the 3D Viewer [Click here to View](/components/3d-viewer#properties),  unique properties are listed below

<table data-full-width="true"><thead><tr><th>Topic</th><th>Description</th></tr></thead><tbody><tr><td>3D Text</td><td>Allows you to create new 3D text objects.</td></tr></tbody></table>


# 3D text

Customize how your viewers see the 3D object in their space.

<figure><img src="https://564713456-files.gitbook.io/~/files/v0/b/gitbook-x-prod.appspot.com/o/spaces%2FKNcXDcNRYHUBsVw12Dii%2Fuploads%2F4Yqz15y6Rtcs6EAFuHOy%2FScreenshot%202024-09-27%20at%2015.41.08.png?alt=media&amp;token=029012b3-b5dd-4ed9-99a5-024612144442" alt=""><figcaption></figcaption></figure>

<table data-full-width="true"><thead><tr><th width="207">Features</th><th>Description</th></tr></thead><tbody><tr><td><a href="/components/3d-text/generate-3d-text">Generate 3D Text</a></td><td>Open the 3D text editor for you to generate custom 3D text for your screen.</td></tr></tbody></table>


# Generate 3D Text

Customize how your viewers see the 3D object in their space.

<figure><img src="https://564713456-files.gitbook.io/~/files/v0/b/gitbook-x-prod.appspot.com/o/spaces%2FKNcXDcNRYHUBsVw12Dii%2Fuploads%2FKdgVEd8Cyv7bYIhLEGhi%2FScreenshot%202024-09-27%20at%2015.40.26.png?alt=media&amp;token=7eeba2b0-7c54-4b7b-aa33-ae6845c2f742" alt=""><figcaption></figcaption></figure>

<table data-full-width="true"><thead><tr><th width="207">Features</th><th>Description</th></tr></thead><tbody><tr><td>Color</td><td>Allows you change the font color.</td></tr><tr><td>Font Style</td><td>Allows you to choose your font style.</td></tr><tr><td>Size</td><td>Adjust the size of text.</td></tr><tr><td>Depth</td><td>Controls the Depth of the text along its sides.</td></tr><tr><td>Thickness</td><td>Controls the thickness of the Object and spacing withing text.</td></tr><tr><td>Smoothness</td><td>Controls how smooth the bezels of the text is.</td></tr></tbody></table>


# Indexable 3D Viewer (Developers)

Add interactive 3D content to your applications

<figure><img src="https://564713456-files.gitbook.io/~/files/v0/b/gitbook-x-prod.appspot.com/o/spaces%2FKNcXDcNRYHUBsVw12Dii%2Fuploads%2FR38YyQg4aWEnCRevLfVa%2Fproduct-dimension.png?alt=media&amp;token=709f6a86-dbd4-47e6-8238-93da671d3970" alt="" width="300"><figcaption></figcaption></figure>

## Introduction

The Indexable 3D Viewer component extends the 3D viewer component but with added functionality.&#x20;

This is an Individual product publishing identification feature that enables each asset to be called uniquely to an assigned space when the project is published.\
\
All components in SwiftXR are extended from the 3D Model Viewer.

<figure><img src="https://564713456-files.gitbook.io/~/files/v0/b/gitbook-x-prod.appspot.com/o/spaces%2FKNcXDcNRYHUBsVw12Dii%2Fuploads%2F7071VNq6K5gJjn1vKJXz%2FScreenshot%202024-09-28%20at%2023.49.58.png?alt=media&amp;token=0b1bd1c2-8465-43f3-b632-19138520231d" alt=""><figcaption></figcaption></figure>

## Design

This extends the 3D Viewer Designs [Click here to View,](/components/3d-viewer#design)

## Properties

This extends some properties from the 3D Viewer [Click here to View](/components/3d-viewer#properties),  unique properties are listed below

<table data-full-width="true"><thead><tr><th>Topic</th><th>Description</th></tr></thead><tbody><tr><td><a href="/components/indexable-3d-viewer-developers/indexing-options">Indexing Options</a></td><td>This provides cutomization to how your Indexing should be handled.</td></tr></tbody></table>


# Indexing Options

Customize how your viewers see the 3D object in their space.

<figure><img src="https://564713456-files.gitbook.io/~/files/v0/b/gitbook-x-prod.appspot.com/o/spaces%2FKNcXDcNRYHUBsVw12Dii%2Fuploads%2F2kWNk3S5t72mbKgorHlq%2FScreenshot%202024-09-28%20at%2023.49.58.png?alt=media&amp;token=efabc7a6-e887-4c91-ad17-80401192ff4d" alt=""><figcaption></figcaption></figure>

<table data-full-width="true"><thead><tr><th width="207">Features</th><th>Description</th></tr></thead><tbody><tr><td>Add New Entry</td><td>Toggles the Customization option.</td></tr><tr><td>Url Param Name</td><td>This is the custom name you give to the parameters on your url <br>example:<br>https://****.swiftxr.app?swf=1<br><br>here "swf" is the parameter for the indexed entries.</td></tr><tr><td>Export CSV</td><td>Allows you to export the list of all entries added as a CSV file</td></tr></tbody></table>


# Face Tracking

Face detection or tracking is a computer technology utilized in various applications to identify human faces in digital images. It also refers to the psychological process by which humans recognize and focus on faces within a visual scene.

<figure><img src="https://564713456-files.gitbook.io/~/files/v0/b/gitbook-x-prod.appspot.com/o/spaces%2FKNcXDcNRYHUBsVw12Dii%2Fuploads%2FFcENp2ETvTMJeUKiKq06%2Fcreate.jpg?alt=media&amp;token=38a6ca29-9b58-4535-8b49-223ef7420ef0" alt=""><figcaption></figcaption></figure>

## To Create a Face Tracking Project on SwiftXR

Click on 3D under components and select the Face tracking feature.

<figure><img src="https://564713456-files.gitbook.io/~/files/v0/b/gitbook-x-prod.appspot.com/o/spaces%2FKNcXDcNRYHUBsVw12Dii%2Fuploads%2FImb2O3qehnyZzwE9DwNu%2Fface%20trackking.PNG?alt=media&amp;token=79fbaabd-7864-41a1-bd6b-4daa48043d73" alt=""><figcaption></figcaption></figure>

Upload a 3D model of your desired virtual element (either a face glass or a necklace or a earring or even a cap). You can upload a custom 3D model of your choice or simply request for one on the platform.

<figure><img src="https://564713456-files.gitbook.io/~/files/v0/b/gitbook-x-prod.appspot.com/o/spaces%2FKNcXDcNRYHUBsVw12Dii%2Fuploads%2F18yysSTm9m3eXLUXS8sK%2Fadd%203D%20Modell.PNG?alt=media&amp;token=7c2b52cb-b1b2-4f9c-b27c-d45a29cc14c0" alt=""><figcaption></figcaption></figure>

## Adjust Object on Face

On the right hand side of the editor click  on properties and select Face Tracking. Select adjust object on face. In the editor  use the “All” panel under size to resize your 3D object to fit the face model. Then to adjust the position use  XYZ control panel to  move your object around appropriately. <br>

<figure><img src="https://564713456-files.gitbook.io/~/files/v0/b/gitbook-x-prod.appspot.com/o/spaces%2FKNcXDcNRYHUBsVw12Dii%2Fuploads%2FqTs3ODqeKy777S44YDSj%2FadjustImage.jpg?alt=media&amp;token=e868f4af-e035-487f-969f-d1da51c70d21" alt=""><figcaption></figcaption></figure>

Click on “save” when you are done:

## Preview and Publish your Project

Click on the drop down icon beside Publish to preview your project and view in AR. Place your camera on your face and your glasses should appear. Once you are satisfied with your fittings, go ahead to publish your project.

<br>


# Indexable Model Viewer

This explains how you can build a project using the indexable model viewer on SwiftXR

This is an Individual product publishing identification feature that enables each asset to be called uniquely to an assigned space when the project is published.&#x20;

<figure><img src="https://564713456-files.gitbook.io/~/files/v0/b/gitbook-x-prod.appspot.com/o/spaces%2FKNcXDcNRYHUBsVw12Dii%2Fuploads%2F0W8JBU5Cjc2JeXg5XTrP%2FINDEXABLE%203D%20Viewer.PNG?alt=media&amp;token=10284326-6417-44d5-97e0-b0338aa9ec56" alt=""><figcaption></figcaption></figure>

To give a clearer explanation, we will guide you through the steps to publish an e-commerce website featuring 3D models using SwiftXR. For each product on sale, you will import 3D models into the SwiftXR canvas, assign them a unique model ID, and link them with a **Model Swap Parameter** for easy model management. This will allow users to swap between models on the published project.

We will walk you through how to:

1. [Add models to the canvas.](/components/3d-viewer)
2. Assign model IDs and a Model Swap Parameter.
3. Publish the project with a URL to view each model.
4. Integrate the project into a website using iframe.

### Step 1: Access the Indexable Model Viewer (IMV)

1. In the SwiftXR platform, navigate to the **Design Components**.
2. Go to [**3D Viewer Components**](/components/3d-viewer) and select [**Indexable Model Viewer (IMV)**](/components/indexable-3d-viewer-developers).
3. Drag and drop the **IMV** tab into your canvas. This is where you will add your 3D models. Upon adding, you will see a default asset (e.g., a box) displayed to show the viewer is active.

<figure><img src="https://564713456-files.gitbook.io/~/files/v0/b/gitbook-x-prod.appspot.com/o/spaces%2FKNcXDcNRYHUBsVw12Dii%2Fuploads%2FUoBIgqLOqryouIhhkxwy%2FGuide%20Screenshots%20(14).png?alt=media&amp;token=36f539eb-a7f1-4de2-b1ea-3dbf882c6ea8" alt=""><figcaption></figcaption></figure>

### Step 2: Set Up Indexing and Model Swap Parameters

1. On the right-hand side, click the **PROPERTIES** tab.
2. Scroll to the **Indexing Settings** section. Here, you will see the **Model Swap Parameter** and the **Add Entry** button.
   * The **Model Swap Parameter** is a class index that will house the names of all models in the indexable model viewer.
   * By default, it is named “swf,” but this can be edited by the user.
3. Click the **Add Index Model** button to add your models. For each model added, you will see an **Index ID**. This ID is unique to each model and will be used in the URL to access the specific model.
4. If you wish to rename the **Model Swap Parameter**, you can change it from the default “swf” to something more relevant. In this tutorial, we’ll use “user” as the new parameter.

<figure><img src="https://564713456-files.gitbook.io/~/files/v0/b/gitbook-x-prod.appspot.com/o/spaces%2FKNcXDcNRYHUBsVw12Dii%2Fuploads%2FUkpfnS3SpT78MDTaP7go%2FINDEXX.PNG?alt=media&amp;token=08e355fd-1f80-4b90-810f-fb2cab93870e" alt=""><figcaption></figcaption></figure>

### Step 3: Add Your 3D Models

<figure><img src="https://564713456-files.gitbook.io/~/files/v0/b/gitbook-x-prod.appspot.com/o/spaces%2FKNcXDcNRYHUBsVw12Dii%2Fuploads%2FLrZIk9sAGUIWzkYxfU75%2FIndexxx.PNG?alt=media&amp;token=e9afd833-dbf2-4343-ba49-9c4fc9f9dbca" alt=""><figcaption></figcaption></figure>

1. To add your models, click the **Add Entry** button.
2. Drag and drop your 3D models (in `.glb,.gltf,fbx, obj, sti, dae and folders,` format) into the box labeled “Paste link or drag glb…”.
   * Each time you add a model, it will be assigned a unique **Index ID** (starting from 1). In this example, the first model will have an Index ID of “1”, the second model “2”, and so on.

### Step 4: Publish the Project

1. Once all models are added, click the **Publish/Update** button.

2. Upon successful publication, a web link will be generated. You can access each indexed model individually using the following format:

   ```ruby
   https://your-project-link.swiftxr.app/?[Model Swap Parameter]=[Index ID]
   ```

   For example, if your **Model Swap Parameter** is set to “user” and the **Index ID** of the first model is “1”, your link will look like this:

   ```ruby
   https://bead-christmas.swiftxr.app/?user=1
   ```

3. To view other models, simply replace the **Index ID** with “2” or “3” to display the respective models. For instance, to view the second model:

   ```ruby
   https://bead-christmas.swiftxr.app/?user=2
   ```

#### Step 5: Embed the Project into a Website

1. After publishing your project, you can integrate it into your website. To do this, click on the **Copy Embed** button located at the top of the web address modal.
2. Paste the generated iframe embed code into your website’s HTML file, and the 3D model viewer will be displayed on your page.


# AR Artwork Viewer

Spice up your Art work with AR Artwork Viewer

<figure><img src="https://564713456-files.gitbook.io/~/files/v0/b/gitbook-x-prod.appspot.com/o/spaces%2FKNcXDcNRYHUBsVw12Dii%2Fuploads%2FLX4FhB0BF3VatDjTvLVY%2Fartwork-template.png?alt=media&amp;token=9ad6cd2d-8fd6-465b-b123-a88006d3a735" alt="" width="306"><figcaption></figcaption></figure>

## Introduction

The AR Artwork Viewer component extends the 3D viewer component but with added functionality.&#x20;

The AR Artwork Viewer component allows you to upload your 2D Artwork and converts it to 3D which can be viewed using AR or in VR also.\
\
All components in SwiftXR are extended from the 3D Model Viewer.

<figure><img src="https://564713456-files.gitbook.io/~/files/v0/b/gitbook-x-prod.appspot.com/o/spaces%2FKNcXDcNRYHUBsVw12Dii%2Fuploads%2FUerKeLMXtSIlKsN0Dtft%2FGuide%20Screenshots%20(15).png?alt=media&amp;token=bffc5567-75b4-457a-947d-57e49641adfa" alt=""><figcaption></figcaption></figure>

## Design

This extends the 3D Viewer Designs [Click here to View,](/components/3d-viewer#design)

## Properties

This extends some properties from the 3D Viewer [Click here to View](/components/3d-viewer#properties),  unique properties are listed below

<table data-full-width="true"><thead><tr><th>Topic</th><th>Description</th></tr></thead><tbody><tr><td><a href="/components/ar-artwork-viewer/artwork-settings">Artwork Settings</a></td><td>Allows you to customize your artwork</td></tr></tbody></table>


# Artwork Settings

Customize your generated 3D Artwork

<figure><img src="https://564713456-files.gitbook.io/~/files/v0/b/gitbook-x-prod.appspot.com/o/spaces%2FKNcXDcNRYHUBsVw12Dii%2Fuploads%2FiTsVm64ZPD5DaetGuleF%2Fartwork%20setting.PNG?alt=media&amp;token=14e529e6-c745-4e37-b163-0bd981fef566" alt=""><figcaption></figcaption></figure>

<table data-full-width="true"><thead><tr><th width="207">Features</th><th>Description</th></tr></thead><tbody><tr><td>Add Artwork Image</td><td>Upload Your Artwork</td></tr><tr><td>Frame Color</td><td>Allows you to change the frame color of the artwork</td></tr><tr><td>Artwork Filter Color</td><td>Adjust the filter color of art work</td></tr></tbody></table>


# AI Artwork Viewer

Add 3D Art Work to your applications

<figure><img src="https://564713456-files.gitbook.io/~/files/v0/b/gitbook-x-prod.appspot.com/o/spaces%2FKNcXDcNRYHUBsVw12Dii%2Fuploads%2Fd3aNArlecx9Oltj7yro1%2FArtworkk.PNG?alt=media&amp;token=2ac9a52e-a06f-4a92-b023-19c47a9d288c" alt=""><figcaption></figcaption></figure>

## Introduction

The  AR Art Work Viewer extends the 3D viewer component but with added functionality.&#x20;

The AR Artwork is a component that allows you to import 2D images and convert them to a 3D Art work that you can use in your space\
\
All components in SwiftXR are extended from the 3D Model Viewer.

<figure><img src="https://564713456-files.gitbook.io/~/files/v0/b/gitbook-x-prod.appspot.com/o/spaces%2FKNcXDcNRYHUBsVw12Dii%2Fuploads%2Fq20WEkzlaFG0vUeR0UFq%2FAI%20Artwork%20viewer.PNG?alt=media&amp;token=667c29a4-66c6-42b8-ac24-2f8b62bd69d6" alt=""><figcaption></figcaption></figure>

## Design

This extends the 3D Viewer Designs [Click here to View,](/components/3d-viewer#design)

## Properties

This extends some properties from the 3D Viewer [Click here to View](/components/3d-viewer#properties),  unique properties are listed below

<table data-full-width="true"><thead><tr><th>Topic</th><th>Description</th></tr></thead><tbody><tr><td><a href="/components/ai-artwork-viewer/ai-artwork">AI Artwork</a></td><td>Use our powerful AI tool to generate 3D Art</td></tr><tr><td><a href="/components/ar-artwork-viewer/artwork-settings">Artwork Settings</a></td><td>This extends the Artwork Settings <a href="/components/ar-artwork-viewer/artwork-settings">Click here to View</a></td></tr></tbody></table>


# AI Artwork

Generate 3D Artwork with our powerful AI Tool.

<figure><img src="https://564713456-files.gitbook.io/~/files/v0/b/gitbook-x-prod.appspot.com/o/spaces%2FKNcXDcNRYHUBsVw12Dii%2Fuploads%2FvJiBd8kYw9KYFUlPSmLq%2FAI%20Artwork%20setting.PNG?alt=media&amp;token=a1d70603-bfa8-4bb5-93ae-7c4c49ea9f54" alt=""><figcaption></figcaption></figure>

<table data-full-width="true"><thead><tr><th width="207">Features</th><th>Description</th></tr></thead><tbody><tr><td><a href="/components/ai-artwork-viewer/ai-generator">Open AI Generator</a></td><td>Utilize the AI generator to generate Artwork</td></tr></tbody></table>


# AI Generator

Generate Artwork with our AI generator

<figure><img src="https://564713456-files.gitbook.io/~/files/v0/b/gitbook-x-prod.appspot.com/o/spaces%2FKNcXDcNRYHUBsVw12Dii%2Fuploads%2FhzmMoSHjR1uaSd2rjsMg%2Fdancing%20bunny.PNG?alt=media&amp;token=b6a68829-d857-4eea-a799-ea420c84b0ab" alt=""><figcaption></figcaption></figure>

<figure><img src="https://564713456-files.gitbook.io/~/files/v0/b/gitbook-x-prod.appspot.com/o/spaces%2FKNcXDcNRYHUBsVw12Dii%2Fuploads%2FowArrWUsso1EbTMWuiYY%2FAI%20Artwork%20generator.PNG?alt=media&amp;token=93a6d131-a5ef-4e26-9196-e43306ae4bb2" alt=""><figcaption></figcaption></figure>

<table data-full-width="true"><thead><tr><th width="207">Features</th><th>Description</th></tr></thead><tbody><tr><td>Prompt Box</td><td>Enter your prompt to generate Artwork e.g a dancing bunny</td></tr><tr><td>Generate</td><td>Click on Generate to create Artwork with our AI tool</td></tr></tbody></table>


# ReadyPlayerMe

Create 3D Customizable Avatars

<figure><img src="https://564713456-files.gitbook.io/~/files/v0/b/gitbook-x-prod.appspot.com/o/spaces%2FKNcXDcNRYHUBsVw12Dii%2Fuploads%2FCYckzjPA9SYHFfYEFFPb%2Fportfolio-template.png?alt=media&amp;token=fd60d914-3024-4a18-816d-cb214c5664f6" alt="" width="306"><figcaption></figcaption></figure>

## Introduction

The ReadyPlayerMe component extends the 3D viewer component but with added functionality.&#x20;

This component allows you to create amazing avatar for your games.\
\
All components in SwiftXR are extended from the 3D Model Viewer.

<figure><img src="https://564713456-files.gitbook.io/~/files/v0/b/gitbook-x-prod.appspot.com/o/spaces%2FKNcXDcNRYHUBsVw12Dii%2Fuploads%2FEMx0csynv4SAIyncNyA2%2FScreenshot%202024-09-30%20at%2009.22.43.png?alt=media&amp;token=2d4a2ed3-f44d-46ed-9298-d507e2a64e5e" alt=""><figcaption></figcaption></figure>

## Design

This extends the 3D Viewer Designs [Click here to View,](/components/3d-viewer#design)

## Properties

This extends some properties from the 3D Viewer [Click here to View](/components/3d-viewer#properties),  unique properties are listed below

<table data-full-width="true"><thead><tr><th>Topic</th><th>Description</th></tr></thead><tbody><tr><td><a href="/components/readyplayerme/avatar-settings">Avatar Settings</a></td><td>This provides customization to how you want your ReadPlayerMe Avatar to look like.</td></tr></tbody></table>


# Avatar Settings

Customize how your viewers see the 3D object in their space.

<figure><img src="https://564713456-files.gitbook.io/~/files/v0/b/gitbook-x-prod.appspot.com/o/spaces%2FKNcXDcNRYHUBsVw12Dii%2Fuploads%2FETvdd9xJFsAxtTFLGfkG%2FScreenshot%202024-09-30%20at%2009.22.43.png?alt=media&amp;token=d3be4e8b-fa43-420f-9da6-3af950e49989" alt=""><figcaption></figcaption></figure>

<table data-full-width="true"><thead><tr><th width="207">Features</th><th>Description</th></tr></thead><tbody><tr><td>Target</td><td>Choose the gender of the avatar</td></tr><tr><td>Animation </td><td>Select from a list of movements you want the avatar to perform.</td></tr><tr><td>Open Avatar Creator</td><td>This opens an editor where you can create new avatars.</td></tr></tbody></table>

### Avatar Creator

<figure><img src="https://564713456-files.gitbook.io/~/files/v0/b/gitbook-x-prod.appspot.com/o/spaces%2FKNcXDcNRYHUBsVw12Dii%2Fuploads%2Frt1pFH6H93fFmstJdEKU%2FScreenshot%202024-09-30%20at%2009.21.18.png?alt=media&amp;token=f57fb869-3af9-44d8-a697-8a8db1673192" alt=""><figcaption></figcaption></figure>


# 🔌 Plugins

Access SwiftXR’s potential with plugins for easy 3D, AR, and VR integration into your preferred content management systems and development environments.


# Big Commerce

Add or embed 3D, Augmented Reality (AR) and Virtual Reality (VR) content/design to your Bigcommerce website

## Introduction:

SwiftXR is a powerful platform for creating and sharing interactive 3D, augmented reality (AR), and virtual reality (VR) experiences on the web. With the SwiftXR (3D/AR/VR) Integration for Bigcommerce, you can easily integrate SwiftXR Projects into your Bigcommerce stores/websites, enabling you to create immersive  and interactive web experiences.

## Creating a Project in SwiftXR

* Navigate to the SwiftXR Hub: Begin by visiting the SwiftXR Hub, or alternatively click on this link: <https://swiftxr.io/hub>&#x20;
* Initiate Project Creation: Once on Hub, click the “Create Project” button and enter your desired project name.
* Design or Develop: Utilize the intuitive editor to effortlessly add and customize SwiftXR components, bringing your 3D vision to life.

<figure><img src="https://564713456-files.gitbook.io/~/files/v0/b/gitbook-x-prod.appspot.com/o/spaces%2FKNcXDcNRYHUBsVw12Dii%2Fuploads%2FzQRi3ZbEEk6S2fTQ3CPs%2FScreenshot%202025-08-26%20131659.png?alt=media&amp;token=8eddf54d-d1c2-4a15-a7b7-341e882766cf" alt=""><figcaption></figcaption></figure>

## Publishing your SwiftXR Project

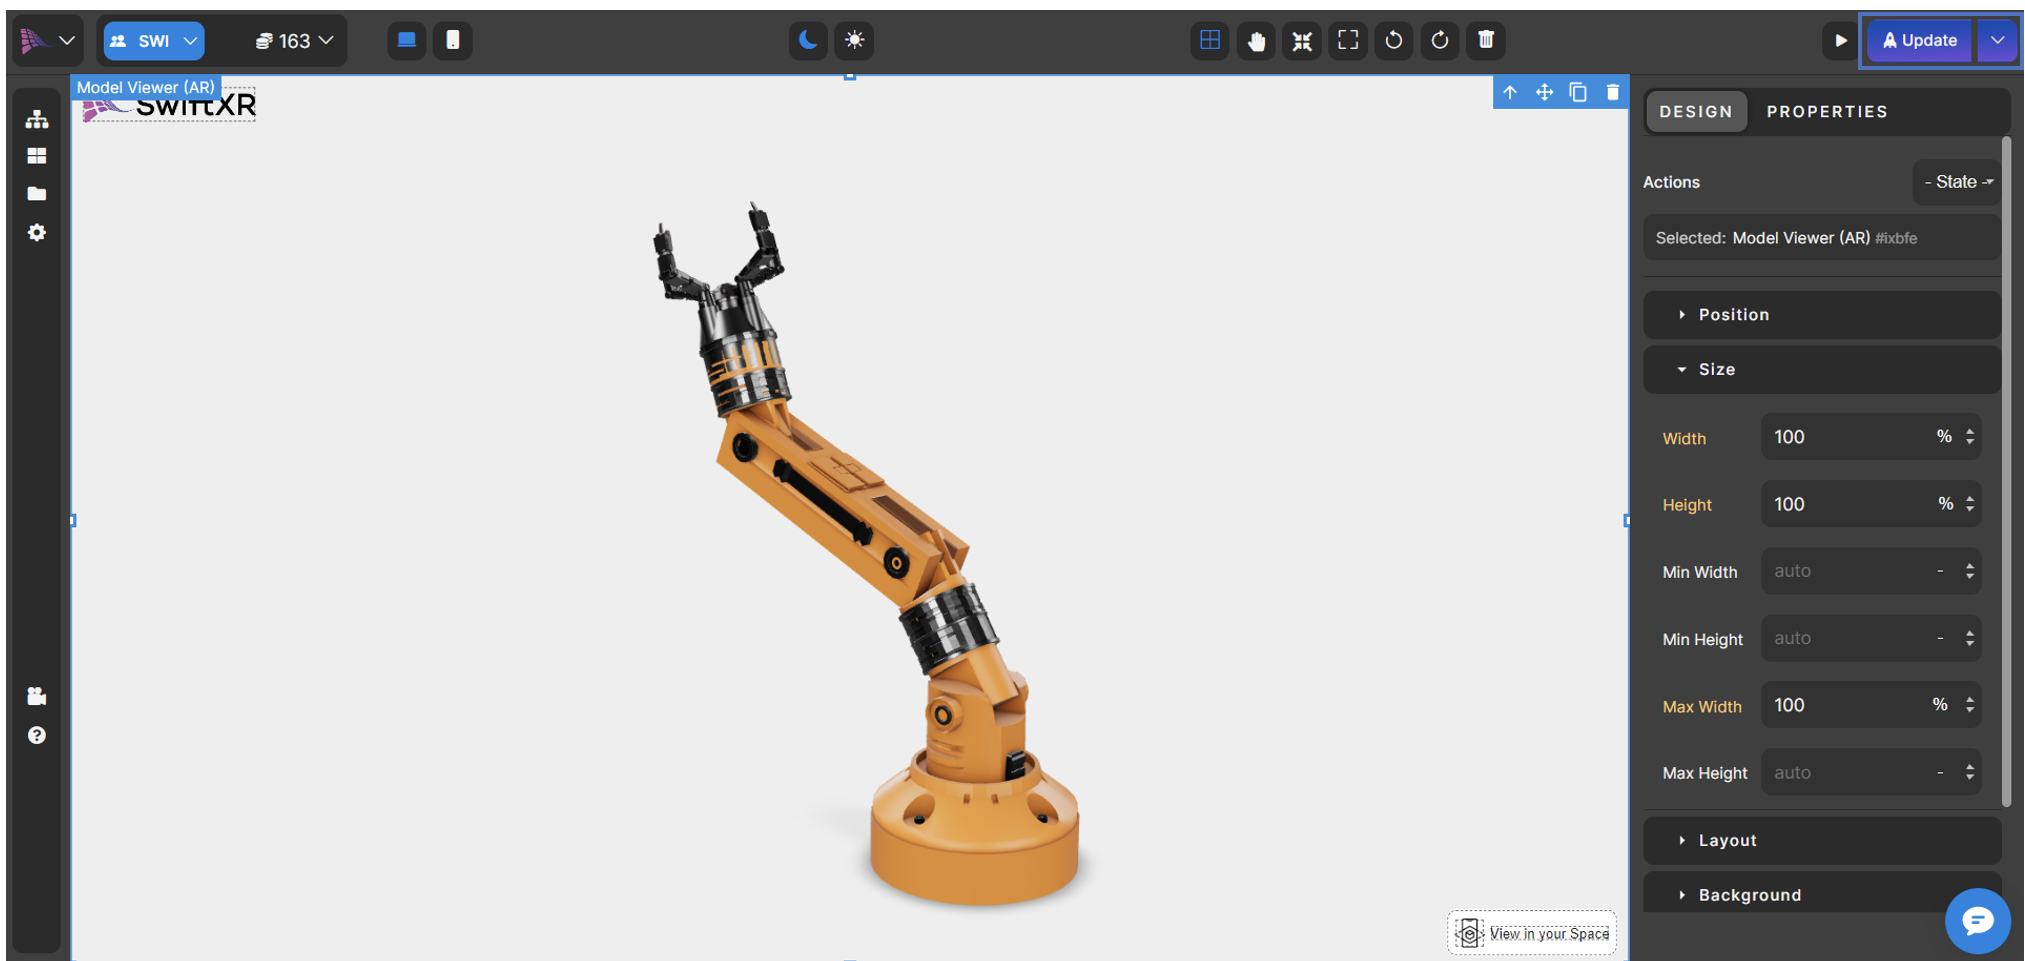
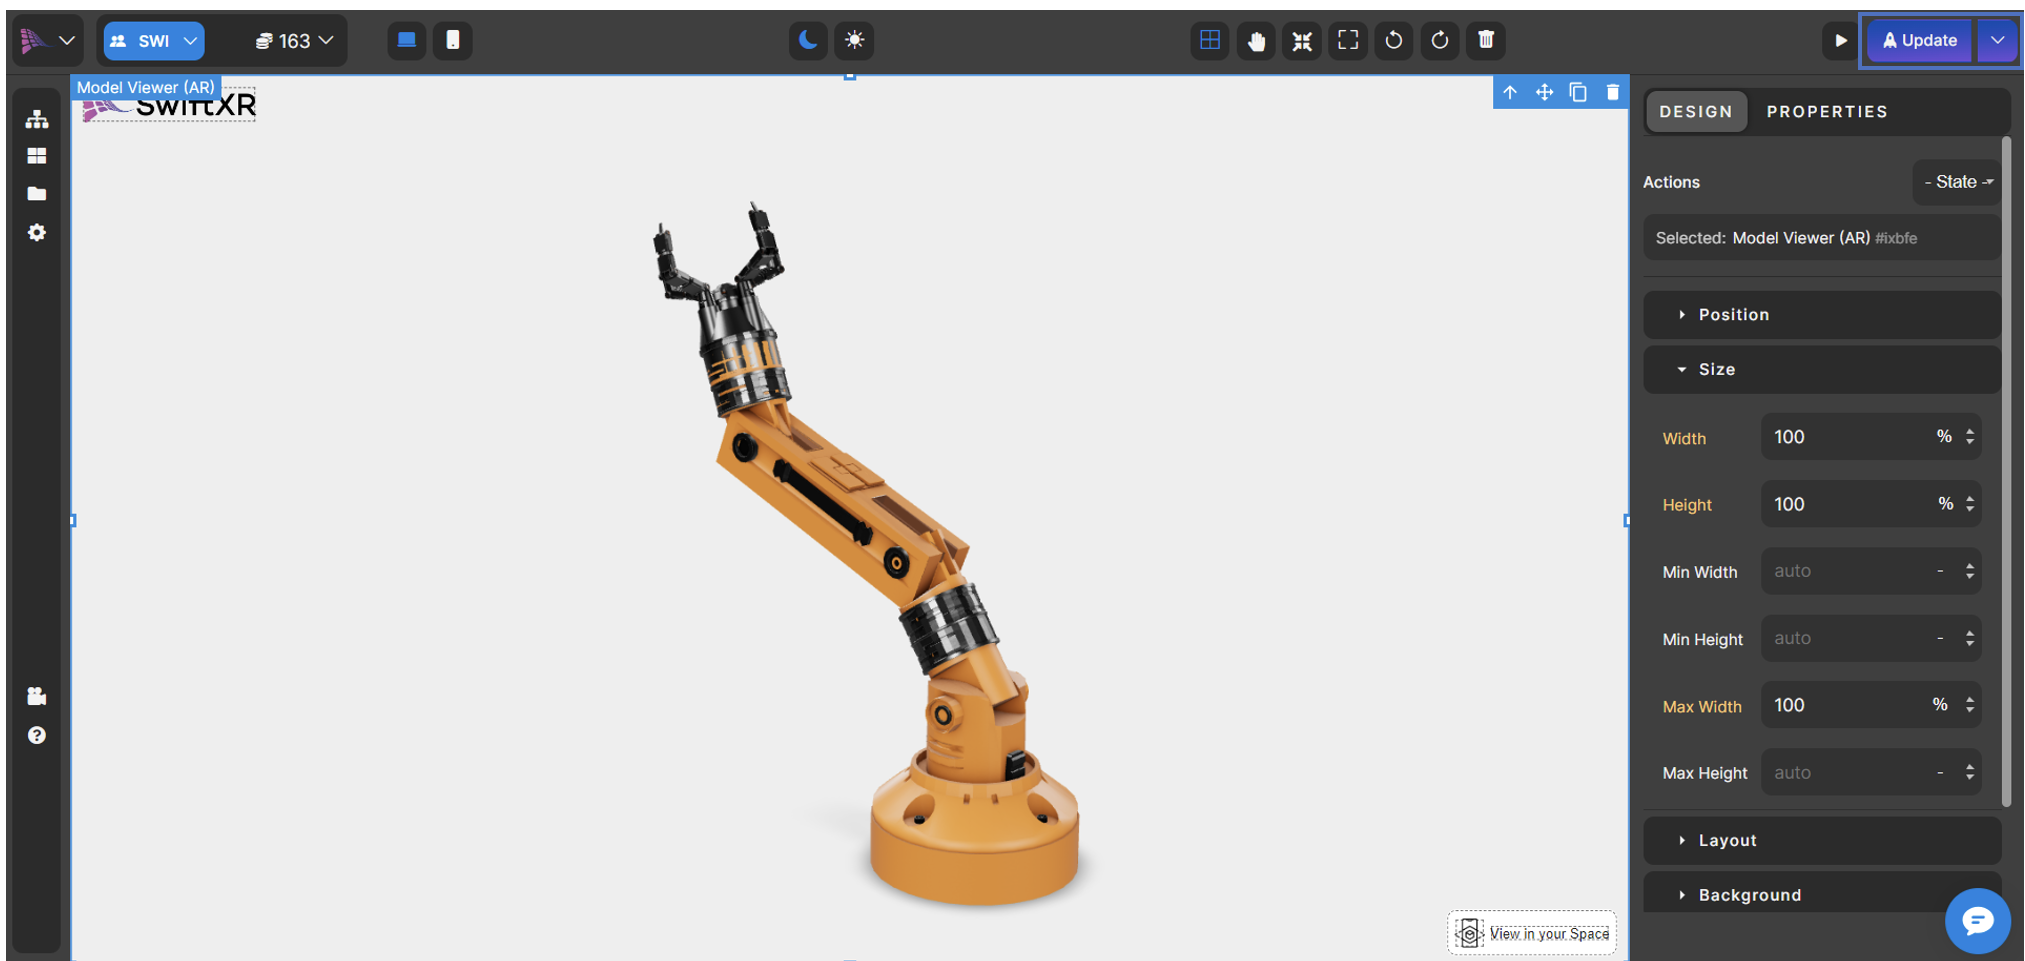
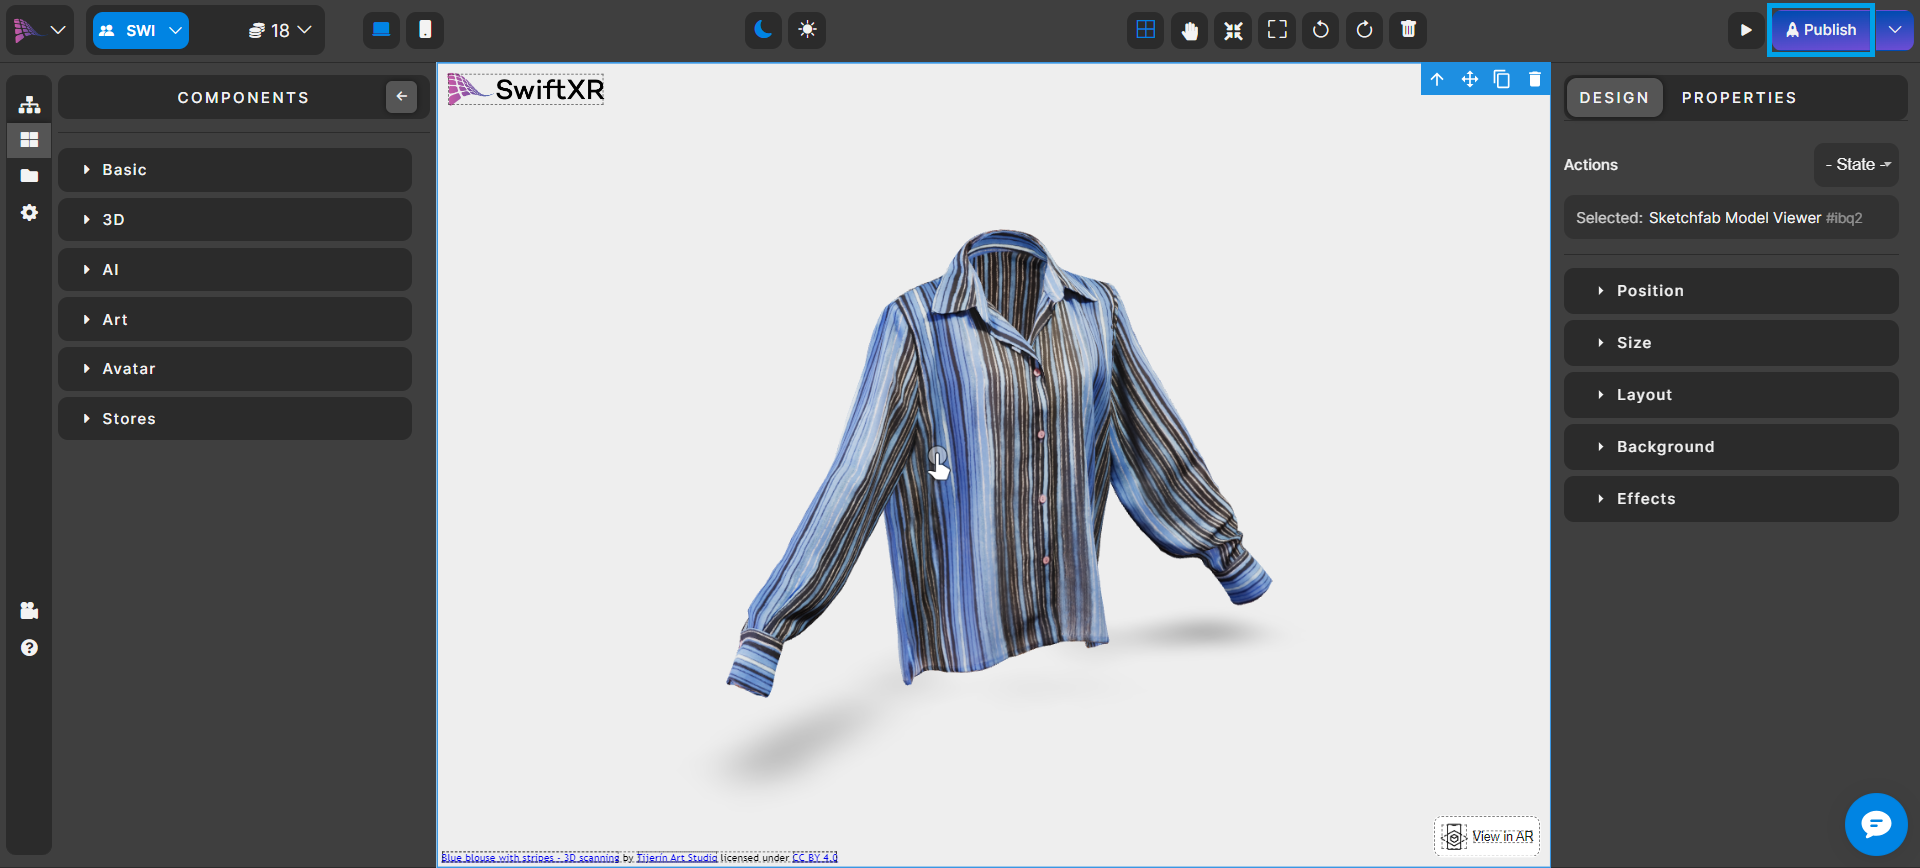
Utilize the editor to create your 3D vision using the SwiftXR components. Once satisfied with your creation, press the “Publish” or “Update” button to make your project live.

<figure><img src="https://564713456-files.gitbook.io/~/files/v0/b/gitbook-x-prod.appspot.com/o/spaces%2FKNcXDcNRYHUBsVw12Dii%2Fuploads%2F089hgPA9wG8bkIIg1pKn%2FScreenshot%202025-08-26%20131911.png?alt=media&amp;token=7f812e92-d04c-477f-832e-50e3ec6e5165" alt=""><figcaption></figcaption></figure>

## Copy Embed Code

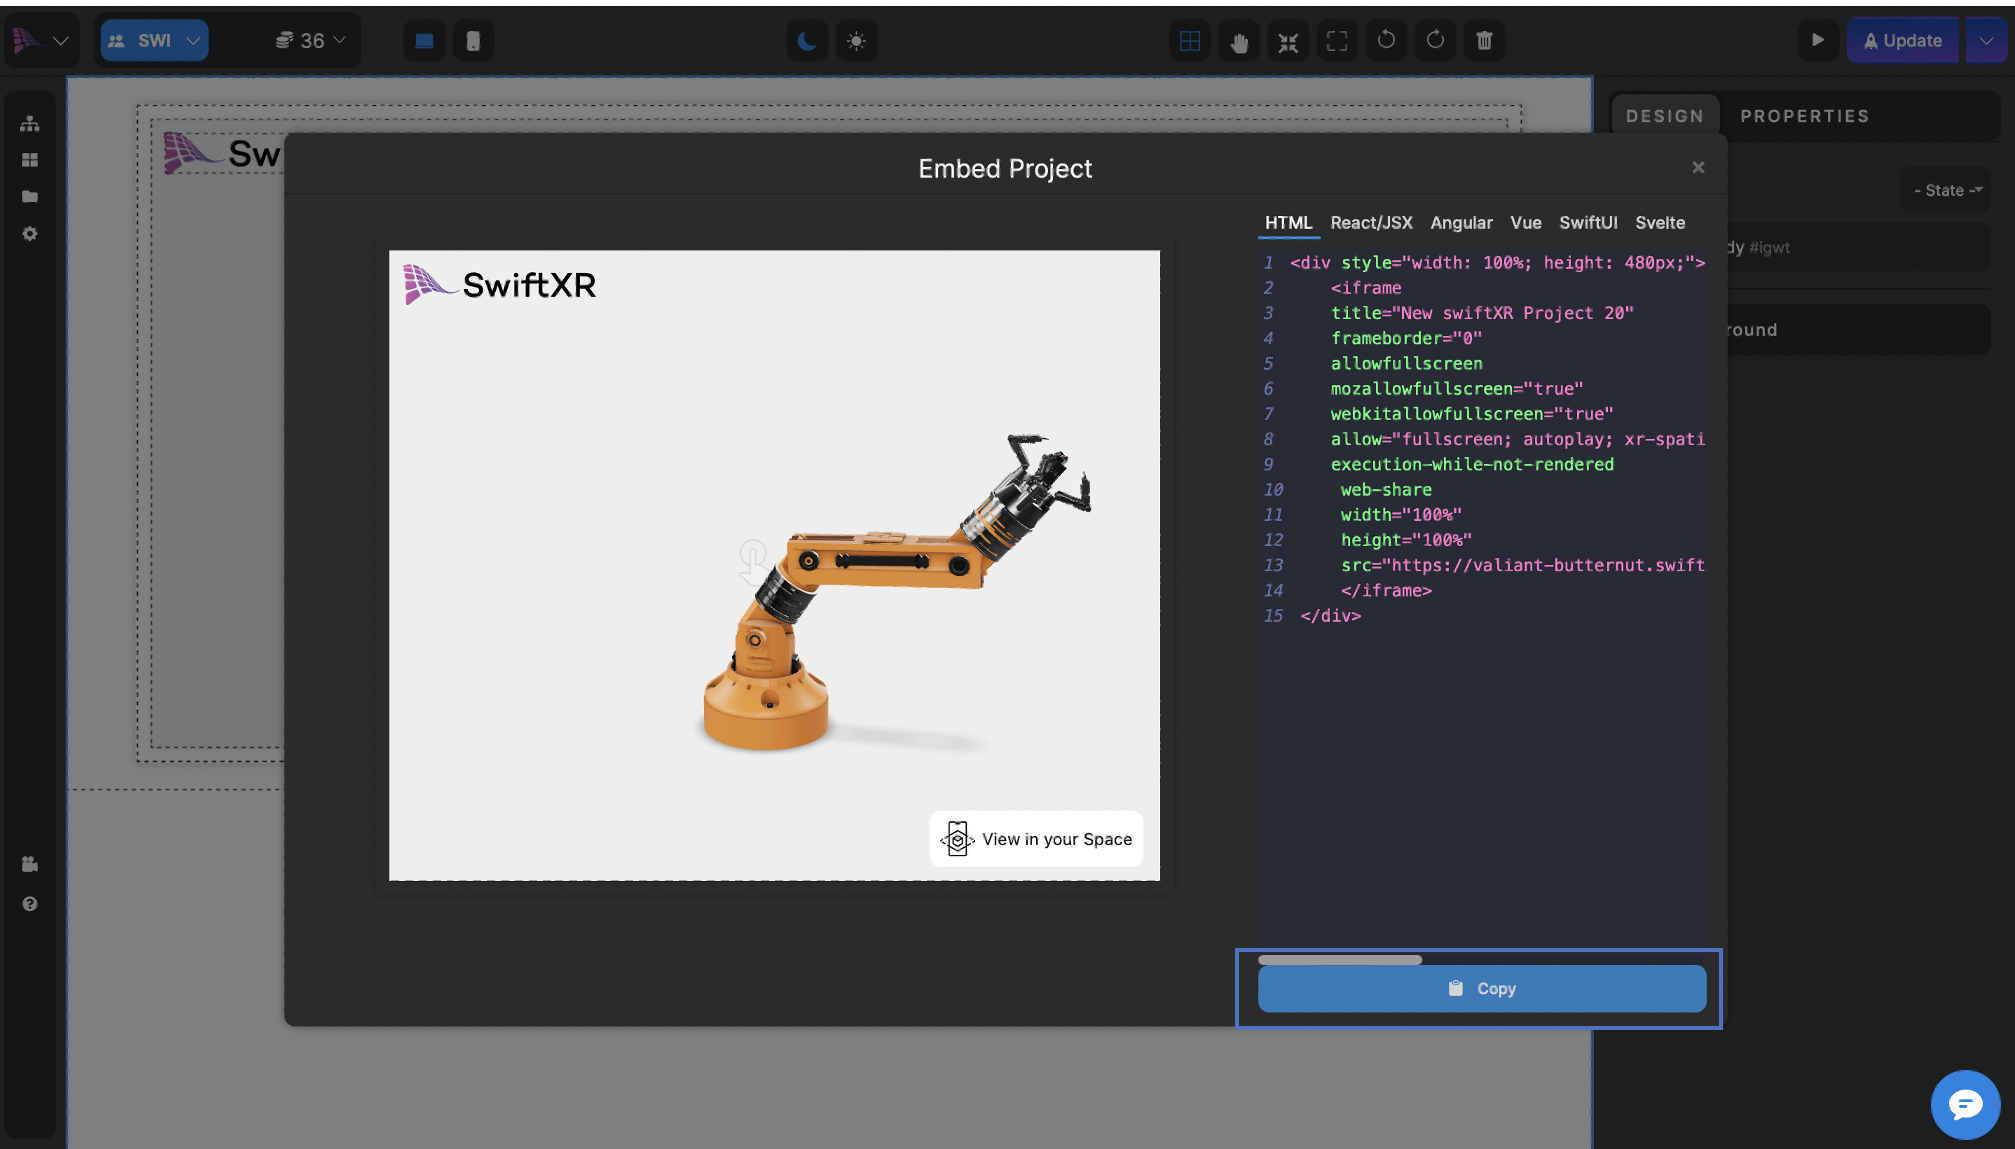
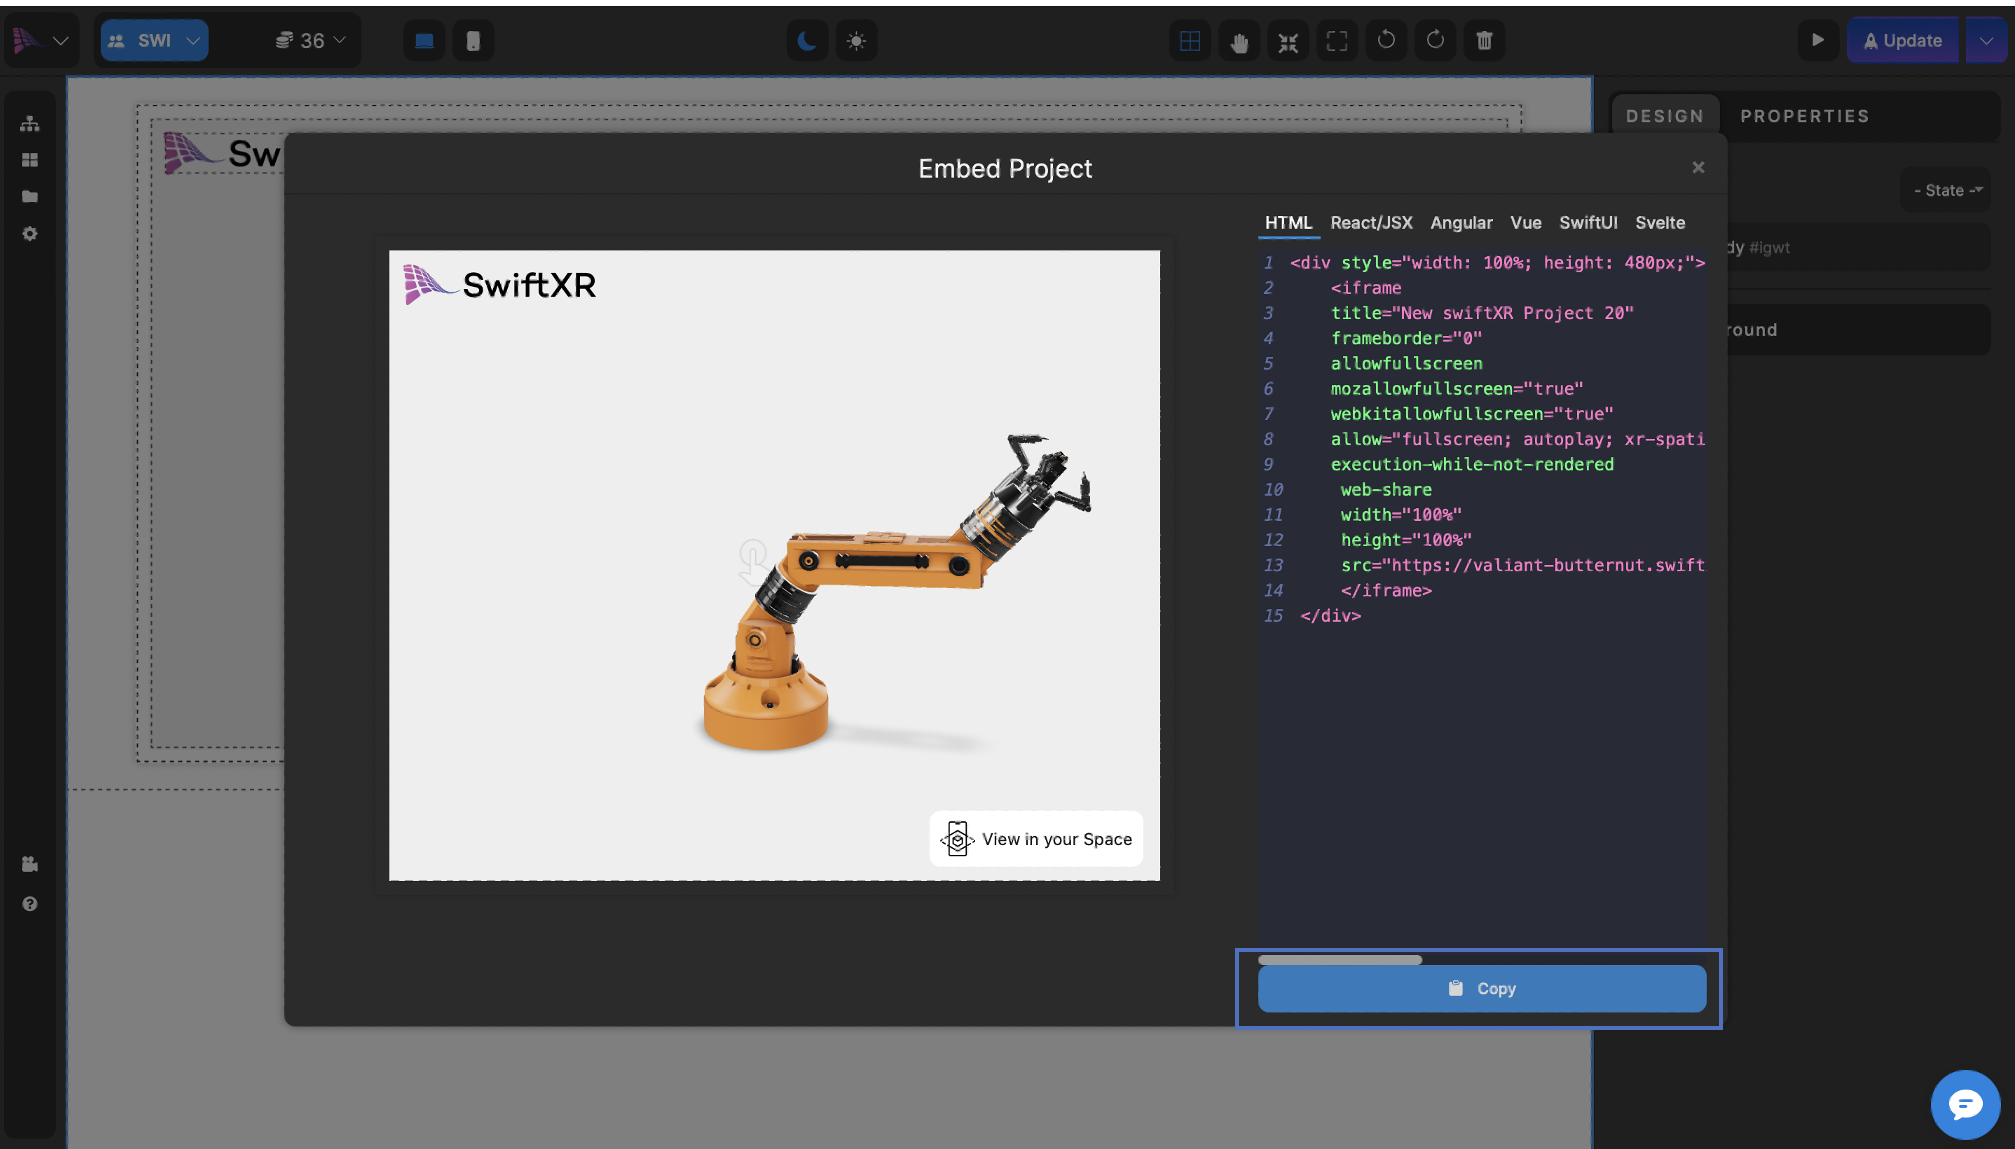
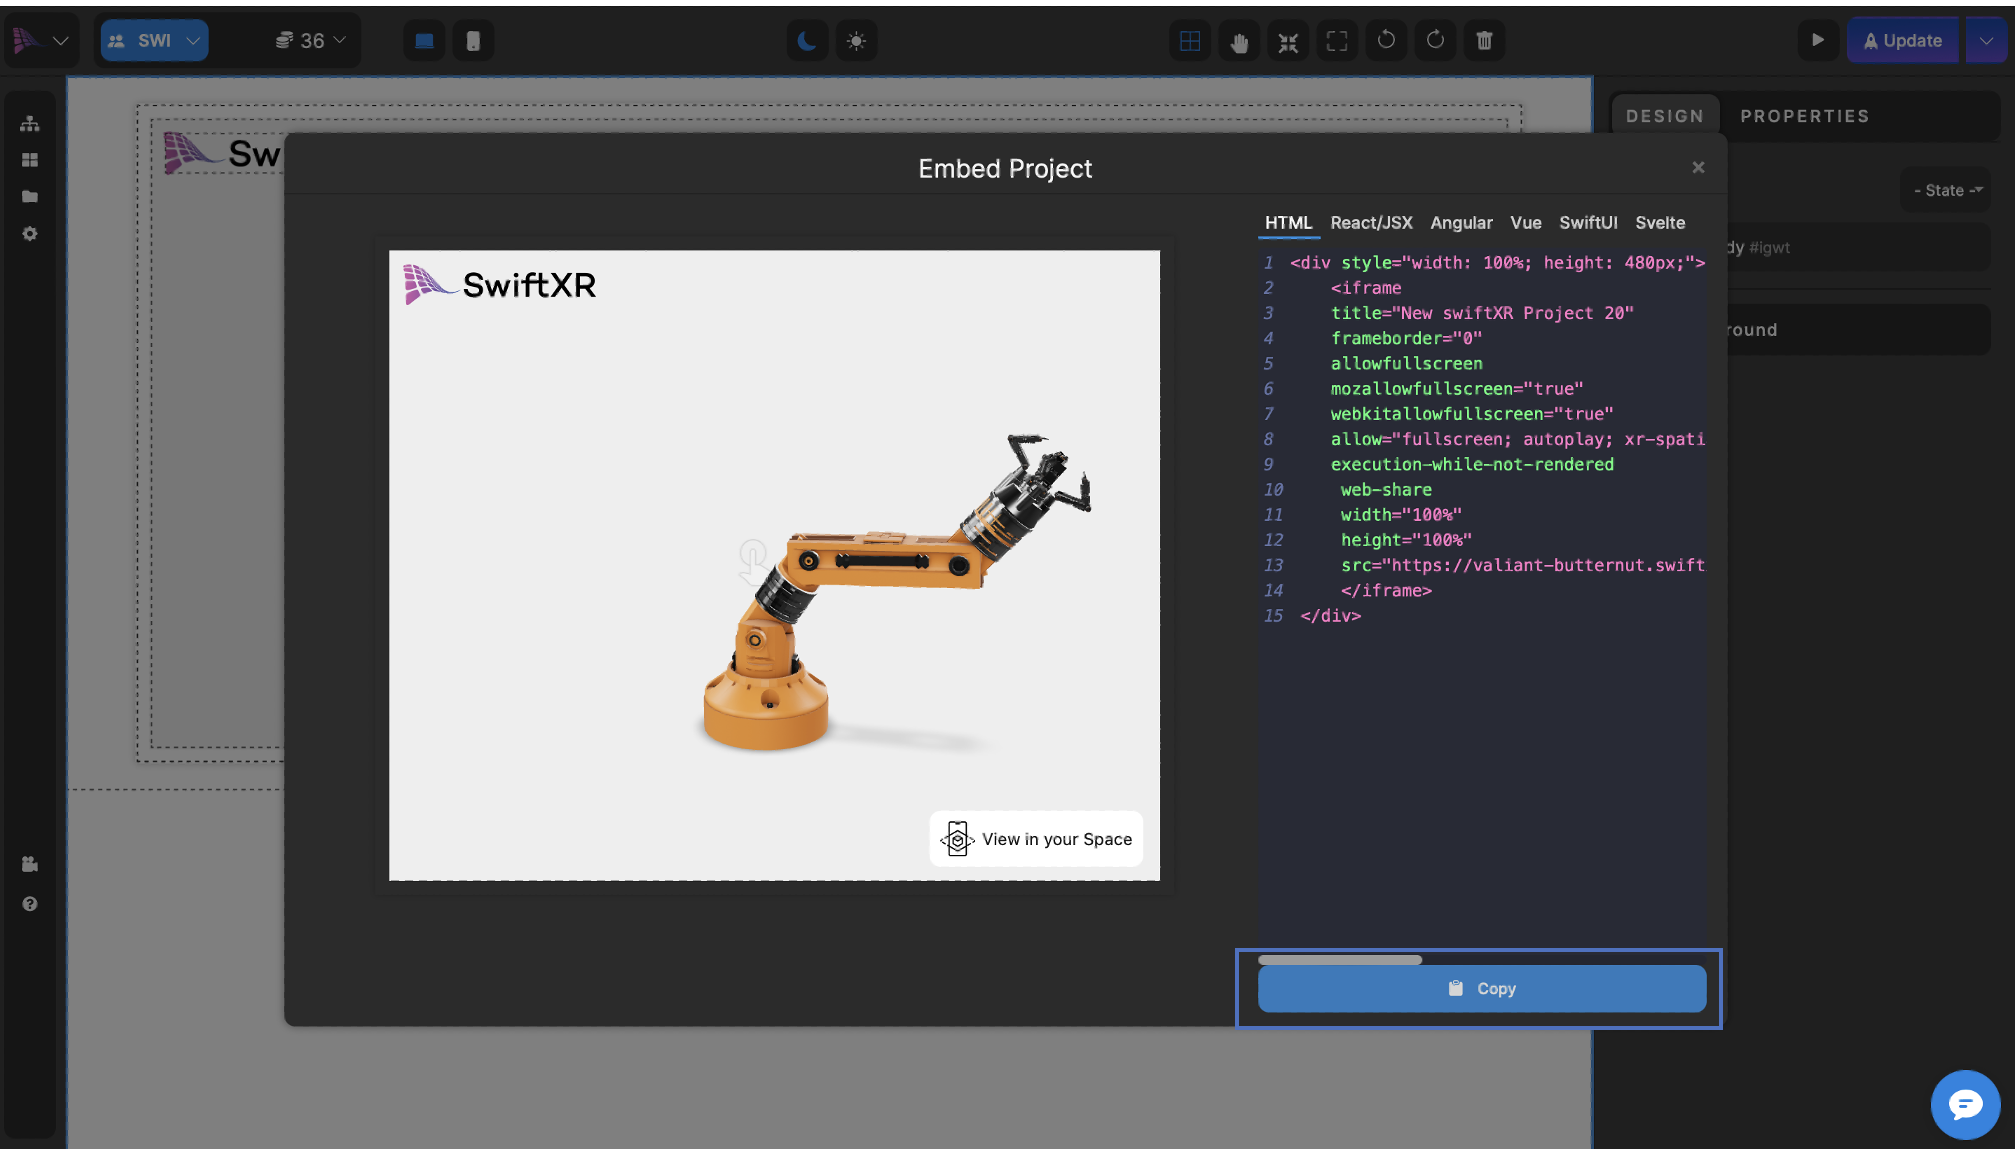
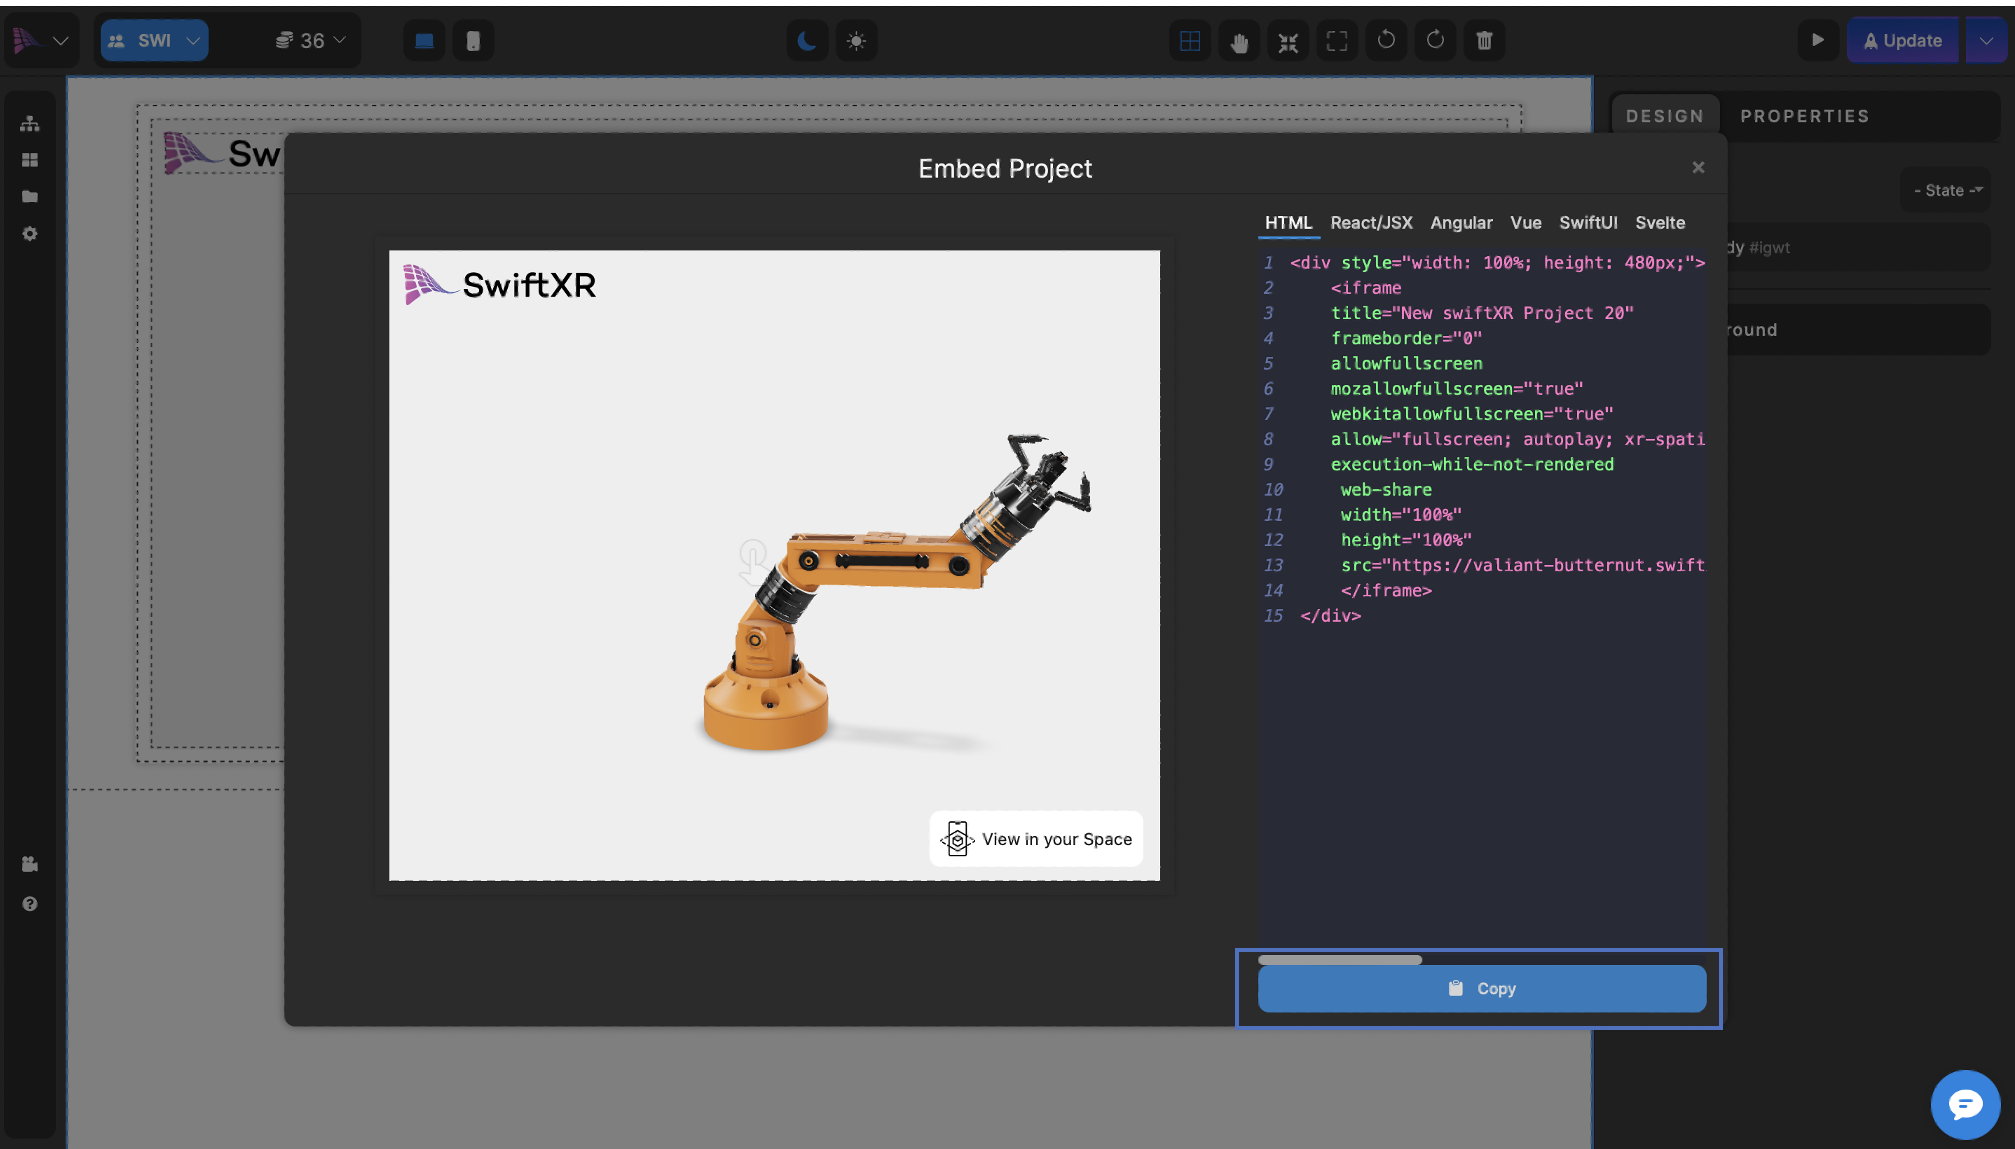
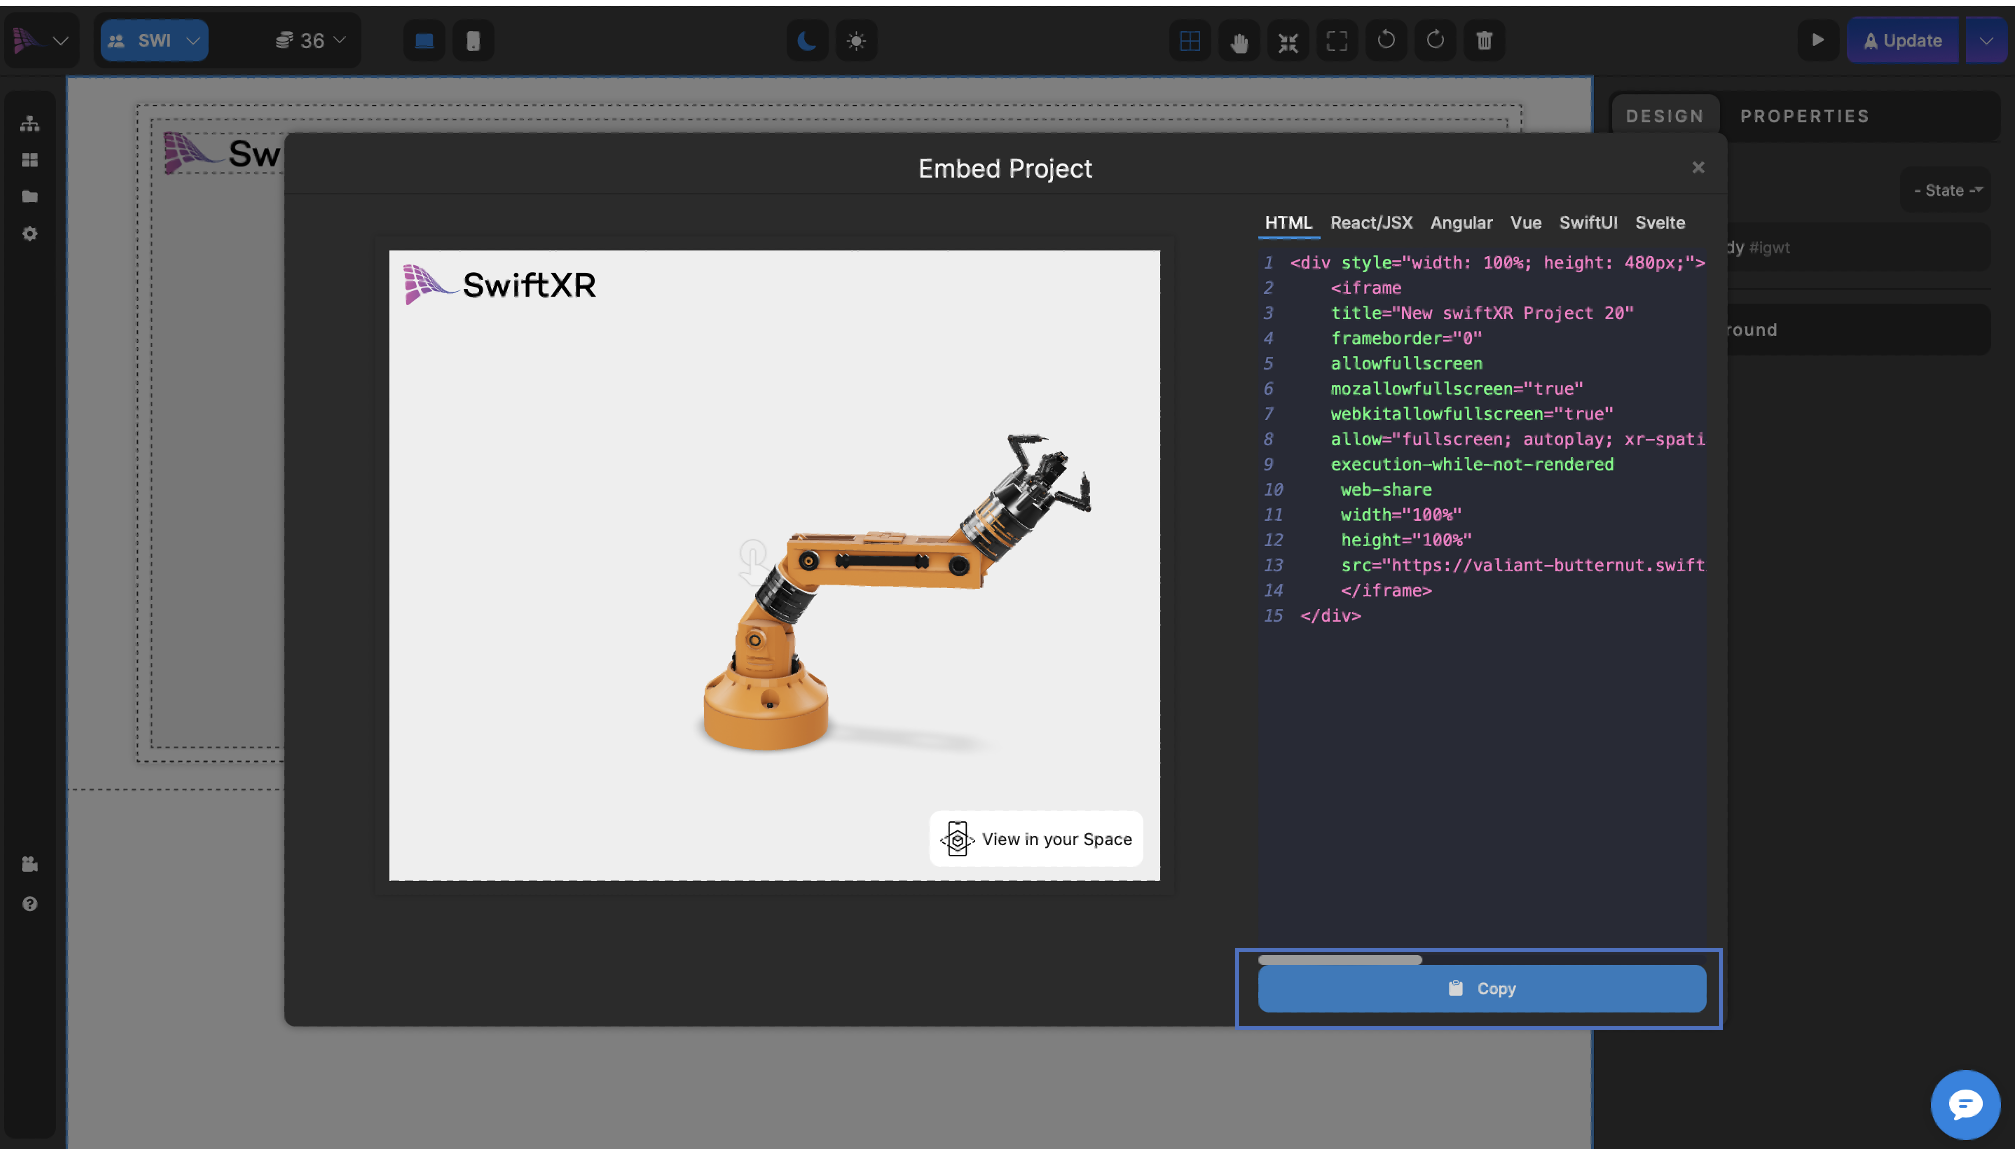
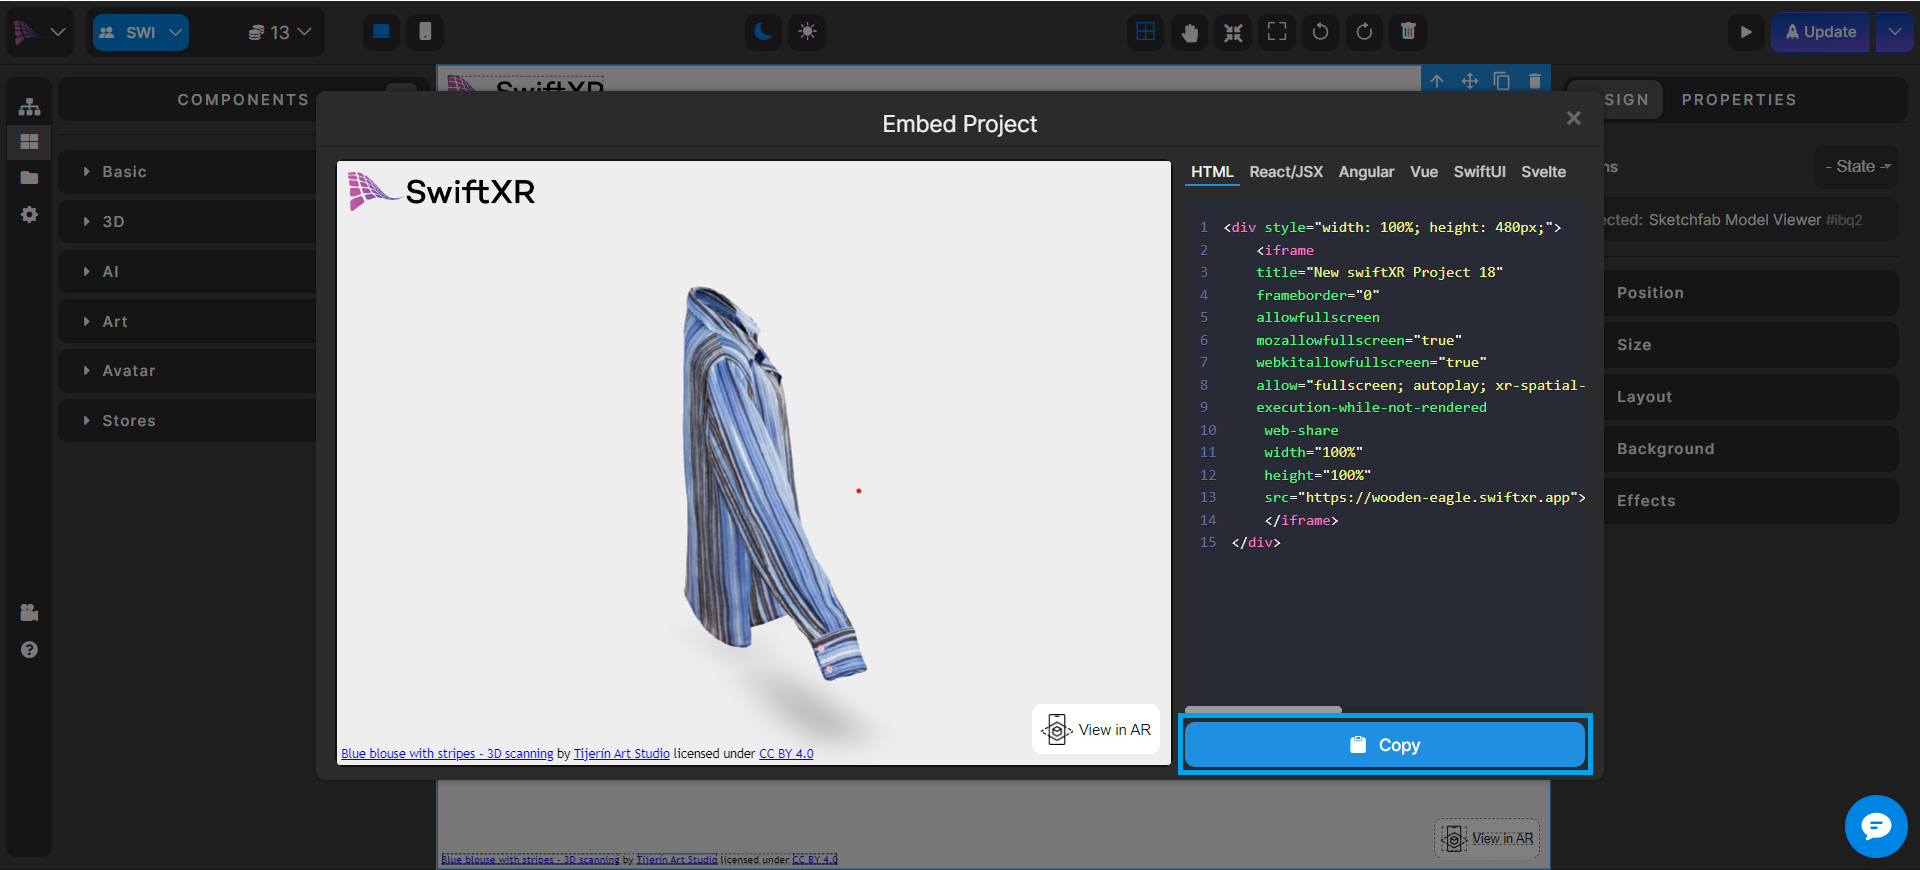
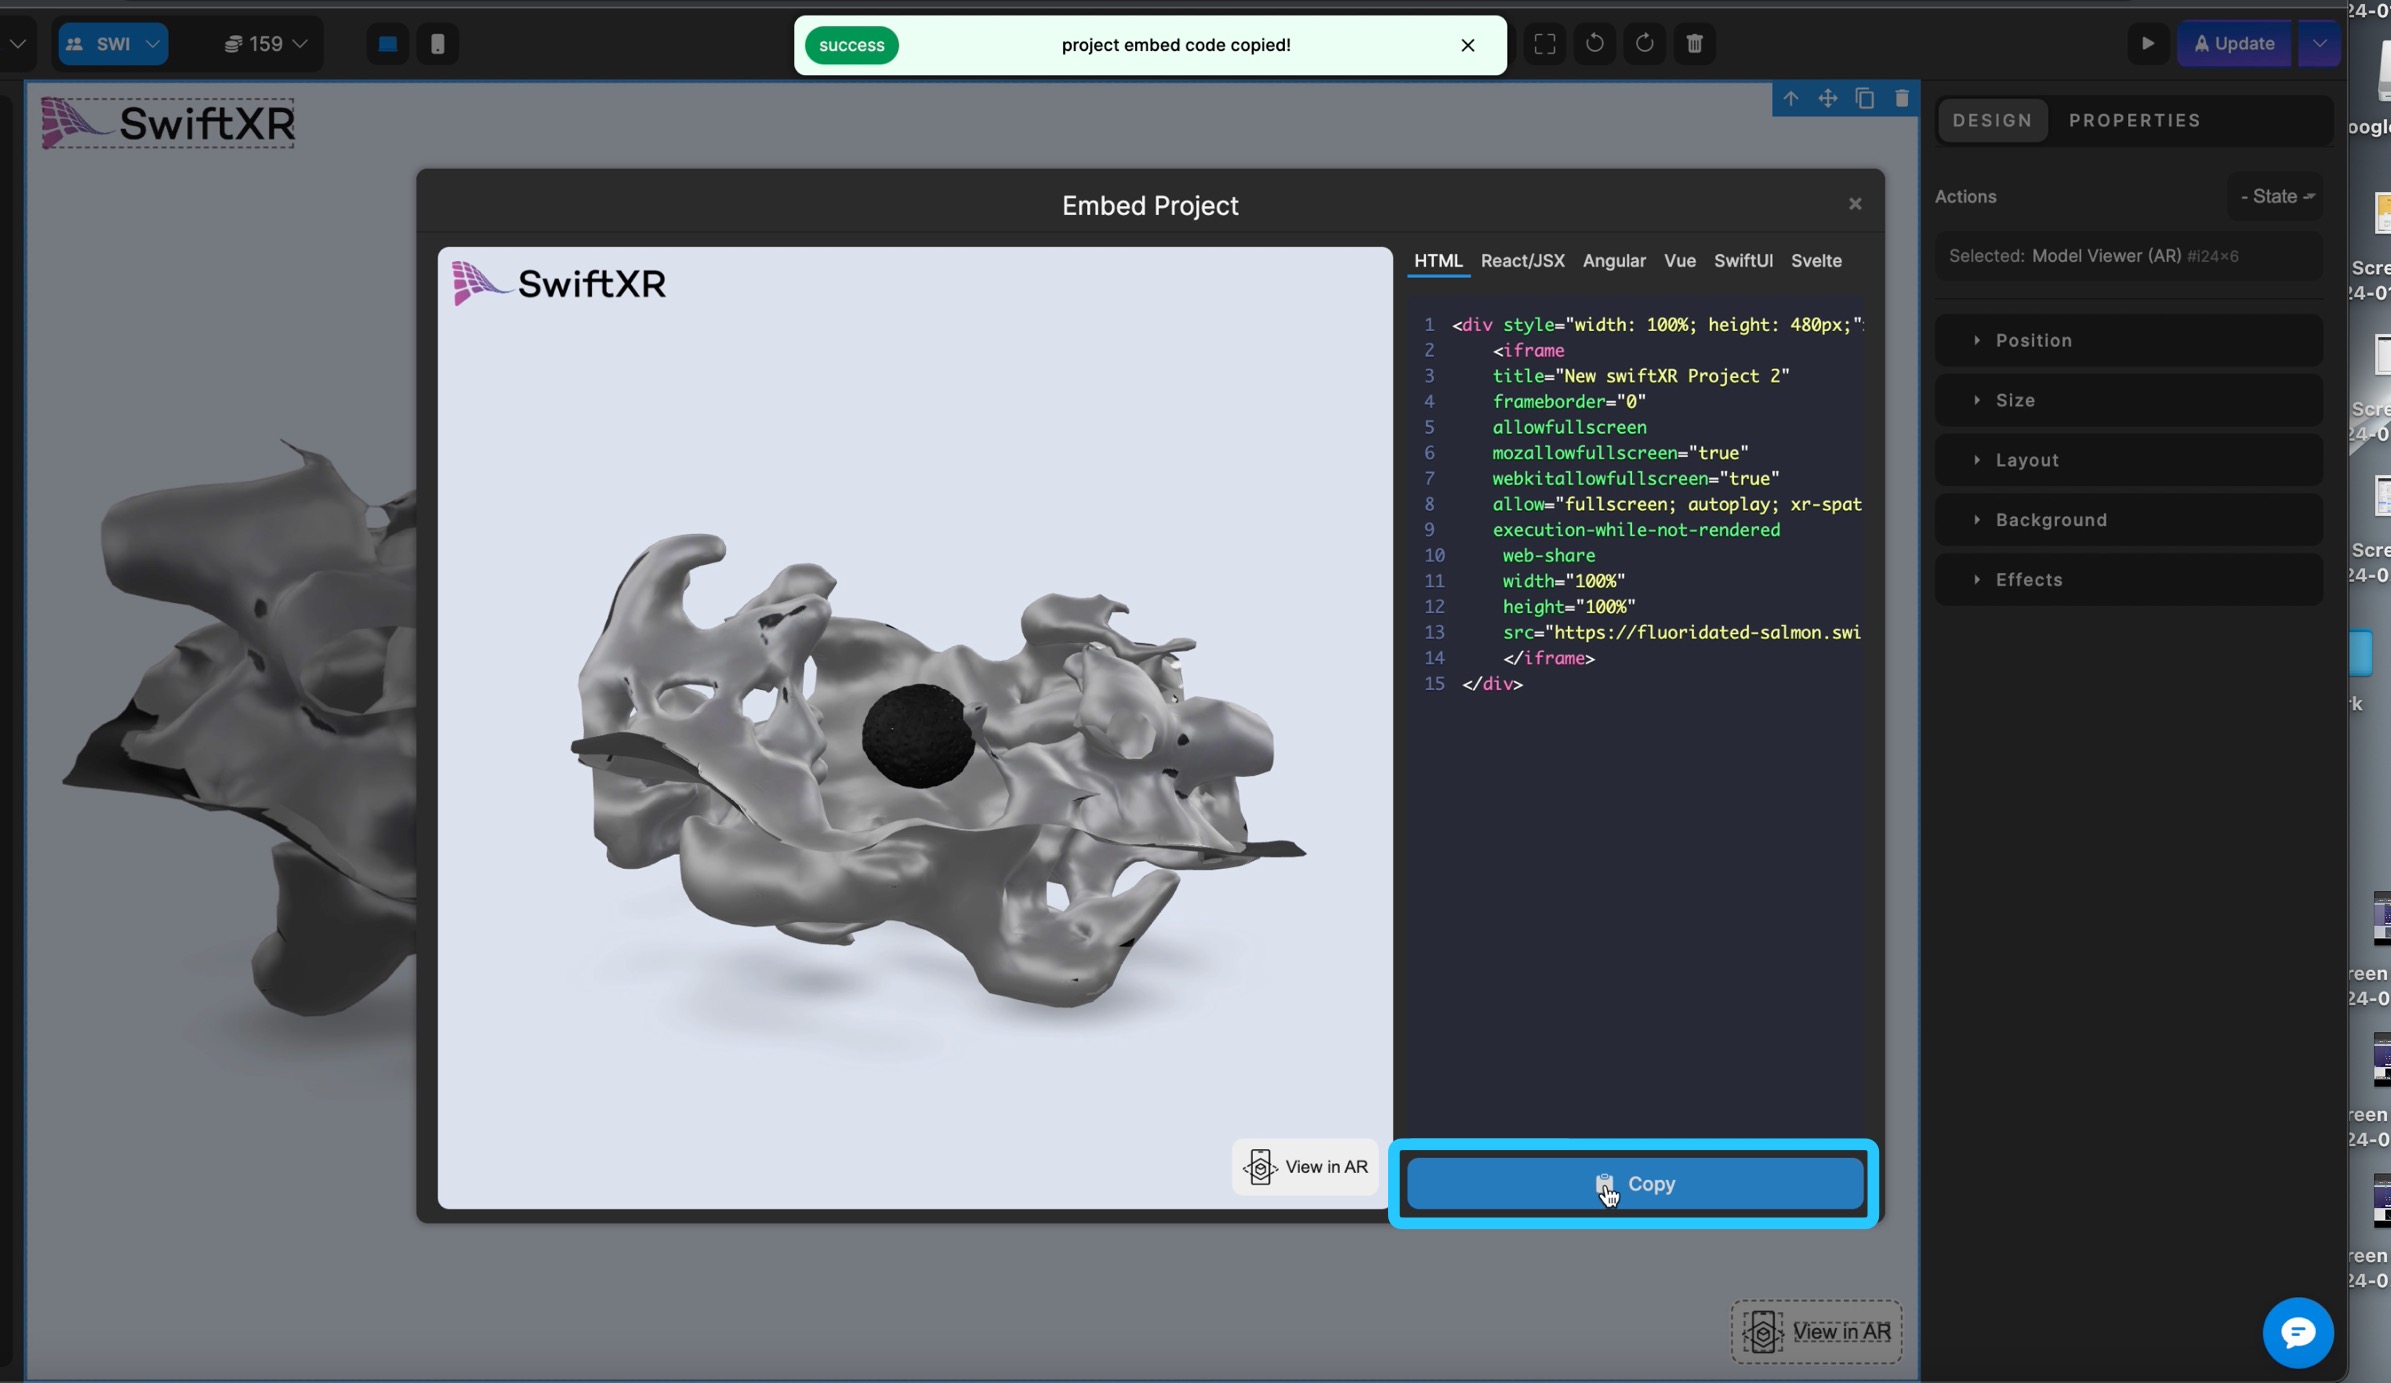
After publishing, click the dropdown button beside the “Update” button and select “Share.” Within the Share modal, click the “Copy Embed” button to copy the embed code for your project

<figure><img src="https://564713456-files.gitbook.io/~/files/v0/b/gitbook-x-prod.appspot.com/o/spaces%2FKNcXDcNRYHUBsVw12Dii%2Fuploads%2FkdYtotZkF7MZcr739akV%2FScreenshot%202025-08-26%20132224.png?alt=media&amp;token=15936141-6ea7-4109-bde8-abb95e4ad3ed" alt=""><figcaption></figcaption></figure>

## Integrating SwiftXR into Bigcommerce Store

* Go to Bigcommerce login or alternatively, click on this link: <https://login.bigcommerce.com/>&#x20;
* Enter your store credentials and access your store admin dashboard.
* From your Bigcommerce dashboard, navigate to “Products” and click on “Add new”

<figure><img src="https://564713456-files.gitbook.io/~/files/v0/b/gitbook-x-prod.appspot.com/o/spaces%2FKNcXDcNRYHUBsVw12Dii%2Fuploads%2F8qGVK3ibqTEkVWMlf38O%2FScreenshot%202025-08-26%20132431.png?alt=media&amp;token=a52abcc2-a829-431f-9f93-8067101c1694" alt=""><figcaption></figcaption></figure>

## Add essential information about your Product

Describe how your product would appear in the Storefront which includes the product name, the quantity of such product and so on

<figure><img src="https://564713456-files.gitbook.io/~/files/v0/b/gitbook-x-prod.appspot.com/o/spaces%2FKNcXDcNRYHUBsVw12Dii%2Fuploads%2F7wPyt3fje3AECzBCnW92%2FScreenshot%202025-08-26%20133022.png?alt=media&amp;token=3932e362-59c6-4e62-881a-01f0986d16d8" alt=""><figcaption></figcaption></figure>

## Add your SwiftXR Embed Code

* In the description below, after describing your product, in the top right corner, you’d see an HTML symbol that looks like this “<>”, click on it and embed your SwiftXR code in it.
* When done, click on “Save” and then click on “View storefront” to explore your product.

<figure><img src="https://564713456-files.gitbook.io/~/files/v0/b/gitbook-x-prod.appspot.com/o/spaces%2FKNcXDcNRYHUBsVw12Dii%2Fuploads%2FASkMyueT4LgV4ksnbcmB%2FScreenshot%202025-08-26%20133350.png?alt=media&amp;token=b6eb0100-d8a4-4433-bcdc-1dbfedfb097f" alt=""><figcaption></figcaption></figure>

## Click on your Product from the Storefront

* After clicking on “View Storefront”, it would direct you to this page where you would see your product, you will click on it

<figure><img src="https://564713456-files.gitbook.io/~/files/v0/b/gitbook-x-prod.appspot.com/o/spaces%2FKNcXDcNRYHUBsVw12Dii%2Fuploads%2FQRnYqs81VMa5WPFZYwS0%2FScreenshot%202025-08-26%20134022.png?alt=media&amp;token=158e8d0c-5012-4118-a89f-135ecfd42f30" alt=""><figcaption></figcaption></figure>

## Viewing your product on the Storefront

* After clicking on your product, you will be redirected to this page below where you can see what your product looks like in the Storefront

<figure><img src="https://564713456-files.gitbook.io/~/files/v0/b/gitbook-x-prod.appspot.com/o/spaces%2FKNcXDcNRYHUBsVw12Dii%2Fuploads%2FFnEq8Ynznk8GPXzlZkXq%2FScreenshot%202025-08-26%20134313.png?alt=media&amp;token=a020a0d2-0b02-4da6-8a47-fc447497a603" alt=""><figcaption></figcaption></figure>

## Experience your Product in 3D/AR

* You can now view the product immersively with the help of SwiftXR in making the product in a 3D format, enabling you to see all the sides of the product.

<figure><img src="https://564713456-files.gitbook.io/~/files/v0/b/gitbook-x-prod.appspot.com/o/spaces%2FKNcXDcNRYHUBsVw12Dii%2Fuploads%2F082cxUrLkZAxTAquGrRZ%2FScreenshot%202025-08-26%20134550.png?alt=media&amp;token=50c0300d-ff0b-416c-a227-80856b0dde08" alt=""><figcaption></figcaption></figure>

## Conclusion

By embedding SwiftXR into your Bigcommerce store, you can provide customers with an interactive 3D and AR shopping experience. Whether you add it through the page builder, custom fields, or theme files, the integration allows shoppers to explore your products in details before making a purchase. This not only improves customers engagement but can also increase conversion rates and reduce product returns.


# Bravarent

Add or embed 3D, Augmented Reality (AR) and Virtual Reality (VR) content/design to your Bravarent website

## Introduction

SwiftXR is a powerful platform for creating and sharing interactive 3D, augmented reality (AR), and virtual reality (VR) experiences on the web. With the SwiftXR (3D/AR/VR) Integration for Bravenet, you can easily integrate SwiftXR Projects into your Bravenet website, enabling you to create immersive  and interactive web experiences.

**Creating a Project in SwiftXR**

* Navigate to the SwiftXR Hub: Begin by visiting the SwiftXR Hub, or alternatively click on this link: <https://swiftxr.io/hub>&#x20;
* Initiate Project Creation: Once on Hub, click the “Create Project” button and enter your desired project name.
* Design or Develop: Utilize the intuitive editor to effortlessly add and customize SwiftXR components, bringing your 3D vision to life

<figure><img src="https://564713456-files.gitbook.io/~/files/v0/b/gitbook-x-prod.appspot.com/o/spaces%2FKNcXDcNRYHUBsVw12Dii%2Fuploads%2FzwVW6xnhzMEkNesPP2PJ%2Fimage.png?alt=media&amp;token=72e06421-64ab-407d-abdb-6b3a6cf0c870" alt=""><figcaption></figcaption></figure>

**Publishing your SwiftXR Project**

* Utilize the editor to create your 3D vision using the SwiftXR components. Once satisfied with your creation, press the “Publish” or “Update” button to make your project live.

<figure><img src="https://564713456-files.gitbook.io/~/files/v0/b/gitbook-x-prod.appspot.com/o/spaces%2FKNcXDcNRYHUBsVw12Dii%2Fuploads%2FrGpUI3sliqZKHxo7L1AR%2Fimage.png?alt=media&amp;token=7e78eed0-d2e8-4c5b-bc98-2d2dd07b8787" alt=""><figcaption></figcaption></figure>

**Copy Embed Code**

* After publishing, click the dropdown button beside the “Update” button and select “Share.” Within the Share modal, click the “Copy Embed” button to copy the embed code for your project.

<figure><img src="https://564713456-files.gitbook.io/~/files/v0/b/gitbook-x-prod.appspot.com/o/spaces%2FKNcXDcNRYHUBsVw12Dii%2Fuploads%2FryMrN1Egfqv4OUJGcWQH%2Fimage.png?alt=media&amp;token=461bfd0a-a592-4c24-85f9-78a9f4501a81" alt=""><figcaption></figcaption></figure>

**Integrating SwiftXR into Bravenet Website**

* Go to [bravenet.com](http://bravenet.com) and Log in if you already have an account, if not simply create an account.
* From your dashboard, open your website project.

<figure><img src="https://564713456-files.gitbook.io/~/files/v0/b/gitbook-x-prod.appspot.com/o/spaces%2FKNcXDcNRYHUBsVw12Dii%2Fuploads%2FPZ8SdNnp5kOkV5rckp8y%2Fimage.png?alt=media&amp;token=2dd30ce6-387b-41d3-821a-72963ccbe3d3" alt=""><figcaption></figcaption></figure>

<br>

**Choose a Template to Start With**\
You would see a lot of templates below, simply select one of them you would like to work with.

<figure><img src="https://564713456-files.gitbook.io/~/files/v0/b/gitbook-x-prod.appspot.com/o/spaces%2FKNcXDcNRYHUBsVw12Dii%2Fuploads%2FS4EVFqtcnwpt4CHisKXR%2Fimage.png?alt=media&amp;token=b48f430f-9a86-45da-9126-ce1d0171403c" alt=""><figcaption></figcaption></figure>

**Add an HTML Element**

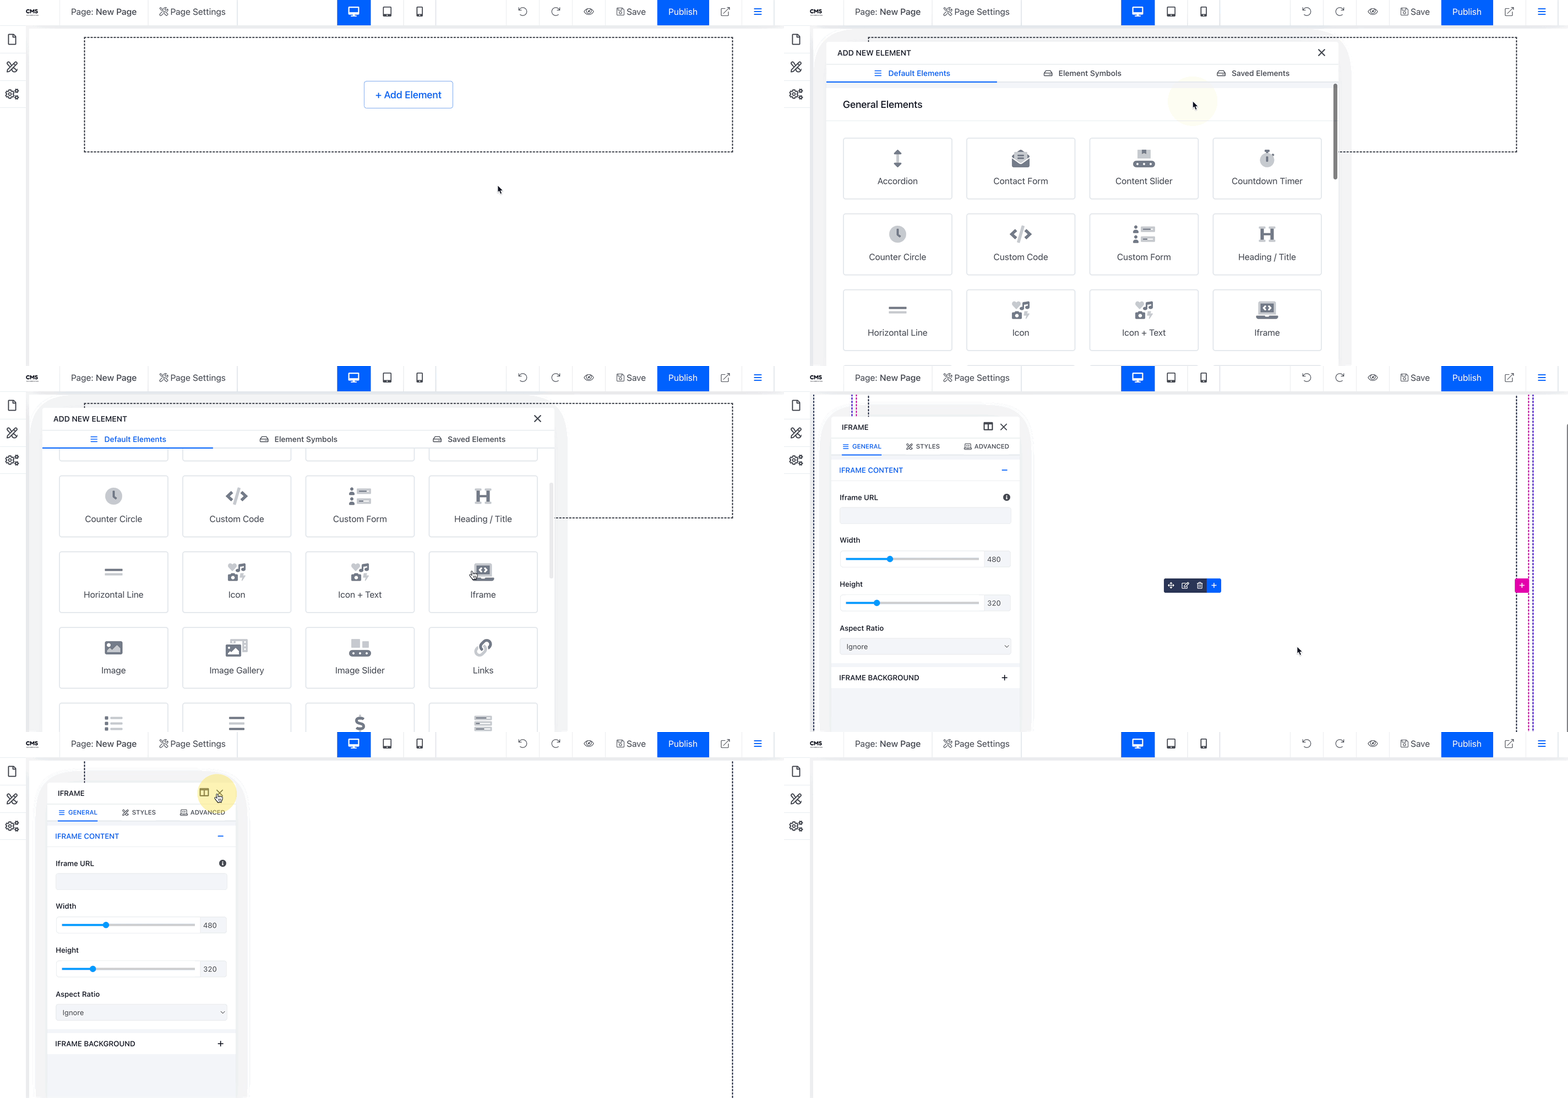
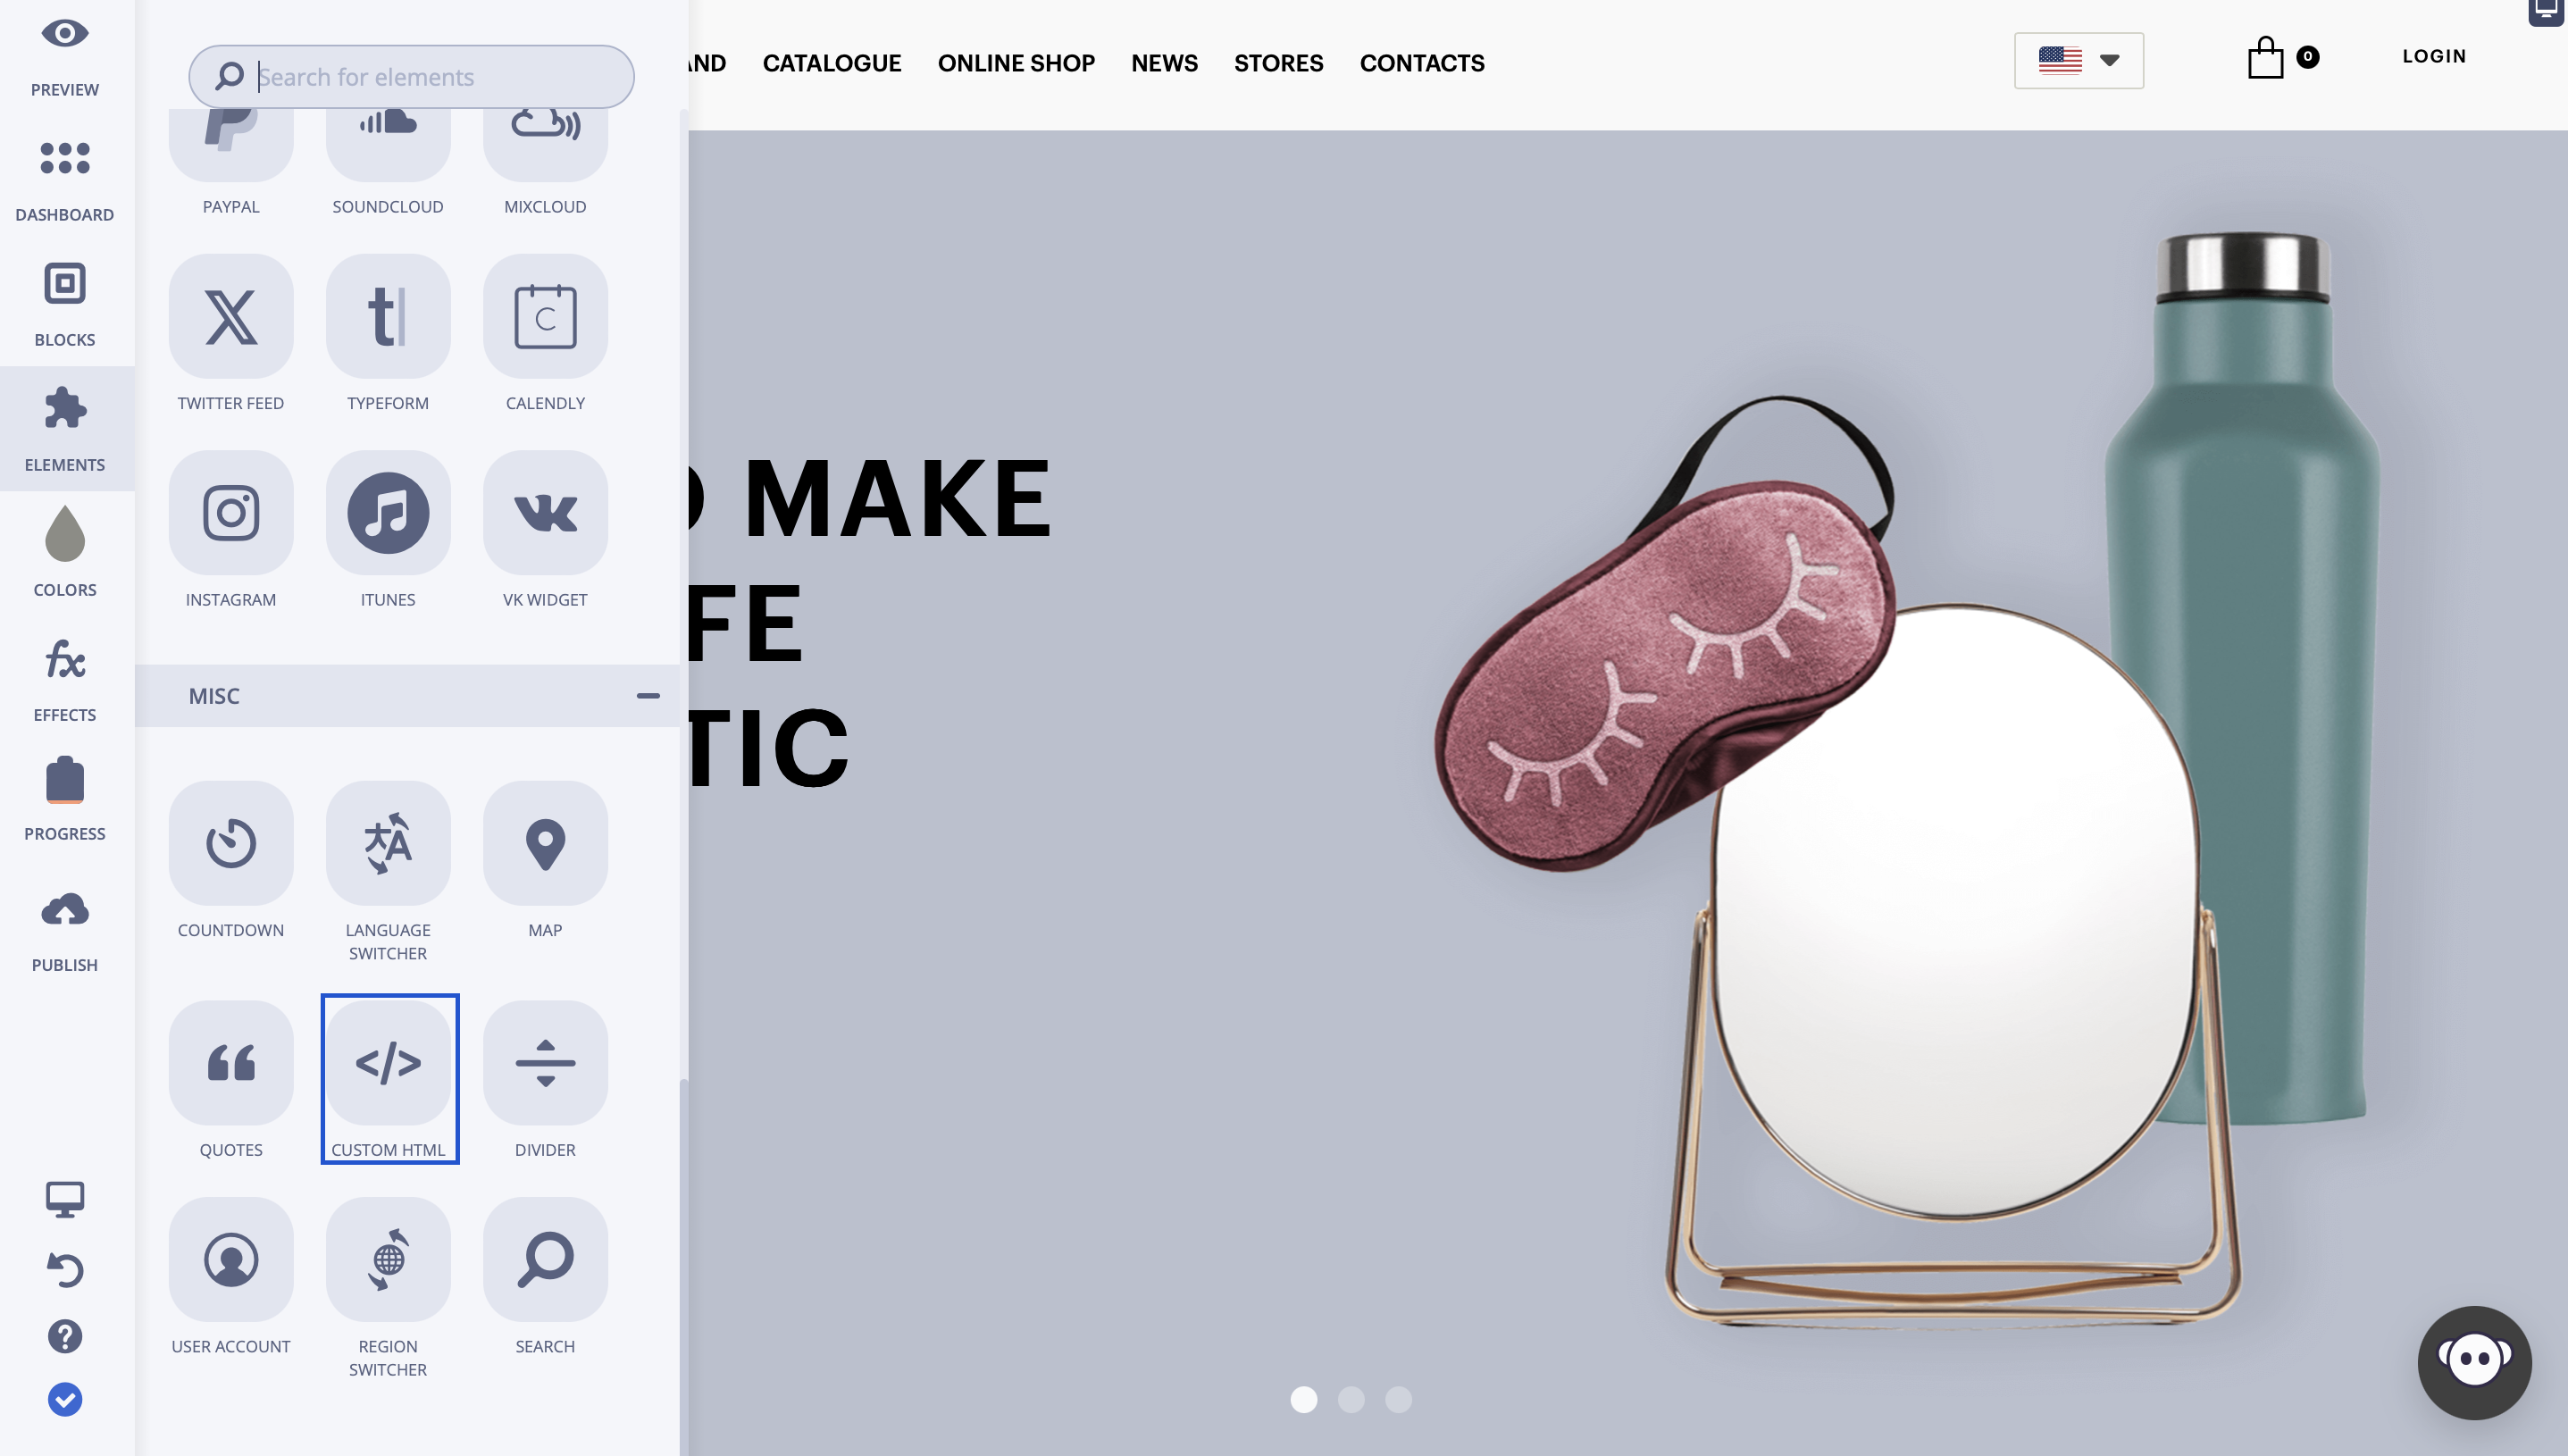
* In the left toolbar, find and select “Custom Code”
* Drag and drop it into the section of your page where you want your 3D/AR model to appear.

<figure><img src="https://564713456-files.gitbook.io/~/files/v0/b/gitbook-x-prod.appspot.com/o/spaces%2FKNcXDcNRYHUBsVw12Dii%2Fuploads%2FitBKzGn4502SVGUlv9ks%2Fimage.png?alt=media&amp;token=db2abfc9-f765-474a-bb50-efb245e0b417" alt=""><figcaption></figcaption></figure>

**Paste your SwiftXR Embed Code**

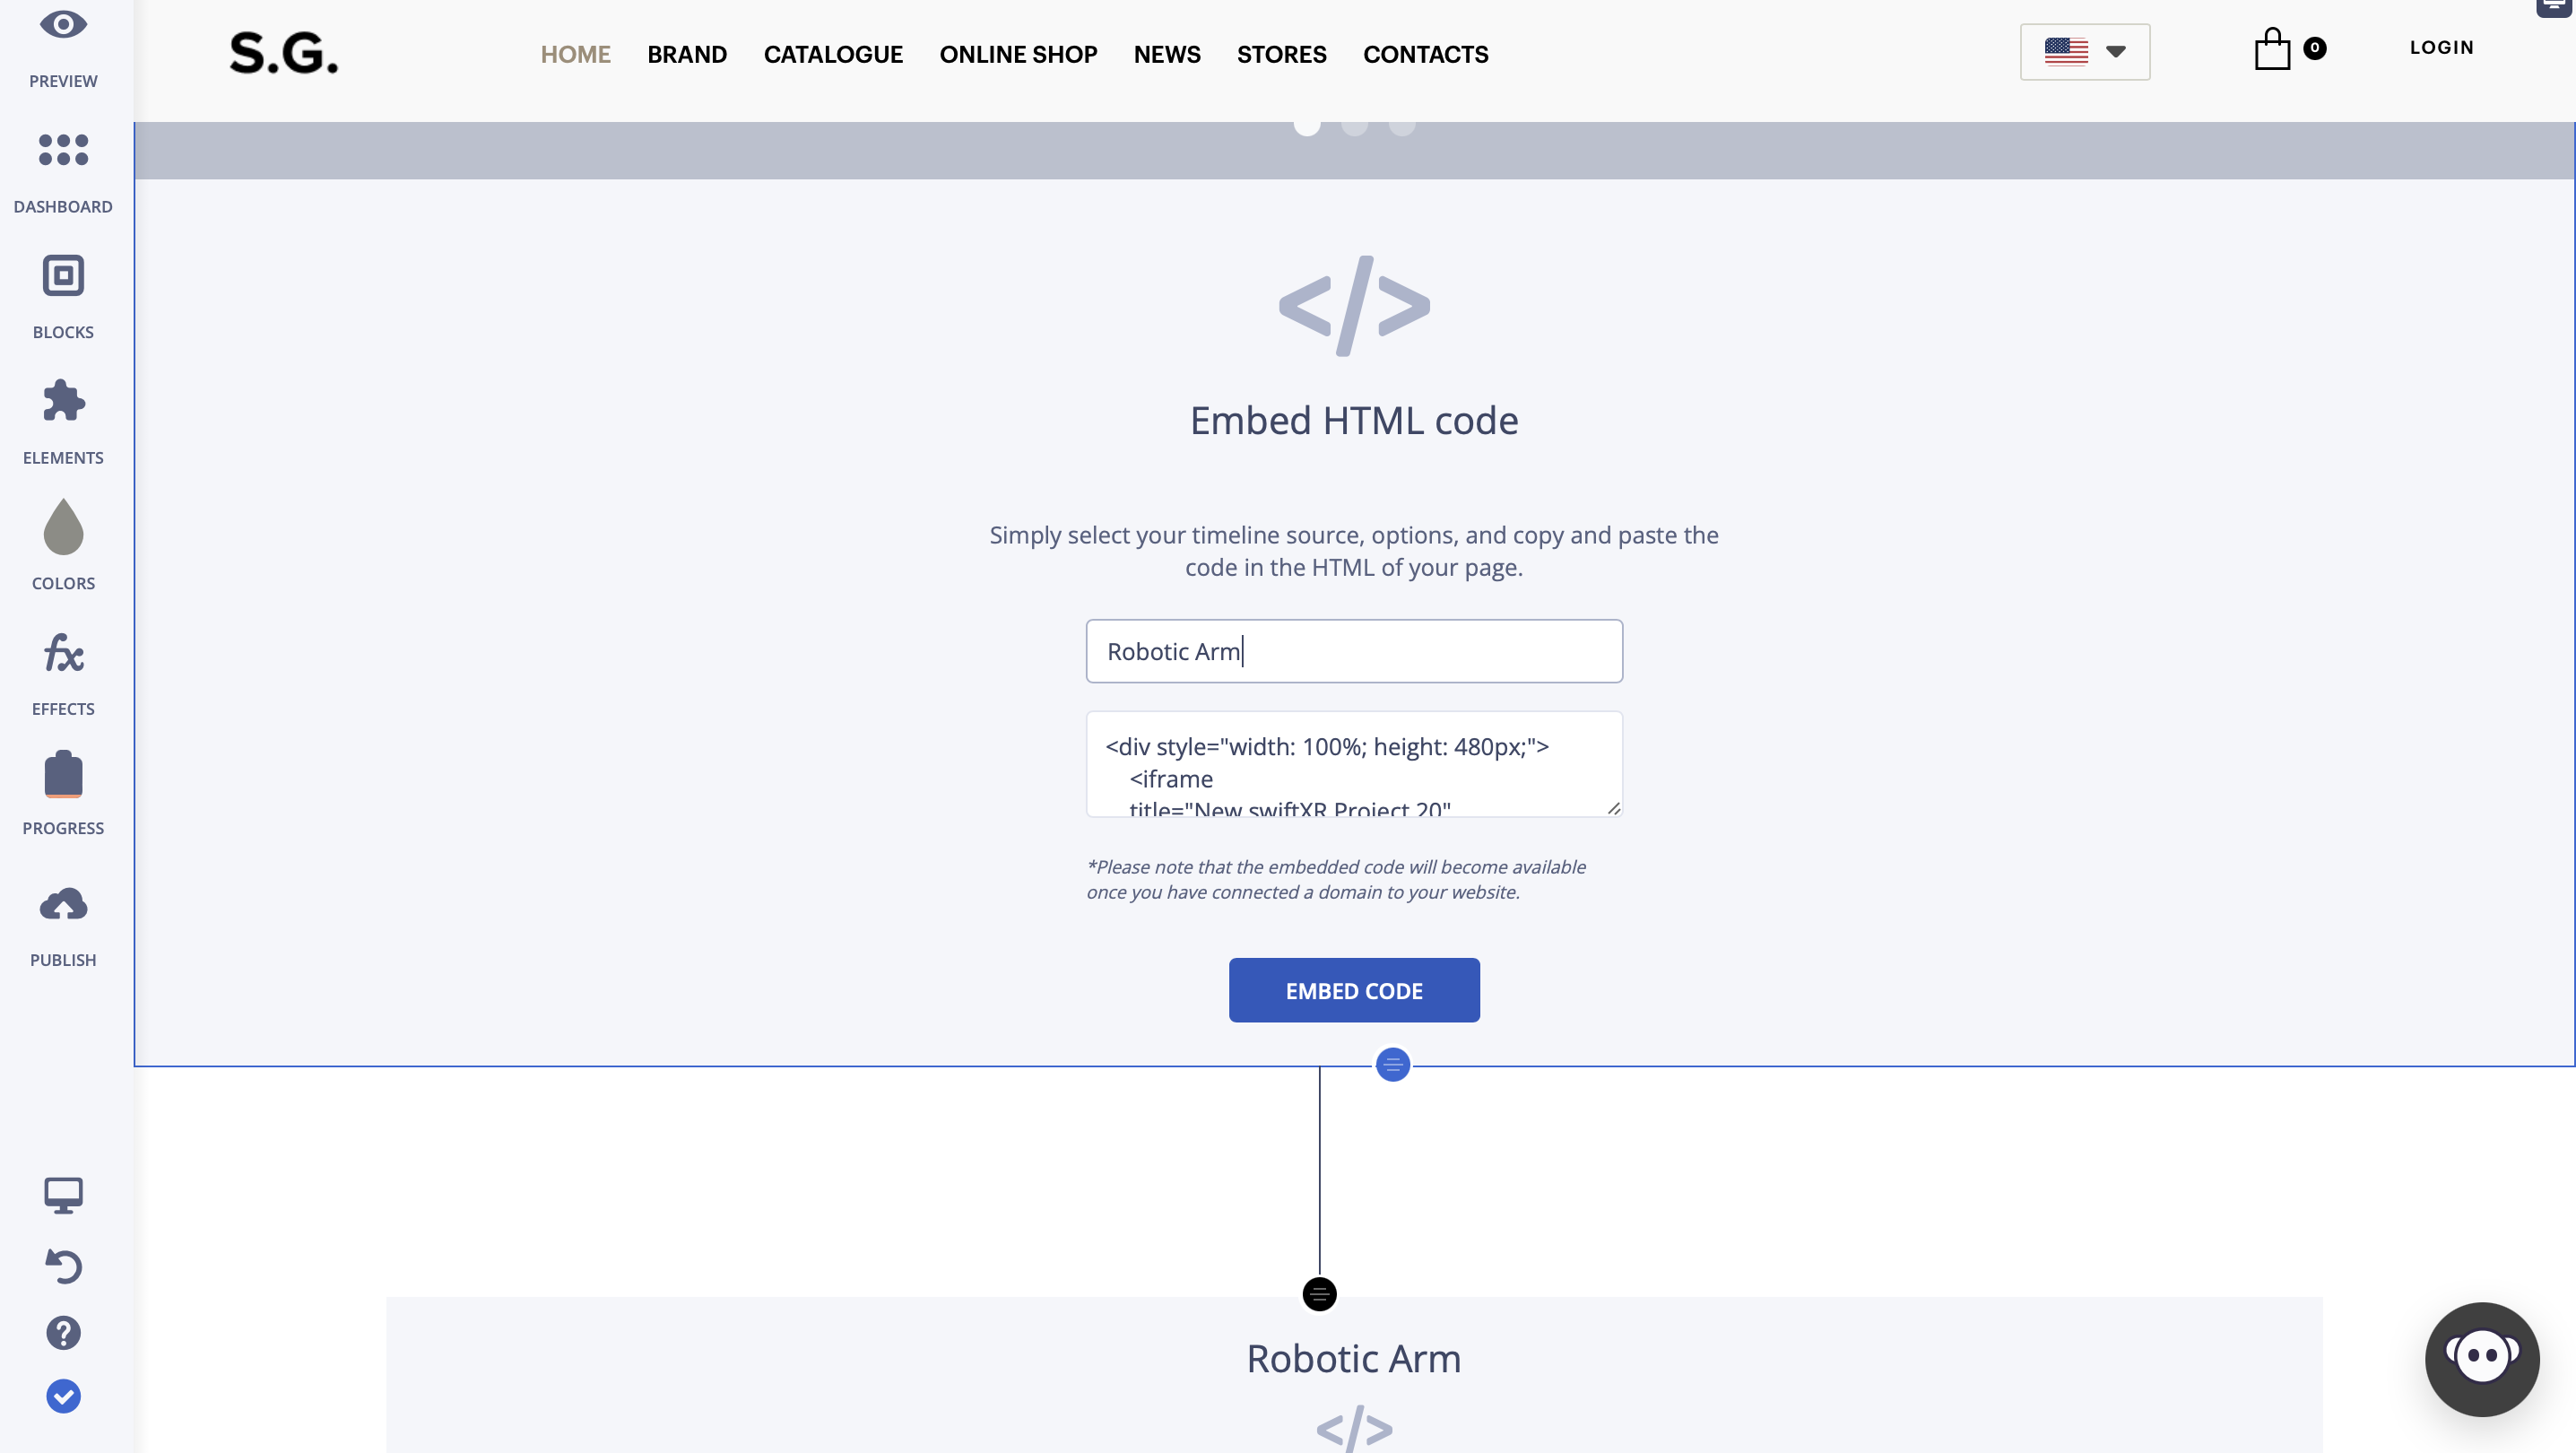
* Paste your SwiftXR iframe code into the Custom HTML editor box in Bravenet.
* Click on “Save Changes” below

<figure><img src="https://564713456-files.gitbook.io/~/files/v0/b/gitbook-x-prod.appspot.com/o/spaces%2FKNcXDcNRYHUBsVw12Dii%2Fuploads%2FhzVGFXmZ6U9iObnUCOjR%2Fimage.png?alt=media&amp;token=57df0542-c842-4026-936c-df832e0640ec" alt=""><figcaption></figcaption></figure>

**Viewing your Product in the Website**

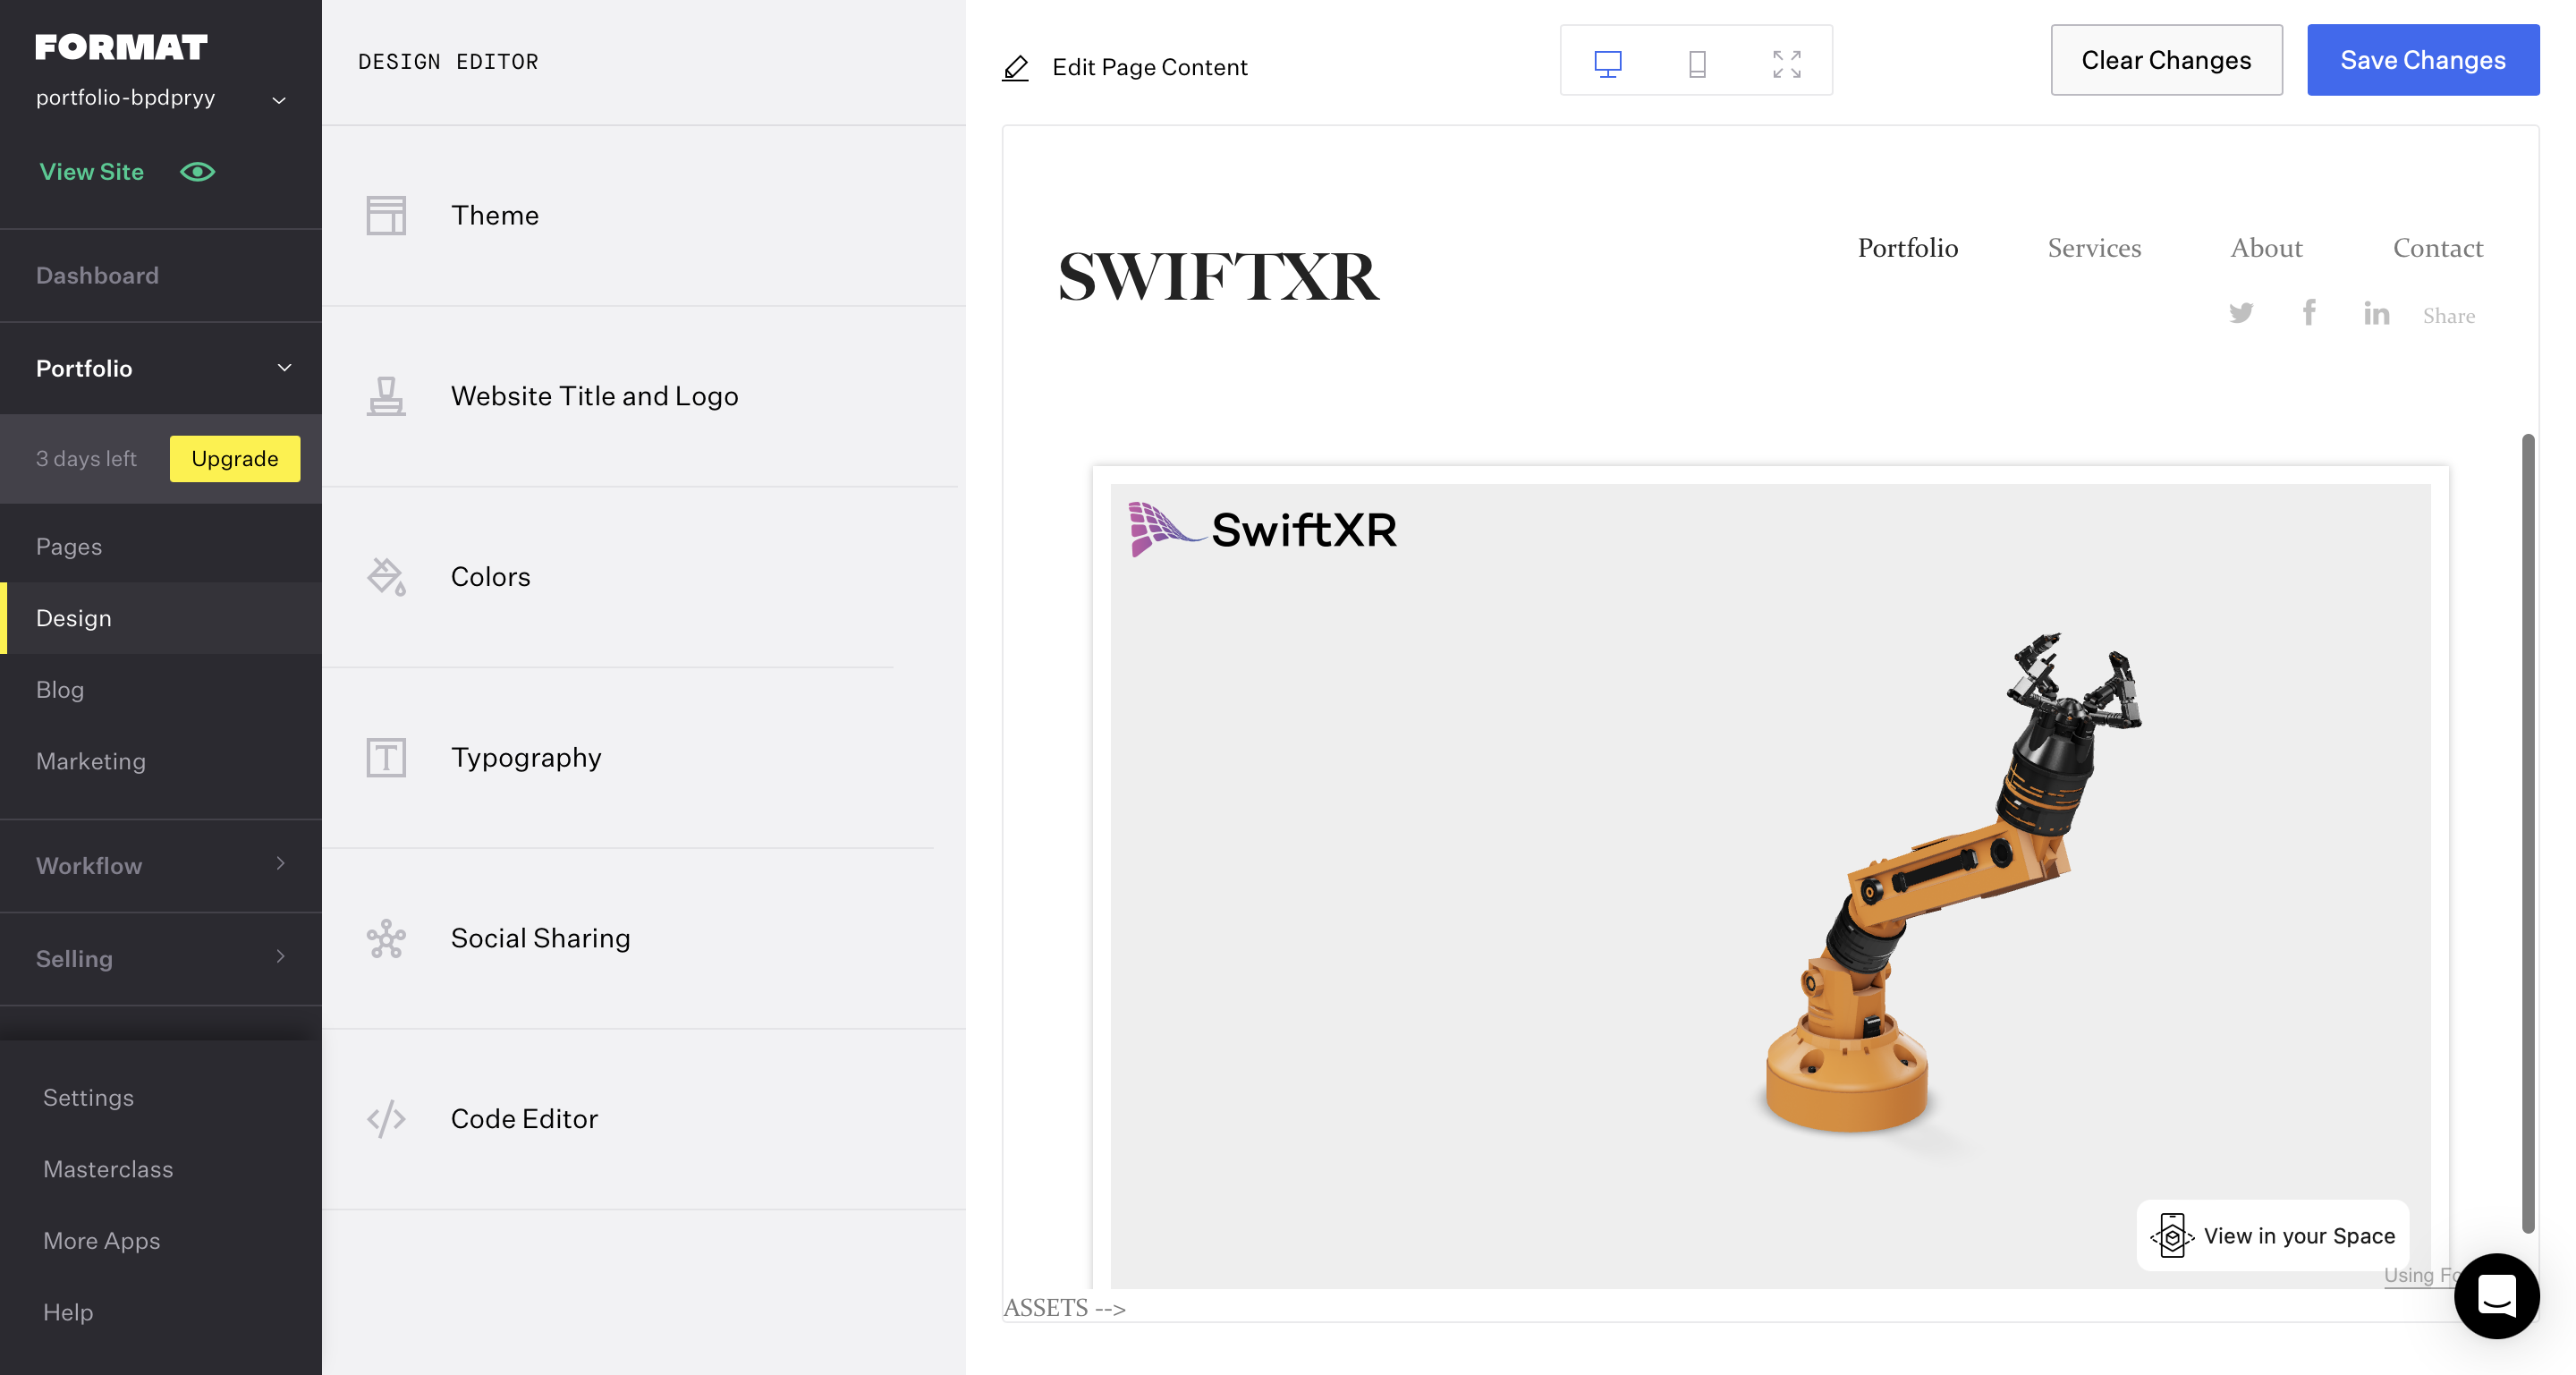
* After pasting your SwiftXR iframe embed code, you would see the result in the website.

<figure><img src="https://564713456-files.gitbook.io/~/files/v0/b/gitbook-x-prod.appspot.com/o/spaces%2FKNcXDcNRYHUBsVw12Dii%2Fuploads%2FgEHWQDHIBiDwvXaJyHpN%2Fimage.png?alt=media&amp;token=d8d8527a-ce18-4d15-abfc-892da36f8c62" alt=""><figcaption></figcaption></figure>

**Preview Your Live Site**

* Click on “Site” in the left bottom corner of your screen, it would bring a list of options, click on “Site Managers”

<figure><img src="https://564713456-files.gitbook.io/~/files/v0/b/gitbook-x-prod.appspot.com/o/spaces%2FKNcXDcNRYHUBsVw12Dii%2Fuploads%2FOs5XwH7WI8DiH0DZ2LZ0%2Fimage.png?alt=media&amp;token=97da295e-763e-410e-8e53-1e3db5481fe9" alt=""><figcaption></figcaption></figure>

* It would bring a link, copy the link and paste it in a different tab to view your live product.
* Click “Done

<figure><img src="https://564713456-files.gitbook.io/~/files/v0/b/gitbook-x-prod.appspot.com/o/spaces%2FKNcXDcNRYHUBsVw12Dii%2Fuploads%2FkmcXo38lplONSDkH2bCy%2Fimage.png?alt=media&amp;token=7c06496f-281b-464f-ab6d-c70d0b250e5b" alt=""><figcaption></figcaption></figure>

Viewing your Scene in the Web, AR or VR

* After pasting the link in another tab, your SwiftXR 3D/AR project should now appear embedded on the page.

<figure><img src="https://564713456-files.gitbook.io/~/files/v0/b/gitbook-x-prod.appspot.com/o/spaces%2FKNcXDcNRYHUBsVw12Dii%2Fuploads%2FJTfoZDiKnclH2F2tZDe0%2Fimage.png?alt=media&amp;token=c88496b8-1852-4d8f-8fda-f459522e6323" alt=""><figcaption></figcaption></figure>

<br>

**Conclusion**

Bravenet allows SwiftXR integration without needing a paid plan. By using the Custom HTML element, you can easily embed interactive 3D and AR projects anywhere on your site. This makes Bravenet a simple and free way to share immersive content online.

<br>


# Brizy

Add or embed 3D, Augmented Reality (AR), and Virtual Reality (VR) content/design to your Brizy website

Introduction

SwiftXR is a powerful platform for creating and sharing interactive 3D, augmented reality (AR), and virtual reality (VR) experiences on the web. With the SwiftXR (3D/AR/VR) Integration for Brizy, you can easily integrate SwiftXR Projects into your Brizy websites, enabling you to create immersive and interactive web experiences

## Creating a Project in SwiftXR

Before starting, ensure you have a [SwiftXR account](https://home.swiftxr.io/)

* Navigate to [SwiftXR Hub](https://swiftxr.io/hub)
* Initiate Project Creation: Once on Hub, click the "Create Project" button and enter your desired project name.
* Design and Develop: Utilize the intuitive editor to effortlessly add and customize SwiftXR components, bringing your 3D vision to life

<figure><img src="https://564713456-files.gitbook.io/~/files/v0/b/gitbook-x-prod.appspot.com/o/spaces%2FKNcXDcNRYHUBsVw12Dii%2Fuploads%2FzMrvDgGWfMK1kWDnIEJE%2FWhatsApp%20Image%202025-05-15%20at%2015.29.53.jpeg?alt=media&amp;token=56e73d7f-0b46-41ad-8767-12aa2d8c6f12" alt=""><figcaption></figcaption></figure>

## Publishing your SwiftXR Project

Utilize the editor to create your 3D vision using the SwiftXR components. Once satisfied with your creation, click on the "Publish" or "Update" button to make your project live.

<br>

<figure><img src="https://564713456-files.gitbook.io/~/files/v0/b/gitbook-x-prod.appspot.com/o/spaces%2FKNcXDcNRYHUBsVw12Dii%2Fuploads%2FCyQrTFPpj8R9xY7meB8V%2FWhatsApp%20Image%202025-05-15%20at%2015.29.53%20(1).jpeg?alt=media&amp;token=055c620a-8835-45c3-a357-387945bf6643" alt=""><figcaption></figcaption></figure>

## Copy Embed Code

After publishing, click the dropdown icon beside the "Update" button, select "Embed Code” from the listed options and copy the embed code by clicking on the "Copy" button

<figure><img src="https://564713456-files.gitbook.io/~/files/v0/b/gitbook-x-prod.appspot.com/o/spaces%2FKNcXDcNRYHUBsVw12Dii%2Fuploads%2FuOKdRmACqfigWzmEgrrH%2FWhatsApp%20Image%202025-05-15%20at%2015.29.51.jpeg?alt=media&amp;token=9c8b3512-8873-4e5f-9bf1-ac9b35d29496" alt=""><figcaption></figcaption></figure>

## Integrating SwiftXR into Brizy Website

* Launch the editor of your Brizy website/prototype in which you want to integrate 3D/AR/VR.
* Add Embed Component: Click on the (+) button in the column where you want to add your embed code; drag and drop the “Embed” element from the left sidebar into your column, click on embed field and choose the first option icon representing “Embed”.
* Paste Embed Code: Paste your Embed code in the empty field provided.

<figure><img src="https://564713456-files.gitbook.io/~/files/v0/b/gitbook-x-prod.appspot.com/o/spaces%2FKNcXDcNRYHUBsVw12Dii%2Fuploads%2FBVRYobSbUEWV63M3jtgj%2FWhatsApp%20Image%202025-05-15%20at%2015.29.49.jpeg?alt=media&amp;token=08cda78c-f294-442f-afdb-498bafccbe43" alt=""><figcaption></figcaption></figure>

## Viewing your Scenes in Web, AR or VR

Update and Publish your Project on Brizy, and view the link on any device to explore it immersively.

<br>

<figure><img src="https://564713456-files.gitbook.io/~/files/v0/b/gitbook-x-prod.appspot.com/o/spaces%2FKNcXDcNRYHUBsVw12Dii%2Fuploads%2Fq4x1tgOb2MdExrSoZ4F1%2FWhatsApp%20Image%202025-05-15%20at%2015.29.50.jpeg?alt=media&amp;token=c7949b36-efb5-4799-90f1-da5ef30178a4" alt=""><figcaption></figcaption></figure>

## Conclusion

By integrating SwiftXR with Brizy, you can seamlessly blend 3D elements into your web prototypes, creating more engaging and interactive experiences for your users. Explore the possibilities of using SwiftXR to enhance your Brizy prototypes and bring your ideas to life in an immersive and interactive way.

<br>


# Blender

Export and Embed Blender Scenes in 3D, AR, and VR Experiences

SwiftXR is a powerful platform for creating and sharing interactive 3D, augmented reality (AR), and virtual reality (VR) experiences on the web. With the SwiftXR (3D/AR/VR) Add-On for Blender, you can


# Version 4.1 or Below

Export your Blender scenes for the web with SwiftXR's (3D/AR/VR) Add-On

[Download Add-on](https://swiftxr-static-assets.nyc3.digitaloceanspaces.com/blender-add-on%2Fswiftxr-blender-addon-1.0.2.zip)

<figure><img src="https://docs.swiftxr.io/img/3d/blender/swiftxr-blender-main.jpg" alt=""><figcaption></figcaption></figure>

### Introduction <a href="#introduction" id="introduction"></a>

SwiftXR is a powerful platform for creating and sharing interactive 3D, augmented reality (AR), and virtual reality (VR) experiences on the web. With the SwiftXR (3D/AR/VR) Add-On for Blender, you can easily export your 3D scenes and models directly into the SwiftXR platform, enabling you to showcase your work to clients and colleagues in an immersive, interactive format.

### Installing the Add-On <a href="#installing-the-add-on" id="installing-the-add-on"></a>

To get started, download the SwiftXR (3D/AR/VR) Add-On for Blender from [here](https://swiftxr-static-assets.nyc3.digitaloceanspaces.com/blender-add-on%2Fswiftxr-blender-addon-1.0.2.zip). Once you've downloaded the Add-On, open Blender and navigate to Edit > Preferences > Add-ons. Click on the "Install" button and select the swiftxr-exporter.py file.

<figure><img src="https://docs.swiftxr.io/img/3d/blender/swiftxr-blender-pref.jpg" alt=""><figcaption></figcaption></figure>

### Setting up your API Key <a href="#setting-up-your-api-key" id="setting-up-your-api-key"></a>

To generate an API key, you'll first need to create a SwiftXR account (if you don't have one already). Once you've created your account, navigate to the [SwiftXR Settings](https://swiftxr.io/hub/account) page and click the "Create API Key" button to generate a new API key. Copy the API key and input it into the SwiftXR Exporter Blender preference.

<figure><img src="https://docs.swiftxr.io/img/3d/blender/swiftxr-blender-swiftxr-pref.jpg" alt=""><figcaption></figcaption></figure>

### Setup Up your SwiftXR Domain <a href="#exporting-your-scene" id="exporting-your-scene"></a>

In your  [SwiftXR Settings](https://swiftxr.io/hub/account) , configure your custom domain to ensure seamless access to your projects. Once set up, your projects will be available at: `<domain-name>.swiftxr.site/<project-name>`

This step simplifies sharing and improves accessibility for your immersive experiences!

<figure><img src="https://564713456-files.gitbook.io/~/files/v0/b/gitbook-x-prod.appspot.com/o/spaces%2FKNcXDcNRYHUBsVw12Dii%2Fuploads%2FAjCPBi1dRXF7v0Ab8XRw%2FScreenshot%202025-01-07%20084809.jpg?alt=media&amp;token=d101b6cd-c49e-4d2d-9df8-85efc2dc5bbe" alt=""><figcaption></figcaption></figure>

### Exporting your Scene <a href="#exporting-your-scene" id="exporting-your-scene"></a>

After you've created your 3D scene in Blender, it's time to export it for use in SwiftXR. Click on File > Export > SwiftXR (3D/AR/VR) Viewer to bring up the SwiftXR Exporter options. Here, you can specify the project name (which will be used to generate the website URL), the export mode (3D or AR), the assets to include, and the compression level.

<figure><img src="https://docs.swiftxr.io/img/3d/blender/swiftxr-blender-exporter.jpg" alt=""><figcaption></figcaption></figure>

### Viewing your Scene in the Web and AR <a href="#viewing-your-scene-in-the-web-and-ar" id="viewing-your-scene-in-the-web-and-ar"></a>

Once your project has been successfully exported, SwiftXR will automatically open a URL for your project. You can share this URL with others to view your 3D scene in the web or augmented reality (if you selected the AR export mode).

<figure><img src="https://docs.swiftxr.io/img/3d/blender/swiftxr-blender-web-view.jpg" alt=""><figcaption></figcaption></figure>

### Conclusion <a href="#conclusion" id="conclusion"></a>

With the SwiftXR (3D/AR/VR) Add-On for Blender, you can quickly and easily export your 3D scenes for use on the web and in AR, bringing your designs and creations to life in an interactive and immersive format. If you encounter any issues, be sure to send an email to <support@swiftxr.io> or visit our [discord page](https://discord.gg/hT3zuJgQAw) for live support.


# Version 4.2 or Above

Export your Blender scenes for the web with SwiftXR's (3D/AR/VR) Add-On

[Download Add-on](https://github.com/swiftXR/swiftxr-blender-plugin/archive/refs/tags/1.0.3-patch.zip)

<figure><img src="https://564713456-files.gitbook.io/~/files/v0/b/gitbook-x-prod.appspot.com/o/spaces%2FKNcXDcNRYHUBsVw12Dii%2Fuploads%2FfESc5nk4yp6WmjpCYxoQ%2FScreenshot%202024-07-23%20204128.png?alt=media&amp;token=f875f344-62ca-4fbd-9ba0-faf71ec7ede8" alt=""><figcaption></figcaption></figure>

### Introduction <a href="#introduction" id="introduction"></a>

SwiftXR is a powerful platform for creating and sharing interactive 3D, augmented reality (AR), and virtual reality (VR) experiences on the web. With the SwiftXR (3D/AR/VR) Add-On for Blender, you can easily export your 3D scenes and models directly into the SwiftXR platform, enabling you to showcase your work to clients and colleagues in an immersive, interactive format.

### Installing the Add-On <a href="#installing-the-add-on" id="installing-the-add-on"></a>

To get started, download the SwiftXR (3D/AR/VR) Add-On for Blender from [here](https://github.com/swiftXR/swiftxr-blender-plugin/archive/refs/tags/1.0.3-patch.zip). Once you've downloaded the Add-On, open Blender and navigate to Edit > Preferences > Add-ons. Click on the "Install" button and select the swiftxr-blender-plugin-x.x.x.zip file.

<figure><img src="https://564713456-files.gitbook.io/~/files/v0/b/gitbook-x-prod.appspot.com/o/spaces%2FKNcXDcNRYHUBsVw12Dii%2Fuploads%2FFCcbak6n5kXjMhO5IEew%2FScreenshot%202024-07-24%20083224.png?alt=media&amp;token=b8e1a5cd-7cfc-4365-a87f-b6a8b7abdde8" alt=""><figcaption></figcaption></figure>

### Setting up your API Key <a href="#setting-up-your-api-key" id="setting-up-your-api-key"></a>

To generate an API key, you'll first need to create a SwiftXR account (if you don't have one already). Once you've created your account, navigate to the [SwiftXR Settings](https://swiftxr.io/hub/account) page and click the "Create API Key" button to generate a new API key. Copy the API key and input it into the SwiftXR Exporter Blender preference.

<figure><img src="https://564713456-files.gitbook.io/~/files/v0/b/gitbook-x-prod.appspot.com/o/spaces%2FKNcXDcNRYHUBsVw12Dii%2Fuploads%2FIvR5hGqrBxbuK5kZw9kO%2FScreenshot%202024-07-24%20083714.jpg?alt=media&amp;token=6c3d434b-938b-4f16-a352-dc807fbadc31" alt=""><figcaption></figcaption></figure>

### Setup Up your SwiftXR Domain <a href="#exporting-your-scene" id="exporting-your-scene"></a>

In your  [SwiftXR Settings](https://swiftxr.io/hub/account), configure your custom domain to ensure seamless access to your projects. Once set up, your projects will be available at: `<domain-name>.swiftxr.site/<project-name>`

This step simplifies sharing and improves accessibility for your immersive experiences!

<figure><img src="https://564713456-files.gitbook.io/~/files/v0/b/gitbook-x-prod.appspot.com/o/spaces%2FKNcXDcNRYHUBsVw12Dii%2Fuploads%2FAjCPBi1dRXF7v0Ab8XRw%2FScreenshot%202025-01-07%20084809.jpg?alt=media&amp;token=d101b6cd-c49e-4d2d-9df8-85efc2dc5bbe" alt=""><figcaption></figcaption></figure>

### Exporting your Scene <a href="#exporting-your-scene" id="exporting-your-scene"></a>

After you've created your 3D scene in Blender, it's time to export it for use in SwiftXR. Click on File > Export > SwiftXR (3D/AR/VR) Viewer to bring up the SwiftXR Exporter options. Here, you can specify the project name (which will be used to generate the website URL), the export mode (3D or AR), the assets to include, and the compression level.

<figure><img src="https://docs.swiftxr.io/img/3d/blender/swiftxr-blender-exporter.jpg" alt=""><figcaption></figcaption></figure>

### Viewing your Scene in the Web and AR <a href="#viewing-your-scene-in-the-web-and-ar" id="viewing-your-scene-in-the-web-and-ar"></a>

Once your project has been successfully exported, SwiftXR will automatically open a URL for your project. You can share this URL with others to view your 3D scene in the web or augmented reality (if you selected the AR export mode).

<figure><img src="https://docs.swiftxr.io/img/3d/blender/swiftxr-blender-web-view.jpg" alt=""><figcaption></figcaption></figure>

### Conclusion <a href="#conclusion" id="conclusion"></a>

With the SwiftXR (3D/AR/VR) Add-On for Blender, you can quickly and easily export your 3D scenes for use on the web and in AR, bringing your designs and creations to life in an interactive and immersive format. If you encounter any issues, be sure to send an email to <support@swiftxr.io> or visit our [discord page](https://discord.gg/hT3zuJgQAw) for live support.


# Bubble

Add or embed 3D, Augmented Reality (AR), and Virtual Reality (VR) content/design to your Bubble Website

<figure><img src="https://564713456-files.gitbook.io/~/files/v0/b/gitbook-x-prod.appspot.com/o/spaces%2FKNcXDcNRYHUBsVw12Dii%2Fuploads%2FiLLmsQmLkFs5l3Qpczn7%2FWhatsApp%20Image%202025-05-16%20at%2002.46.13%20(1).jpeg?alt=media&amp;token=896aa084-ccf4-4430-96bd-4167e28d580f" alt=""><figcaption></figcaption></figure>

## Introduction

SwiftXR is a powerful platform for creating and sharing interactive 3D, augmented reality (AR), and virtual reality (VR) experiences on the web. With the SwiftXR (3D/AR/VR) plugin for Bubble, you can easily integrate 3D scenes and models into your Bubble websites, enabling you to create immersive and interactive web experiences.

## Install the Plugin

1. Open your Bubble Project

Launch Bubble and open the editor for your desired project.

2. Go to Plugins

Click on the Plugins icon in the left-hand sidebar. This opens the list of plugins currently installed in your project.

<figure><img src="https://564713456-files.gitbook.io/~/files/v0/b/gitbook-x-prod.appspot.com/o/spaces%2FKNcXDcNRYHUBsVw12Dii%2Fuploads%2FV1VS3zl3NzEJ1qFXX6WL%2FWhatsApp%20Image%202025-05-16%20at%2002.46.14%20(1).jpeg?alt=media&amp;token=5e51dc1c-bd1f-40a9-83fc-ecbb0545b423" alt=""><figcaption></figcaption></figure>

## Install the SwiftXR Plugin

Click the “Add plugins” button, search for “SwiftXR”, and click install to add it to your project.

<br>

<figure><img src="https://564713456-files.gitbook.io/~/files/v0/b/gitbook-x-prod.appspot.com/o/spaces%2FKNcXDcNRYHUBsVw12Dii%2Fuploads%2FnJ5C5eIg0NIhLxxg7BJi%2FWhatsApp%20Image%202025-05-16%20at%2002.46.15.jpeg?alt=media&amp;token=1ae0dc00-8a34-474c-b912-88b884fe5865" alt=""><figcaption></figcaption></figure>

You can now return to your editor to start implementing the plugin

<figure><img src="https://564713456-files.gitbook.io/~/files/v0/b/gitbook-x-prod.appspot.com/o/spaces%2FKNcXDcNRYHUBsVw12Dii%2Fuploads%2Fl9YNokMlVQ4IxkVuD5LD%2FWhatsApp%20Image%202025-05-16%20at%2002.46.14.jpeg?alt=media&amp;token=aeb06d10-4edb-4af2-91d8-94a6e4552fcc" alt=""><figcaption></figcaption></figure>

## Integrating SwiftXR into Bubble Website

Start by creating a Project on the SwiftXR platform to bring your 3D vision to life;

* See guide:  [Step-by-step guide to creating a Project](https://guide.swiftxr.io/creating-a-project)
* Design and Develop: Utilize the intuitive editor to effortlessly add and customize SwiftXR components, bringing your 3D vision to life
* Publish your Project and copy the project link

<figure><img src="https://564713456-files.gitbook.io/~/files/v0/b/gitbook-x-prod.appspot.com/o/spaces%2FKNcXDcNRYHUBsVw12Dii%2Fuploads%2FFN2aXtfa6WeTxEeEvAge%2FWhatsApp%20Image%202025-05-16%20at%2002.46.13.jpeg?alt=media&amp;token=a7873345-1f9e-452e-8175-171ff3c5b724" alt=""><figcaption></figcaption></figure>

* Return to your editor on Bubble.
* In the left side bar, under “Visual Elements”, drag and drop the SwiftXR Viewer plugin into your workspace.&#x20;

Then paste your project link in the Published Project Link field

<figure><img src="https://564713456-files.gitbook.io/~/files/v0/b/gitbook-x-prod.appspot.com/o/spaces%2FKNcXDcNRYHUBsVw12Dii%2Fuploads%2FtyTjpKYjlQij4E4Rlk6a%2FWhatsApp%20Image%202025-05-16%20at%2002.46.14%20(2).jpeg?alt=media&amp;token=8973a2b9-671b-4365-aee1-1148c8d93b1f" alt=""><figcaption></figcaption></figure>

## Viewing your Scenes in the Web, AR or VR

You can now preview, explore and publish your project— interacting with your 3D/AR/VR environment in an immersive way.

<br>

<figure><img src="https://564713456-files.gitbook.io/~/files/v0/b/gitbook-x-prod.appspot.com/o/spaces%2FKNcXDcNRYHUBsVw12Dii%2Fuploads%2FYVYCNepx4Yp4cQTFNbgO%2FWhatsApp%20Image%202025-05-16%20at%2002.46.13%20(1).jpeg?alt=media&amp;token=84b78474-5d04-45c8-a2b6-e1e95b69c036" alt=""><figcaption></figcaption></figure>

## Conclusion

By integrating SwiftXR with Bubble, you can seamlessly blend 3D elements into your web prototypes, creating more engaging and interactive experiences for your users


# Cargo

Add or embed 3D, Augmented Reality (AR) and Virtual Reality (VR) content/design to your Cargo website

## Introduction

SwiftXR is a powerful platform for creating and sharing interactive 3D, augmented reality (AR), and virtual reality (VR) experiences on the web. With the SwiftXR (3D/AR/VR) Integration for Cargo, you can easily integrate SwiftXR Projects into your Cargo website, enabling you to create immersive and interactive web experiences.

**Creating a Project in SwiftXR**

Navigate to the SwiftXR Hub: Begin by visiting the SwiftXR Hub, or alternatively click on this link: <https://swiftxr.io/hub>\
Initiate Project Creation: Once on Hub, click the “Create Project” button and enter your desired project name.\
Design or Develop: Utilize the intuitive editor to effortlessly add and customize SwiftXR components, bringing your 3D vision to life.

<figure><img src="https://564713456-files.gitbook.io/~/files/v0/b/gitbook-x-prod.appspot.com/o/spaces%2FKNcXDcNRYHUBsVw12Dii%2Fuploads%2FrTx8z8kZMQhDCCuHwR8G%2Fimage.png?alt=media&amp;token=9ac3f90c-3854-4a40-95e8-487b79715272" alt=""><figcaption></figcaption></figure>

**Publishing your SwiftXR Project**

* Utilize the editor to create your 3D vision using the SwiftXR components. Once satisfied with your creation, press the “Publish” or “Update” button to make your project live.

<figure><img src="https://564713456-files.gitbook.io/~/files/v0/b/gitbook-x-prod.appspot.com/o/spaces%2FKNcXDcNRYHUBsVw12Dii%2Fuploads%2F7W5EOaAyU915nARdZIRo%2Fimage.png?alt=media&amp;token=d5ff71e3-f253-40cc-b314-d61d2a4d9283" alt=""><figcaption></figcaption></figure>

**Copy Embed Code**

* After publishing, click the dropdown button beside the “Update” button and select “Share.” Within the Share modal, click the “Copy Embed” button to copy the embed code for your project.

<figure><img src="https://564713456-files.gitbook.io/~/files/v0/b/gitbook-x-prod.appspot.com/o/spaces%2FKNcXDcNRYHUBsVw12Dii%2Fuploads%2FeWSsOrH9LEOAG6tv4TEi%2Fimage.png?alt=media&amp;token=f8846311-c668-4078-9501-974a439ddd81" alt=""><figcaption></figcaption></figure>

**Integrating SwiftXR into Bravenet Website**

* Go to <https://cargo.site> and sign in (or create a free account).
* Choose one from the below templates you wish to work with.

<figure><img src="https://564713456-files.gitbook.io/~/files/v0/b/gitbook-x-prod.appspot.com/o/spaces%2FKNcXDcNRYHUBsVw12Dii%2Fuploads%2FewBJezSxLmyIRJUFVptO%2Fimage.png?alt=media&amp;token=fce70f70-fb29-4953-9fe2-c97e2528124a" alt=""><figcaption></figcaption></figure>

**Editing your Cargo Website**

* After you have chosen a template, you would be directed to the page below
* Click on “Edit” in the top left corner of your page to enter Cargo’s editing mode.

<figure><img src="https://564713456-files.gitbook.io/~/files/v0/b/gitbook-x-prod.appspot.com/o/spaces%2FKNcXDcNRYHUBsVw12Dii%2Fuploads%2FDVTvXELiqNOehdcQwUyN%2Fimage.png?alt=media&amp;token=6e274c5b-9944-486a-8710-2ea31121bc67" alt=""><figcaption></figcaption></figure>

**Add an HTML Element**

* In Cargo’s edit mode, you would see in the top right corner the HTML tag (\</>).
* Click on it.

<figure><img src="https://564713456-files.gitbook.io/~/files/v0/b/gitbook-x-prod.appspot.com/o/spaces%2FKNcXDcNRYHUBsVw12Dii%2Fuploads%2Fs1NY8dlDDXYyE0xeU9ZQ%2Fimage.png?alt=media&amp;token=d5bf9231-4eb6-4c26-b253-52ffd76f3656" alt=""><figcaption></figcaption></figure>

**Paste your SwiftXR Embed Code**

* Paste your SwiftXR iframe code into the Custom HTML editor box in Cargo.
* Click outside the editor to save the code

<figure><img src="https://564713456-files.gitbook.io/~/files/v0/b/gitbook-x-prod.appspot.com/o/spaces%2FKNcXDcNRYHUBsVw12Dii%2Fuploads%2F627Kig2DY7IgSWIWTt26%2Fimage.png?alt=media&amp;token=4d8922a6-dc56-4271-b9c9-23bc01f167a7" alt=""><figcaption></figcaption></figure>

**Viewing your Product in the Website**

* After pasting your SwiftXR iframe embed code, you would see the result in the website.

<figure><img src="https://564713456-files.gitbook.io/~/files/v0/b/gitbook-x-prod.appspot.com/o/spaces%2FKNcXDcNRYHUBsVw12Dii%2Fuploads%2FS0t5vx0D0Y9LSkof7FhS%2Fimage.png?alt=media&amp;token=92415487-2719-4949-8aea-aa1d824c8b44" alt=""><figcaption></figcaption></figure>

**Copying the URL to your Live Site**

* Click on the URL icon in the right hand side of your page and click on “Cargo URL”
* Copy the URL and click on “OK”.

<figure><img src="https://564713456-files.gitbook.io/~/files/v0/b/gitbook-x-prod.appspot.com/o/spaces%2FKNcXDcNRYHUBsVw12Dii%2Fuploads%2F75d2E3TWtTuqGvuHBdm9%2Fimage.png?alt=media&amp;token=17a9a362-9d89-405f-9d76-cbe7ff5fb8d6" alt=""><figcaption></figcaption></figure>

**Viewing your Scene in the Web, AR or VR**

* Paste the link you copied in a different tab and your SwiftXR 3D/AR project should now appear embedded on the page.

<figure><img src="https://564713456-files.gitbook.io/~/files/v0/b/gitbook-x-prod.appspot.com/o/spaces%2FKNcXDcNRYHUBsVw12Dii%2Fuploads%2FFW0wSvDKjjBmUpCPD0Lr%2Fimage.png?alt=media&amp;token=4485b796-dc31-47cc-9dec-5aa9d7f49cb8" alt=""><figcaption></figcaption></figure>

**Conclusion**

Integrating SwiftXR with Cargo makes it easy to embed immersive 3D and AR content into your site. This combination enhances your design with interactive experiences, giving visitors a more engaging and modern way to explore your work.

<br>


# Canva

Generate and embed 3D model images, GIFs, and PNGs in Canva with ease.

<figure><img src="https://docs.swiftxr.io/img/plugins/canva/banner.jpg" alt=""><figcaption></figcaption></figure>

### Introduction <a href="#introduction" id="introduction"></a>

SwiftXR is a powerful platform for creating and sharing interactive 3D, augmented reality (AR), and virtual reality (VR) experiences on the web. With the SwiftXR 3D Snap Plugin for Canva, you can easily export your 3D scenes and models as pictures or gifs from the SwiftXR Platform directly into your Canva project, enabling you to showcase your work to clients and colleagues in an immersive, interactive format.

### Installing the Plugin <a href="#installing-the-plugin" id="installing-the-plugin"></a>

To get started, Click on "Apps" and search for "SwiftXR 3D Snap" from the Canva Apps Marketplace. Once you've installed the App, the SwiftXR Icon should appear on the bottom of the Canva sidebar.

<figure><img src="https://docs.swiftxr.io/img/plugins/canva/step-1.png" alt=""><figcaption></figcaption></figure>

### Creating a 3D Snap <a href="#creating-a-3d-snap" id="creating-a-3d-snap"></a>

After you have tried out the default snaps, it is time to create your own.

#### Go to the SwiftXR Hub <a href="#go-to-the-swiftxr-hub" id="go-to-the-swiftxr-hub"></a>

Click the "Create your Snap" button and it should open the SwiftXR hub where you can create a snap.

<figure><img src="https://docs.swiftxr.io/img/plugins/canva/step-2.png" alt=""><figcaption></figcaption></figure>

#### Create a Project <a href="#create-a-project" id="create-a-project"></a>

On the SwiftXR Hub, Create a new project and import your 3D model or download from our 3D stores.

<figure><img src="https://docs.swiftxr.io/img/plugins/canva/step-3.png" alt=""><figcaption></figcaption></figure>

#### Generate 3D Snap <a href="#generate-3d-snap" id="generate-3d-snap"></a>

On the right sidebar, click "Generate Image" to create a 3D snap or "generate GIF" to create a GIF.

<figure><img src="https://docs.swiftxr.io/img/plugins/canva/step-4-min.jpg" alt=""><figcaption></figcaption></figure>

### Viewing your 3D Snaps in Canva <a href="#viewing-your-3d-snaps-in-canva" id="viewing-your-3d-snaps-in-canva"></a>

Once you have created your snap, select it from the app sidebar and it would be added to your canvas.

<figure><img src="https://docs.swiftxr.io/img/plugins/canva/step-5-min.jpg" alt=""><figcaption></figcaption></figure>

### The Settings Page <a href="#the-settings-page" id="the-settings-page"></a>

The API Key allows you to manage your snaps, if you have multiple SwiftXR accounts.To generate an API key, you'll first need to create a SwiftXR account (if you don't have one already). Once you've created your account, navigate to the SwiftXR Settings page and click the "Create API Key" button to generate a new API key. Copy the API key and click the key icon under the search bar, paste the API key into the text field and click the "Save" button.

<figure><img src="https://docs.swiftxr.io/img/plugins/canva/step-6-min.jpg" alt=""><figcaption></figcaption></figure>

### Conclusion <a href="#conclusion" id="conclusion"></a>

With the SwiftXR 3D for Canva, you can quickly and easily generate 3D Snaps for you to use on Canva , bringing your designs and creations to life in an interactive and immersive format. If you encounter any issues, be sure to send an email to <support@swiftxr.io> or [discord page](https://discord.gg/hT3zuJgQAw) for live support.


# Concrete CMS

Add or embed 3D, Augmented Reality (AR), and Virtual Reality (VR) content/design to your Concrete website.

<figure><img src="https://564713456-files.gitbook.io/~/files/v0/b/gitbook-x-prod.appspot.com/o/spaces%2FKNcXDcNRYHUBsVw12Dii%2Fuploads%2FHHzcK7xf4AMyNWnEoQ4h%2FScreenshot%202024-09-20%20at%2011.33.08.png?alt=media&amp;token=1e8760d3-d5aa-4331-8b5d-70787dc7539d" alt=""><figcaption></figcaption></figure>

### Introduction <a href="#introduction" id="introduction"></a>

SwiftXR is a powerful platform for creating and sharing interactive 3D, augmented reality (AR), and virtual reality (VR) experiences on the web. With the SwiftXR (3D/AR/VR) Integration for Concrete CMS, you can easily integrate SwiftXR Projects into your Concrete websites, enabling you to create immersive and interactive web experiences.

### Creating a Project in SwiftXR <a href="#creating-a-project-in-swiftxr" id="creating-a-project-in-swiftxr"></a>

* Navigate to the SwiftXR Hub: Begin by visiting the [SwiftXR Hub](https://swiftxr.io/hub).
* Initiate Project Creation: Once on Hub, click the "Create Project" button and enter your desired project name.
* Design and Develop: Utilize the intuitive editor to effortlessly add and customize SwiftXR components, bringing your 3D vision to life.

<figure><img src="https://docs.swiftxr.io/img/plugins/framer/step-1.png" alt=""><figcaption></figcaption></figure>

### Publishing Your SwiftXR Project <a href="#publishing-your-swiftxr-project" id="publishing-your-swiftxr-project"></a>

Utilize the editor to create your 3D vision using the SwiftXR components. Once satisfied with your creation, press the "Publish" or "Update" button to make your project live.

<figure><img src="https://564713456-files.gitbook.io/~/files/v0/b/gitbook-x-prod.appspot.com/o/spaces%2FKNcXDcNRYHUBsVw12Dii%2Fuploads%2FQWRwNRaaiKChqt3hzJ0q%2Faddfile.png?alt=media&amp;token=e3747747-40a5-4e93-ba5a-f415410ed98f" alt=""><figcaption></figcaption></figure>

### Copy Embed Code <a href="#copy-embed-code" id="copy-embed-code"></a>

After publishing, click the dropdown button beside the "Update" button and select "Share." Within the Share modal, click the "Copy Embed" button to copy the embed code for your project.

<figure><img src="https://564713456-files.gitbook.io/~/files/v0/b/gitbook-x-prod.appspot.com/o/spaces%2FKNcXDcNRYHUBsVw12Dii%2Fuploads%2FilZD2DmitfEzNTAbZC5k%2FScreenshot%202024-09-20%20at%2011.31.40.png?alt=media&amp;token=912b97a3-58d9-4b64-818c-97089d3b5864" alt=""><figcaption></figcaption></figure>

### Integrating SwiftXR into  Weebly Websites <a href="#integrating-swiftxr-into-framer-websites" id="integrating-swiftxr-into-framer-websites"></a>

* Launch ConcreteCMS and open the website where you want to integrate your 3D/AR/VR project.
* Copy the embed Html Code from SwiftXr.
* Click on  the plus button on the te.

<figure><img src="https://564713456-files.gitbook.io/~/files/v0/b/gitbook-x-prod.appspot.com/o/spaces%2FKNcXDcNRYHUBsVw12Dii%2Fuploads%2FthHN9bwBqTvqTbZuAI0q%2FScreenshot%202024-09-18%20at%2013.09.55.png?alt=media&amp;token=c96da2a9-0f57-4ed8-acf6-0484467b7cd6" alt=""><figcaption></figcaption></figure>

* Paste Embed Code: Seamlessly integrate your SwiftXR project by pasting the copied embed code into the HTML field within the Editor.&#x20;

<figure><img src="https://564713456-files.gitbook.io/~/files/v0/b/gitbook-x-prod.appspot.com/o/spaces%2FKNcXDcNRYHUBsVw12Dii%2Fuploads%2FqrymSmgL6S5MsbWpbgWr%2FScreenshot%202024-09-18%20at%2015.03.21.png?alt=media&amp;token=c19e212c-084e-41f8-9252-220af8d10b46" alt=""><figcaption></figcaption></figure>

### Viewing your Scene in the Web, AR or VR <a href="#viewing-your-scene-in-the-web-ar-or-vr" id="viewing-your-scene-in-the-web-ar-or-vr"></a>

Save and publish the Weebly website and view the link on any device to explore it immersively.

<figure><img src="https://564713456-files.gitbook.io/~/files/v0/b/gitbook-x-prod.appspot.com/o/spaces%2FKNcXDcNRYHUBsVw12Dii%2Fuploads%2FHHzcK7xf4AMyNWnEoQ4h%2FScreenshot%202024-09-20%20at%2011.33.08.png?alt=media&amp;token=1e8760d3-d5aa-4331-8b5d-70787dc7539d" alt=""><figcaption></figcaption></figure>

### Conclusion <a href="#conclusion" id="conclusion"></a>

By integrating SwiftXR with Weebly you can seamlessly blend 3D elements into your web prototypes, creating more engaging and interactive experiences for your users. Explore the possibilities of using SwiftXR to enhance your Weebly Websites and bring your ideas to life in an immersive and interactive way.


# Clo3d

Export and Embed CLO3D Clothing Designs in 3D, AR, and VR Experiences

<figure><img src="https://564713456-files.gitbook.io/~/files/v0/b/gitbook-x-prod.appspot.com/o/spaces%2FKNcXDcNRYHUBsVw12Dii%2Fuploads%2Fe2ziiDAplPJpa1xjCxSl%2Fimage.png?alt=media&amp;token=637050a7-8ef9-4dfe-935c-e984af73a240" alt=""><figcaption></figcaption></figure>

This guide will walk you through the process of exporting your Clothing from CLO3D to SwiftXR for VR and AR experiences. Each step is explained in detail to help both beginners and experienced users.

Before starting, ensure you have:

\- CLO3D installed (They have a 30 free version for the complete software) <https://www.clo3d.com/en/clo/download>

\- SwiftXR account [ https://home.swiftxr.io/](https://home.swiftxr.io/)

## &#x20;Step-by-Step Process

### 1. Once you are done with your cloth creations, please check the following below.

* If you have topstitch please make sure the type is TEXTURE

<figure><img src="https://lh7-rt.googleusercontent.com/docsz/AD_4nXciqoy2WSM9zKi5FsbUhBxQDTwde3ApBxKxlobIovChpgDiGWHveAG0Rg1X05KGq9gp-CmHqZb8OP-x6reaVkw453vVtAJf-ATsEjTYaFW-BYYcW6pZC3MmENE1AA2ZbIsER_lDUw?key=X8Z6fmL6za6DIb9T_XfQABvf" alt=""><figcaption></figcaption></figure>

### &#x20;2. Uv Setting

* Go to the top of your menu, you will see Simulation, click the drop down and choose UV editor

<figure><img src="https://lh7-rt.googleusercontent.com/docsz/AD_4nXeRwuPbmTPZ5jEksxGrJgG13g43meepStKGYBCswHdn3bMLP4HeyJbCPvBWTcam3fmpXEbhvlpdexLWBU_1-VaVxiotP5pquikZ-Bc-qgyOM3ctIVSqvCyruxZ5P2IdUvVIt7X8?key=X8Z6fmL6za6DIb9T_XfQABvf" alt=""><figcaption></figcaption></figure>

* You need to arrange the UV into one single UV tile, there are three methods
* * Method One - Manual select all the UV patterns, scale and resize to fit one Uv box, make sure they are scaled all at ones and noon is outside the UV tile or touching each other within the tile<br>

<figure><img src="https://lh7-rt.googleusercontent.com/docsz/AD_4nXdcO7sz3ITZYMZr_nBu_6bne5Wx6wW-w8GSu6mnY38ifFAT7AFemc4Yf1d7FTUmdm2E6nSzSHGcuDFOr_8IsXfO9s2S2PMnlCT9Sptg4kusves0H7lutwERZNBbEh4Ugs-2LxgHDw?key=X8Z6fmL6za6DIb9T_XfQABvf" alt=""><figcaption></figcaption></figure>

<figure><img src="https://lh7-rt.googleusercontent.com/docsz/AD_4nXf9rtzGxJYCRkG_Th0A8evOQ0RTAINhMonFnZE8WKlpRVawksT7XM_cjUDl6YFTk7SFtvNitQSYxcJXXEqsZAmJ4jaCmZKuRn07OCyUJPiRa7qdgRzTT3I0d5WdFFidzAuLZg1D?key=X8Z6fmL6za6DIb9T_XfQABvf" alt=""><figcaption></figcaption></figure>

* Method Two - Go to the sidebar of the UV editor and click on the auto UV packing, when the pop up shows up.
* * Change the padding to 0.004
  * Change Fidelity to 3
  * Make sure fix scale ratio is checked
  * Check 0 to 1<br>

<figure><img src="https://lh7-rt.googleusercontent.com/docsz/AD_4nXdinh3_Lb92WcqNohv6dlJbo3t5YImyC3TXie6CZ1cG9HbwFdJtXopfTyiQ7BESltMBKTv4Or5SSFcodnRBJklX6RoJQE6Is8faQLlq8695hrT3OQCXi-c-0O1xqTBxy1QSJjvd?key=X8Z6fmL6za6DIb9T_XfQABvf" alt=""><figcaption></figcaption></figure>

<figure><img src="https://lh7-rt.googleusercontent.com/docsz/AD_4nXcq2-beqhEfNwJ31KPkBz2sv1Hiv0WqpyZdd4m2nyVmHhIWqvHahePZ4LRUC1A2uOkuIbUVARo5dz-QMkbIzFke8kK870cy0ff1hqL7psiqWgbSIdtJKlco-i5LR-BO-UrUH69Ofg?key=X8Z6fmL6za6DIb9T_XfQABvf" alt=""><figcaption></figcaption></figure>

<figure><img src="https://lh7-rt.googleusercontent.com/docsz/AD_4nXcOPK4pPdooozyQZUwGTGeZtBbpRvHdB3A66QQ3ttL8E1CQPZtBrzNvvoTqu0aGCqx3EdibXtEs1zfutap8vIt6NMS11Te45cifQcuGVt5vqv752z0P78gUgHRwLgX7rtkVA9LQEQ?key=X8Z6fmL6za6DIb9T_XfQABvf" alt=""><figcaption></figcaption></figure>

* Method Three - Right click on your UV editor window and click fit all uv to 0-1also click UV coordinate then OK\ <br>

<figure><img src="https://lh7-rt.googleusercontent.com/docsz/AD_4nXfX_EIDypyefkOkVMdccTuneU_oeqafQHxIhZu5VI2I6K60r3GncvAbByAogQs82vuo1wObZUut_k9CcuNe2xTZOj_vv-xlfz5X-0s_Dkjww0iJxeDR9zwaQ2D4INDi_lBjYmzIMQ?key=X8Z6fmL6za6DIb9T_XfQABvf" alt=""><figcaption></figcaption></figure>

<br>

<figure><img src="https://lh7-rt.googleusercontent.com/docsz/AD_4nXem-boW5IQA90su2zq3iXlnPnYvrUDK1SJv-MkX-u_RSDGrden72vSIAiDejL9rZDIP12OJnyG7wHjwwobsO73tHCEPRZYhXl7ArKSi4T8w3gmGSun_ljT24PP-E6Wy4ue-b6lv?key=X8Z6fmL6za6DIb9T_XfQABvf" alt=""><figcaption></figcaption></figure>

#### 3. Once you are done with UV Editor and you have packed the UV properly

* You need to go back to the simulation tab

<figure><img src="https://lh7-rt.googleusercontent.com/docsz/AD_4nXdfC05ofaGL1qFBhXbMPTh959kYKPDcIAWwArUBuQWQhZS8gszTyhXEvg6vN5_r87fZiFZasBSgjGw8RGSugemKHyyQEyqqLWdsQnElc2bkp5X7zjFozi4Zuusr3Y9ljr9IT4PMjQ?key=X8Z6fmL6za6DIb9T_XfQABvf" alt=""><figcaption></figcaption></figure>

* Click on Connect > Everywear

<figure><img src="https://lh7-rt.googleusercontent.com/docsz/AD_4nXfX6c1YCRCZOJZRcHrHPuAxeeRcwE1rzYM5CH7WCaTAeEjCwYn--BnNVFLV0xPog9zZw5Og4P9yJsyWWFbiEvSR1y7Qhz2lxBmzV_dzar5CIqCPO3nQVzZ1Cb3UKDa5i0c_ksIYXA?key=X8Z6fmL6za6DIb9T_XfQABvf" alt=""><figcaption></figcaption></figure>

* Ones you see the pop up but the desired number in the garment polygon depending on how low poly you want the garment to be then click the optimize button

<figure><img src="https://lh7-rt.googleusercontent.com/docsz/AD_4nXcP5YHsKg_9VanqWPedqwU5xgJULuPh6vbbjT9Hx-HX8WQ9XDCC0nd1Ztijp5c5RrG_A5zQSZ75tKQqEIeV74Y8CrfWueeD_L7o1wOiQcosrBE5dYB_pENEF1t9cwBdXy1_8xlo?key=X8Z6fmL6za6DIb9T_XfQABvf" alt=""><figcaption></figcaption></figure>

### 3.  Export as GLB

* &#x20;Go to File > Export > gltf 2.0 (GLB), Choose where to save and give it a name

<figure><img src="https://lh7-rt.googleusercontent.com/docsz/AD_4nXd94W52oVUA_S9UYMB7ra99S3HzF8Zegw9Shu1ZSefe4XCYpJUeAEuvPWAd6YhEItf-mVSh_lVuNOvWvjDflYL_4McMCcJhQPuFy2R-IH5v7KGhcQjnqCvqN3Bre3gQJqenymKw?key=X8Z6fmL6za6DIb9T_XfQABvf" alt=""><figcaption></figcaption></figure>

* The GLB export settings will poop out, check out
* * Check out all avatar
  * Make sure it is set to Thin
  * Check unified UV Coordinates
  * Image size depends on how you want the texture to look but , for the size it is advisable you use 1k so as to export a low poly mesh
  * Make the scale CM and 1.00%
  * Check save and compress (ZIP)<br>
* After making sure the settings are similar to the above, click Ok and export.&#x20;
* Go to where it exported and unzip to see your GLB<br>

<figure><img src="https://lh7-rt.googleusercontent.com/docsz/AD_4nXdQmzftfW_IfqmpTOclnj0yU3UXVq7-jgYqY_6TjdjbRlqqtU1K1NfA1jcMr3LrDJ7zZA8gcrLX31sSctOC2O1gXWiHFJtZgrCZKlM0WaNOujP4nv5eFwvwm6Jz7C6uSPHg0YiuVA?key=X8Z6fmL6za6DIb9T_XfQABvf" alt=""><figcaption></figcaption></figure>

### 4. Import to SwiftXR

* [Create a new project](/creating-a-project) in SwiftXR, see how to create a project [here](/creating-a-project) <br>
* You can either Drag your model and drop it on the SwiftXR Canvas or you go to File > Upload<br>

<figure><img src="https://lh7-rt.googleusercontent.com/docsz/AD_4nXcqRxntv7uf1Lsk4XP9_N8v6dwu4DtE4kdDpBip19H4qPZ5beM-Ikc4fFNcXbqrIkxcHfsSacEu56Pi5kL5FbfrrpxaW7acCZ_aCGw28LxRf5_5CJrnbMO6uA2KUrRw-N5NcJJ6wQ?key=X8Z6fmL6za6DIb9T_XfQABvf" alt=""><figcaption></figcaption></figure>

* You will get a warning sign if your model is more than 50mb so it advisable to keep it at 100mb so following the export setting from style3D is crucial to achieve this, Click on proceed.<br>

  <figure><img src="https://lh7-rt.googleusercontent.com/docsz/AD_4nXeB_vMsMgWRVHo5g1rEqb-yiotvX6mCGKedO0R--YUOJS9q2BmArCGkSQfCgUQ2ndRZExSjvL2QGKBeGzx0ukRSHJspC-hgjh96Z4dPvoQN-ZoQ-vwfMEqpCD-KyBiOlshd49Z8Fw?key=X8Z6fmL6za6DIb9T_XfQABvf" alt=""><figcaption></figcaption></figure>
* &#x20;Once imported, carefully check your model in SwiftXR. Verify that all parts, textures, and materials appear as expected.<br>

<figure><img src="https://lh7-rt.googleusercontent.com/docsz/AD_4nXcN2vibeJoERszov5BrsyPQMKffsJ7LNCfVQBYBUkflgKaBsVR0hTthAz-S6gU82xhqS35v0gc5SXEkbnCEUfthKRWPabJK14KxSxq6fPmiYwqj8hV_bxvviO0o6TS1B2swOa-crQ?key=X8Z6fmL6za6DIb9T_XfQABvf" alt=""><figcaption></figcaption></figure>


# Dorik

Add or embed 3D, Augmented Reality (AR), and Virtual Reality (VR) content/design to your Dorik website.

<figure><img src="https://docs.swiftxr.io/img/plugins/dorik/step-0.png" alt=""><figcaption></figcaption></figure>

### Introduction <a href="#introduction" id="introduction"></a>

SwiftXR is a powerful platform for creating and sharing interactive 3D, augmented reality (AR), and virtual reality (VR) experiences on the web. With the SwiftXR (3D/AR/VR) Integration for Dorik, you can easily integrate SwiftXR Projects into your Dorik prototypes/websites, enabling you to create immersive and interactive web experiences.

### Creating a Project in SwiftXR <a href="#creating-a-project-in-swiftxr" id="creating-a-project-in-swiftxr"></a>

* Navigate to the SwiftXR Hub: Begin by visiting the [SwiftXR Hub](https://swiftxr.io/users/authenticate).
* Initiate Project Creation: Once on Hub, click the "Create Project" button and enter your desired project name.
* Design and Develop: Utilize the intuitive editor to effortlessly add and customize SwiftXR components, bringing your 3D vision to life.

<figure><img src="https://docs.swiftxr.io/img/plugins/dorik/step-1.png" alt=""><figcaption></figcaption></figure>

### Publishing Your SwiftXR Project <a href="#publishing-your-swiftxr-project" id="publishing-your-swiftxr-project"></a>

Utilize the editor to create your 3D vision using the SwiftXR components. Once satisfied with your creation, press the "Publish" or "Update" button to make your project live.

<figure><img src="https://docs.swiftxr.io/img/plugins/dorik/step-2.png" alt=""><figcaption></figcaption></figure>

### Copy Embed Code <a href="#copy-embed-code" id="copy-embed-code"></a>

Copy the link within the quotation marks in the second last line.

<figure><img src="https://docs.swiftxr.io/img/plugins/dorik/step-3.png" alt=""><figcaption></figcaption></figure>

### Integrating SwiftXR into Dorik Websites <a href="#integrating-swiftxr-into-dorik-websites" id="integrating-swiftxr-into-dorik-websites"></a>

* Click on **Add Element** in an empty row and section
* From the **General Elements** section, select **Iframe**
* Paste link into the Iframe URL box.

<figure><img src="https://docs.swiftxr.io/img/plugins/dorik/step-4.gif" alt=""><figcaption></figcaption></figure>

### Viewing your scene in the Web, VR or AR <a href="#viewing-your-scene-in-the-web-vr-or-ar" id="viewing-your-scene-in-the-web-vr-or-ar"></a>

Save and publish the Dorik website and view the link on any device to explore it immersively.

### Conclusion <a href="#conclusion" id="conclusion"></a>

By integrating SwiftXR with Dorik, you can seamlessly blend 3D elements into your web prototypes, creating more engaging and interactive experiences for your users. Explore the possibilities of using SwiftXR to enhance your Dorik prototypes and bring your ideas to life in an immersive and interactive way.


# Daz3d

Export and Embed Daz3D Clothing Designs in 3D, AR, and VR Experiences

<figure><img src="https://lh7-rt.googleusercontent.com/docsz/AD_4nXdpvdoBAQ9X1Q_G8jEnWKp-hwT64wmpf7iyHB8yQpOUJGitzLonW99d6eg0vwwteWtA7VD9TasbKu92kGAK9iq-4AIZVpll6mvv8pCE-Un0mXGZrdZbAB4urPmfIp6zhn5m-IAk?key=X8Z6fmL6za6DIb9T_XfQABvf" alt=""><figcaption></figcaption></figure>

This guide will walk you through the process of exporting your scene from Daz Studio to SwiftXR for VR and AR experiences. Each step is explained in detail to help both beginners and experienced users.

### Before starting, ensure you have:

\- Daz Studio installed

\- Daz to Blender Bridge (download from Daz Studio)

\- Blender installed

\- SwiftXR account &#x20;

&#x20;Step-by-Step Process

### Step 1:  Prepare Your Daz Studio Scene

Open your scene in Daz Studio. Make sure all elements you want to export are visible and selected in the scene tab. This step is crucial as only selected items will be exported.

<figure><img src="https://lh7-rt.googleusercontent.com/docsz/AD_4nXeG1rYwvzyTsVny8TO3DRfmzmfUgFRtdA6JvoZJhD06hantGTK2BVHwVKUjBD68N8540YUttGPOb9fHBNF7-WBuLsS7c-hbIhbmSGxmvGd_7GCMGkA5h8Ge9qXp07lXHAW9TJ4A?key=X8Z6fmL6za6DIb9T_XfQABvf" alt=""><figcaption></figcaption></figure>

### Step 2:  Reduce the Mesh Resolution to get a Low poly&#x20;

* Make sure your model is selected then go to parameter then Mesh Resolution

<figure><img src="https://lh7-rt.googleusercontent.com/docsz/AD_4nXfWNMJxqY2I-xBkbIXmCBu4vxzj6iDHAZoixE5IPgue-ZcM-CGeic5vnGYdBKVVumoGv63_iKzQD2WJYWhB4D_vFUaPR62qcxCNTFTdOfBRrMtT4PjcyHgCzJQBKEO7pn_z8Nu_Kg?key=X8Z6fmL6za6DIb9T_XfQABvf" alt=""><figcaption></figcaption></figure>

* Change the Resolution level to Base

<figure><img src="https://lh7-rt.googleusercontent.com/docsz/AD_4nXe2ealvidxRTO4zLUAIo1SKk8h5ppxUtJ-nPDcQSzfp9hapYn-8gR-UGhMKASgZ_Vh2oHJSLuxBgresZIenBaiy_H7P3oP9uEiWjECQYbBAJYTW_O96luCP7U-8o_3_8zAUvAGjDA?key=X8Z6fmL6za6DIb9T_XfQABvf" alt=""><figcaption></figcaption></figure>

* Subdivision Level should be 0

<figure><img src="https://lh7-rt.googleusercontent.com/docsz/AD_4nXdqQemnbfj70j_OIGITJ2U6Ttg-fN6jyMF6-k0ZJxcCmLBo2_axq0SHXgIE684JCHHwwK9Iwuu6dve3Fv6sg0C7vPCWZiDb2RU1I-W_sP31jnM0YGy5YtKG9kOu--iuUd-CMMyf?key=X8Z6fmL6za6DIb9T_XfQABvf" alt=""><figcaption></figcaption></figure>

* Then Render SubD Level (Minimum) should be 0 too

<figure><img src="https://lh7-rt.googleusercontent.com/docsz/AD_4nXf-ClTdxq4gRJTpsyYAMXv0zCZJyhkthSnicwED6IlL19HhsVVxifaKpUJ_VlCEl2sAlf5A0FVbQVvrkQHRVOFi2KbnOIBRxEe8bJJgTm-HhI865sHO1jASYRL0Yn6X1HoXa6ZgpA?key=X8Z6fmL6za6DIb9T_XfQABvf" alt=""><figcaption></figcaption></figure>

### &#x20;Step 3: Export from Daz Studio to Blender

* Go to File > Send to Daz to Blender.

<figure><img src="https://lh7-rt.googleusercontent.com/docsz/AD_4nXfvLqVKX1YfwN-nsoUZDVObrgYym6v7kKEL5nmL5LvJlBONgzknO07mWiezSptkFMgMfda3V8rS8m-C-pMYrPZnuWg6ba1kpoCPD8BakpaeWbyapwUHRc_2ne3op5O8vxTF16BRSw?key=X8Z6fmL6za6DIb9T_XfQABvf" alt=""><figcaption></figcaption></figure>

* Keep the default settings only pick the version of your blender and change any other thing  unless you have specific requirements.
* Click Accept and wait for the export process to complete. This may take a few minutes depending on the complexity of your scene.

<figure><img src="https://lh7-rt.googleusercontent.com/docsz/AD_4nXf-CKVR1BWJfZsQc67vJWwRz_Id0W54FWsqetiSzT4TA6JOZg2RG7fUJy4dl0oGU5UgI2o6DIYEncVWq4kurPnBRyQQ8_VzhAhDs3xgFjFpxXl4xxXw6fGahTi_nLfLJLBsaVDZ?key=X8Z6fmL6za6DIb9T_XfQABvf" alt=""><figcaption></figcaption></figure>

### Step 4: Export as OBJ

* &#x20;In Daz Studio, go to File > Export.

<figure><img src="https://lh7-rt.googleusercontent.com/docsz/AD_4nXdbKLYW8qntr4oABqGevanGYjNkvhIUud9kq4HnnODaaJnwspmMa8It5p4DNJ1RA4tiwlVKnSM3w7qddU2ViZ1c2CsKVnhjhW6wGHdJ2VnTB2WNUYQwBOJbwxgjfmH0cJ4_7b7wAA?key=X8Z6fmL6za6DIb9T_XfQABvf" alt=""><figcaption></figcaption></figure>

* Name your file (e.g., "SwiftXR\_daz"). Choose a name that's easy to identify later.
* Set the following export settings:

&#x20;                \- Scale: 1 (to maintain the original size)

&#x20;                \- Vertical: Y (standard for most 3D software)

&#x20;                \- Depth: Z (ensures correct orientation in Blender)

&#x20;                \- Set write surface to none

* Click Accept to start the export.

<figure><img src="https://lh7-rt.googleusercontent.com/docsz/AD_4nXfTyKpuowFMuQGdT9Zr3PIYZc1sws_JdG-iA6-RJ2FzOu-mW4j6luwo3yAZ5M0lN8c4GahlWOUX86LexrsFFD6PF1w0SAQ533-yzp7NTtnIjaYp7kz3w0wi944rrt-J5xKBq_Wk?key=X8Z6fmL6za6DIb9T_XfQABvf" alt=""><figcaption></figcaption></figure>

### Step 5: Prepare Blender Scene

* Open Blender
* Delete the default cube, camera, and light. Select each and press X to delete.

<figure><img src="https://lh7-rt.googleusercontent.com/docsz/AD_4nXc9YPxXLEgcA-7PWOUXbBwoBA-AgHrqm2PNM5lTGSjA4I_F_c1hnFDUhQpR_7zAuJg05VZldlCWgjJDAhi6id3HF3EILbW_Sfwur53CeNnHAiFRLKmylMj00NJdlR5b01Hv8GQNQg?key=X8Z6fmL6za6DIb9T_XfQABvf" alt=""><figcaption></figcaption></figure>

* Press N to open the options tab on the right side of the 3D viewport and Click on Daz to Blender in the options tab&#x20;

<figure><img src="https://lh7-rt.googleusercontent.com/docsz/AD_4nXcYyhp7g41Z0TM15Rv5A28H7CIS2So2eTnNZEFN5uwjncvF0xEnginVVeqGkNVorpWLE_39p3RdJ3a1_CAcanugNMLQzCuhwxCVXE0ihElLR9wQ3oQAMKaKH2kOQGGjX9uAJz32?key=X8Z6fmL6za6DIb9T_XfQABvf" alt=""><figcaption></figcaption></figure>

* Then click on Import New Genesis Figure, a pop-up will show then you click on OK

<figure><img src="https://lh7-rt.googleusercontent.com/docsz/AD_4nXejuy5t1NwaULhcMD7qh319qP6wSo3evdM3bAVeuS6z3LPn7YhjMGNdeNz2A2vtEztrROiNSkiueDNU0qge8fzZvSnA7cmeQUoOeeqC_UQqIce2xS1NksZ-eJ52GiQvj3VVjVA_jw?key=X8Z6fmL6za6DIb9T_XfQABvf" alt=""><figcaption></figcaption></figure>

* Click on Viewport shading or Render button to Verify that all textures and assets are intact. Check the materials tab to ensure textures are loaded correctly.

<figure><img src="https://lh7-rt.googleusercontent.com/docsz/AD_4nXcVSnujcPE-yj9KVX4_wXG2DsAcqFbXKlxTh4GMHugxTUKmufURYNMD-joEL3s0kLW43IyD9KnRdw9ZOFzJrGzmVfX3aC-gYDA6lOKKjBVNZNZZ2B4CRJXPAGLgJEPLvvlr6f33vA?key=X8Z6fmL6za6DIb9T_XfQABvf" alt=""><figcaption></figcaption></figure>

### Step 6: Pack Resources and Save Blender File

* Go to File > External > Automatically Pack Resources. This ensures all textures are included in your Blender file.

<figure><img src="https://lh7-rt.googleusercontent.com/docsz/AD_4nXdrpumXgUhEZrpG2rjRTjuoBJpZYx2AnEk7kqyAx8kfdJlfaq3PoHNHOUXPO6GaJo45YLXg-iGC0Rz3hfr8aDeMfkQQZrAKdSB5BZXmbG1tp6ngRfRHE6tT1pwUMpQSJWNcucLmmg?key=X8Z6fmL6za6DIb9T_XfQABvf" alt=""><figcaption></figcaption></figure>

* Save the file: File > Save As (e.g., "swiftxr\_daz.blend"). Choose a location you can easily find later.

<figure><img src="https://lh7-rt.googleusercontent.com/docsz/AD_4nXfCI-1FHw0aFmR01CWDm5qQec-feTXYofhsMlNbJkSfoy5nPMqxeGsFORvmyib-fCs1ERyfYyYwAdVoWenKY11RWiXh3hKS1XqCkuzUNL_vQ9PFrbifC1YcAx9gWfO8yoV58qhH?key=X8Z6fmL6za6DIb9T_XfQABvf" alt=""><figcaption></figcaption></figure>

### Step 7:  Import OBJ to New Blender File

* Create a new Blender file: File > New > General. This gives you a clean workspace.
* Delete the default cube, camera, and light as before.

<figure><img src="https://lh7-rt.googleusercontent.com/docsz/AD_4nXfC7L7LiDsjvtpInISnOdCWLWvnc08HHBO8dCBq35-FKjzBuIt5nMnUS2mXVvISkjd18RrhnUaltMqxZlLlwgpkh5_whquQ7q9Pk4vhZYb8f4E4b71_vND8aqLG5dhYvYr2fGnGYQ?key=X8Z6fmL6za6DIb9T_XfQABvf" alt=""><figcaption></figcaption></figure>

* Go to File > Import > OBJ.

<figure><img src="https://lh7-rt.googleusercontent.com/docsz/AD_4nXdcooIhWiZ6pn8ZqO0erpDUUDmysFb0ySqW6pXIRn8zrauvdBQeSB9UIgK_KHkA3gaMFnmmiPzaozrbA3f-ORtA-1Fne1g8Rqayr6ZIeuITQar79d86vC_8_VScReVx1FbTuo7HhQ?key=X8Z6fmL6za6DIb9T_XfQABvf" alt=""><figcaption></figcaption></figure>

* Find and select your OBJ file and make sure the setting is as the screenshot below, then click import wavefront OBJ.

<figure><img src="https://lh7-rt.googleusercontent.com/docsz/AD_4nXfbjxKcm77LRyeGoGZya0WByb8xPKw-F19aCS-gvUxqJR3V4Ll0shpOQJFhmSfR0GWuSjMIdWHyxB3hM2O2__gauyMmfbdMmGPfx_3Y4bD4STtT0KjyrTSS82jfnqo1MEynD-8wxA?key=X8Z6fmL6za6DIb9T_XfQABvf" alt=""><figcaption></figcaption></figure>

* Import the file and check that it appears correctly in your scene.

<figure><img src="https://lh7-rt.googleusercontent.com/docsz/AD_4nXf-uWs2X4evmXBoQNpaSg6u2O5jfZCztdzLwnr5y73zDEg3f80NEIsXBqaGKX0yg2xt-SiwWUAT7L_ACHPYAXtDa-uBQm41naFQMzkUIuSKwUFdYk2BqxMvtnexPzPetZJojHxi?key=X8Z6fmL6za6DIb9T_XfQABvf" alt=""><figcaption></figcaption></figure>

### Step 8: Append Textures

* Go to File > Append and Navigate to the Blender file you saved in Step 5.

<figure><img src="https://lh7-rt.googleusercontent.com/docsz/AD_4nXf4t9haNlTbDO7BC2puHPClyCmpgVjsKHAOfPrvoPwalJ1p5E1eA9cXCco2ik76TPsrO946sldMBtKzrd6G0cK_EMTxOIvR074AIcER2QqF01lR3hM5YFMhliyQrKmRdt1Cm-eBdQ?key=X8Z6fmL6za6DIb9T_XfQABvf" alt=""><figcaption></figcaption></figure>

3\. Select all materials and append them. You can use Shift+Click to select multiple materials at once, then click on Append

<figure><img src="https://lh7-rt.googleusercontent.com/docsz/AD_4nXcahs1Lyb7WQy3DtpvXiX7xFgjOvwkDZDe61maAhGoECyUKPabf37iAD3rMNJLwgAwvwLxTdr4slOTiJJCgGmVgJkCVbU7b6NGe_NbQ9OABmDOl1NjELf5g1x0BVXhsGSz_T60aeg?key=X8Z6fmL6za6DIb9T_XfQABvf" alt=""><figcaption></figcaption></figure>

### Step 9: Apply Textures

For each material (face, eyes, body parts, etc.):

* Go to the Shader Editor (switch from "Layout" to "Shading" at the top of the window).<br>

  <figure><img src="https://lh7-rt.googleusercontent.com/docsz/AD_4nXcgdl8wGhTGpAN5maqGI5H-c7orQLVHtzABMW0IQl0uTDAdGQGaGWNxS7f5KzQnmzJiftJNFBb0Q7AfnzTmUUT3gm9sHwGCxsdNpGSUryKX3D0ijtwp-bZGjRWT3HvZY7_B77UsXQ?key=X8Z6fmL6za6DIb9T_XfQABvf" alt=""><figcaption></figcaption></figure>

&#x20;Or

<figure><img src="https://lh7-rt.googleusercontent.com/docsz/AD_4nXdKOQJZ5Ot20eskZM9VA-kQZyQ21zlWmfOFSIV6Afg_8ziAOWfgPFZr-dtvh4vAv8q58k-pCJIZvrtLrYcCC8HRLeiIdRWV4rUzfGU9AwpsBw5e44yp_z4lmhjcJUONVc2PVffRxw?key=X8Z6fmL6za6DIb9T_XfQABvf" alt=""><figcaption></figcaption></figure>

* Select the material you want to work on from the list and click on the material button by the side to change it to the appended materials

<figure><img src="https://lh7-rt.googleusercontent.com/docsz/AD_4nXf9IbXpVh9xK6FBVdAZGG-497JaY3-WUht1c6riTZntGqPddqMQvwmTaq_pj8W7Lx3DCyOgmE0j6SXcsU7zKSjaRjDrSTCwCTCkSXHPgj7KFQ-BJie894ECBjrzq0X_lX0okdqpuQ?key=X8Z6fmL6za6DIb9T_XfQABvf" alt=""><figcaption></figcaption></figure>

* Adjust settings as needed, particularly for transparent parts like eyes and eyelashes, Make sure Alpha is Zero, Blend mode should be Alpha Blend and Shadow Mode should be Opaque.

<figure><img src="https://lh7-rt.googleusercontent.com/docsz/AD_4nXcB3mI2KYFzyoXrIeXChEJfKJxHOxfcaCix1j8POTLd-dGBheAX4gDCST4TMPQv1lmjP-e6t6Z8IbDbZsN7P_rreyT-Ah36uXeTDZKWmR_AI6LdQiH327ZxSbecXZ7LDBU7x64xyA?key=X8Z6fmL6za6DIb9T_XfQABvf" alt=""><figcaption></figcaption></figure>

### Step 10: Clean Up and Export

* Go to File > Clean Up >Purge Unused Data. This removes any unnecessary data.

<figure><img src="https://lh7-rt.googleusercontent.com/docsz/AD_4nXfgLcNjeqgZelDe-l3nURu0ubVX0HU5jI_TewTQvlWsak80xHjStSLmftdKRCCAg7JljbKnvQiADdj2jASYgXWDDlW86puKqnqiOUYVWfj7A0D_uW_QWdIx2VyM_Y4OeXOs0V2i6Q?key=X8Z6fmL6za6DIb9T_XfQABvf" alt=""><figcaption></figcaption></figure>

* &#x20;Pack files again: File > External > Automatically Pack Resources.

<figure><img src="https://lh7-rt.googleusercontent.com/docsz/AD_4nXccYEA3vkLAiEsXY9UoVJol0JN1BZB3YshWDrK390RwDYjzoDTAuZJ8A57SOwHtUnMd9NP1w43ikP7BfUpeE8s9d_tyGW_l-MTO0VXp5RPZdHCbAsQ8ba2fPXqXMzup5WIlozX8bw?key=X8Z6fmL6za6DIb9T_XfQABvf" alt=""><figcaption></figcaption></figure>

* Save your file one last time.

<figure><img src="https://lh7-rt.googleusercontent.com/docsz/AD_4nXfCI-1FHw0aFmR01CWDm5qQec-feTXYofhsMlNbJkSfoy5nPMqxeGsFORvmyib-fCs1ERyfYyYwAdVoWenKY11RWiXh3hKS1XqCkuzUNL_vQ9PFrbifC1YcAx9gWfO8yoV58qhH?key=X8Z6fmL6za6DIb9T_XfQABvf" alt=""><figcaption></figcaption></figure>

* Export as GLB: File > Export > glTF 2.0 (.glb/.gltf). GLB is preferred as it packages all data into a single file.

<figure><img src="https://lh7-rt.googleusercontent.com/docsz/AD_4nXdkDEyqkm2SY-yp6MpsASZ_3hQm6rSMr0eRlIklVxKWohomC6phoc-aEPP6dKc3WWrmcxVW-WEv3YPQKQ7xZ45LMvUwRK-OpXP-tlNUVgWxoPq03a0mcoXyzCDaUSFzmntCpfte?key=X8Z6fmL6za6DIb9T_XfQABvf" alt=""><figcaption></figcaption></figure>

### Step 11: Import to SwiftXR

* Create a new project in SwiftXR, see image below<br>

<figure><img src="https://lh7-rt.googleusercontent.com/docsz/AD_4nXcjVcQhCPYKiR8yKAmFAFOBgqllXE7MXJiBrFiTZV2Dgm3U2XYJyO_xi3Lh-BmVslnaf7wvuQCDiQ5fEiJW2BTPN71TQ_qlfQxgsInkKxSv-PgC3bwpTKI_ROryH9v0XwmUDR_2?key=X8Z6fmL6za6DIb9T_XfQABvf" alt=""><figcaption></figcaption></figure>

<figure><img src="https://lh7-rt.googleusercontent.com/docsz/AD_4nXed3VeaYQk4iTOxlIeml74TeCuSKaA_VgEaWM_MvAKMu_aB7yW3iwnjV1JzeqPAeCowzrZ-wTJIfEJ0koa7mmVTDeC9wstMctoAW_92cIBwBYo5pq8jqaP3kV_8psyIzV-dn8ZC?key=X8Z6fmL6za6DIb9T_XfQABvf" alt=""><figcaption></figcaption></figure>

* You can either Drag your model and drop it on the SwiftXR Canvas or you go to File > Upload<br>

<figure><img src="https://lh7-rt.googleusercontent.com/docsz/AD_4nXdY4KfAc7KHl83Y_HnEmq3CcKhX-cHMPnAaImGbs4x6XwRT9njVXnT4kSbyNkS8vo2TtxgAtdVmbvaWp1NR9CsL_TOQjX3hnFuSgBJn1QIWaHu-d71-87f9OUHGh67pEhb7zydb?key=X8Z6fmL6za6DIb9T_XfQABvf" alt=""><figcaption></figcaption></figure>

* You will get a warning sign if your model is more than 50mb so it advisable to keep it at 100mb so following the export setting from style3D is crucial to achieve this, Click on proceed.

<figure><img src="https://lh7-rt.googleusercontent.com/docsz/AD_4nXdtcqejQNy1-uc4bt1aHsujqlrGNfE9MN91eV97CX-Vbq746F12A4nnHahhs6D2r6Gzl9sTtgmmrY_lN9kGVNEkXSMXciyVHu2pJ22VbBUBUNLXKB7dTXXbyvGToPufg60DiduMAA?key=X8Z6fmL6za6DIb9T_XfQABvf" alt=""><figcaption></figcaption></figure>

* &#x20;Once imported, carefully check your model in SwiftXR. Verify that all parts, textures, and materials appear as expected.<br>

  <figure><img src="https://lh7-rt.googleusercontent.com/docsz/AD_4nXfzuWlxv7GUbtQhxTeNf33YsSQQJb-M3DyiK_Jp0tcAPJkRZ5qmPJG6nz2QmT84y-E6FmC_vQOgulb-mW9OV0nRHgQm1zPMJI9wBhWpVqGA3DgM5FmWCDw5DlS6x25wljQLJtIR?key=X8Z6fmL6za6DIb9T_XfQABvf" alt=""><figcaption></figcaption></figure>

### Troubleshooting Tips

\- If textures are missing: Double-check Steps 7 and 8. Ensure all materials were appended and connected correctly.

\- If the model appears too large or small: Go back to Blender, adjust the scale, and re-export.

\- If parts of the model are missing: Check that everything was selected in the original Daz Studio scene.

\- For any persistent issues or other inquiries: Reach out to our support team.

\
\
\ <br>


# Figma

Add or embed 3D, Augmented Reality (AR), and Virtual Reality (VR) content/design to your Figma Site.

## Introduction

SwiftXR is a powerful platform for creating and sharing interactive 3D, augmented reality (AR), and virtual reality (VR) experiences on the web. With the SwiftXR (3D/AR/VR) Integration for Figma, you can easily integrate SwiftXR Projects into your Figma sites, enabling you to create immersive and interactive web experiences.

## Creating a Project on SwiftXR

* Navigate to the SwiftXR Hub: Begin by visiting the [SwiftXR Hub](https://swiftxr.io/hub).
* Initiate Project Creation: Once on Hub, click the "Create Project" button and enter your desired project name.
* Design and Develop: Utilize the intuitive editor to effortlessly add and customize SwiftXR components, bringing your 3D vision to life.


# Figma

Generate and embed 3D model images, GIFs, and PNGs in Figma with ease.

<figure><img src="https://564713456-files.gitbook.io/~/files/v0/b/gitbook-x-prod.appspot.com/o/spaces%2FKNcXDcNRYHUBsVw12Dii%2Fuploads%2FZLQ1gHcaJVvCjY8l2f2K%2F762533b1a2d2134e5581977f2d36529f33374b9c.jpeg?alt=media&amp;token=ddc8dcf1-c06d-481d-86a6-d9424482b698" alt=""><figcaption></figcaption></figure>

## [SwiftXR 3D Snap](https://www.figma.com/community/plugin/1209566635632057419/swiftxr-3d-snap)

**SwiftXR 3D Snap** transforms your 3D workflow by allowing you to quickly generate transparent 2D snapshots and animated GIFs from any 3D model. Perfect for designers, marketers, and creators, it makes showcasing your 3D content easier than ever.

Seamlessly integrated with **Figma**, SwiftXR 3D Snap lets you explore and capture the perfect angle of your 3D models, no technical skills needed. Elevate your designs and presentations with clean, professional visuals.

#### **Key Features:**

* **Transparent 2D Snapshots & GIFs**\
  Instantly export 3D models as transparent PNGs or GIFs for use in Canva, Figma, or presentations.
* **Interactive 3D Viewer**\
  Rotate, zoom, and explore your 3D models directly in the browser before capturing your shot.
* **Access Millions of Free 3D Models**\
  Browse an extensive library of high-quality 3D assets, or import your own files.
* **Drag-and-Drop Simplicity**\
  Easily upload and work with your own 3D models using a fast, intuitive interface.

<br>

Tutorial Video: <https://youtu.be/N1uVquQo99Q>

<br>


# Format

Add or embed 3D, Augmented Reality (AR), and Virtual Reality (VR) content/design to your Format website.

<figure><img src="https://docs.swiftxr.io/img/plugins/format/step-0.png" alt=""><figcaption></figcaption></figure>

### Introduction <a href="#introduction" id="introduction"></a>

SwiftXR is a powerful platform for creating and sharing interactive 3D, augmented reality (AR), and virtual reality (VR) experiences on the web. With the SwiftXR (3D/AR/VR) Integration for Format, you can easily integrate SwiftXR Projects into your Format prototypes/websites, enabling you to create immersive and interactive web experiences.

### Creating a Project in SwiftXR <a href="#creating-a-project-in-swiftxr" id="creating-a-project-in-swiftxr"></a>

* Navigate to the SwiftXR Hub: Begin by visiting the [SwiftXR Hub](https://swiftxr.io/users/authenticate).
* Initiate Project Creation: Once on Hub, click the "Create Project" button and enter your desired project name.
* Design and Develop: Utilize the intuitive editor to effortlessly add and customize SwiftXR components, bringing your 3D vision to life.

<figure><img src="https://docs.swiftxr.io/img/plugins/format/step-1.png" alt=""><figcaption></figcaption></figure>

### Publishing Your SwiftXR Project <a href="#publishing-your-swiftxr-project" id="publishing-your-swiftxr-project"></a>

Utilize the editor to create your 3D vision using the SwiftXR components. Once satisfied with your creation, press the "Publish" or "Update" button to make your project live.

<figure><img src="https://docs.swiftxr.io/img/plugins/format/step-2.png" alt=""><figcaption></figcaption></figure>

### Copy Embed Code <a href="#copy-embed-code" id="copy-embed-code"></a>

After publishing, click the dropdown button beside the "Update" button and select "Share." Within the Share modal, click the "Copy Embed" button to copy the embed code for your project.

<figure><img src="https://docs.swiftxr.io/img/plugins/format/step-3.png" alt=""><figcaption></figcaption></figure>

### Integrating SwiftXR into Format Websites <a href="#integrating-swiftxr-into-format-websites" id="integrating-swiftxr-into-format-websites"></a>

* Click on Portfolio, followed by Design and Code Editor
* Click on the box left to the Close button

<figure><img src="https://docs.swiftxr.io/img/plugins/format/step-4.png" alt=""><figcaption></figcaption></figure>

* Scroll and select Gallery HTML
* Paste copied code on line 1

<figure><img src="https://docs.swiftxr.io/img/plugins/format/step-5.png" alt=""><figcaption></figcaption></figure>

* Lastly, click Preview Edits

<figure><img src="https://docs.swiftxr.io/img/plugins/format/step-6.png" alt=""><figcaption></figcaption></figure>

### Viewing your scene in the Web, VR or AR <a href="#viewing-your-scene-in-the-web-vr-or-ar" id="viewing-your-scene-in-the-web-vr-or-ar"></a>

Save and publish the Format website and view the link on any device to explore it immersively.

### Conclusion <a href="#conclusion" id="conclusion"></a>

By integrating SwiftXR with Format, you can seamlessly blend 3D elements into your web prototypes, creating more engaging and interactive experiences for your users. Explore the possibilities of using SwiftXR to enhance your Format prototypes and bring your ideas to life in an immersive and interactive way.


# Framer

Add or embed 3D, Augmented Reality (AR), and Virtual Reality (VR) content/design to your Framer website.

<figure><img src="https://docs.swiftxr.io/img/plugins/framer/step-6.png" alt=""><figcaption></figcaption></figure>

### Introduction <a href="#introduction" id="introduction"></a>

SwiftXR is a powerful platform for creating and sharing interactive 3D, augmented reality (AR), and virtual reality (VR) experiences on the web. With the SwiftXR (3D/AR/VR) Integration for Framer, you can easily integrate SwiftXR Projects into your Framer prototypes/webistes, enabling you to create immersive and interactive web experiences.

### Creating a Project in SwiftXR <a href="#creating-a-project-in-swiftxr" id="creating-a-project-in-swiftxr"></a>

* Navigate to the SwiftXR Hub: Begin by visiting the [SwiftXR Hub](https://swiftxr.io/hub).
* Initiate Project Creation: Once on Hub, click the "Create Project" button and enter your desired project name.
* Design and Develop: Utilize the intuitive editor to effortlessly add and customize SwiftXR components, bringing your 3D vision to life.

<figure><img src="https://docs.swiftxr.io/img/plugins/framer/step-1.png" alt=""><figcaption></figcaption></figure>

### Publishing Your SwiftXR Project <a href="#publishing-your-swiftxr-project" id="publishing-your-swiftxr-project"></a>

Utilize the editor to create your 3D vision using the SwiftXR components. Once satisfied with yur creation, press the "Publish" or "Update" button to make your project live.

<figure><img src="https://docs.swiftxr.io/img/plugins/framer/step-2.png" alt=""><figcaption></figcaption></figure>

### Copy Embed Code <a href="#copy-embed-code" id="copy-embed-code"></a>

After publishing, click the dropdown button beside the "Update" button and select "Share." Within the Share modal, click the "Copy Embed" button to copy the embed code for your project.

<figure><img src="https://docs.swiftxr.io/img/plugins/framer/step-4.png" alt=""><figcaption></figcaption></figure>

### Integrating SwiftXR into Framer Websites <a href="#integrating-swiftxr-into-framer-websites" id="integrating-swiftxr-into-framer-websites"></a>

* Open Framer Website: Launch Framer and open the website where you want to integrate your 3D/AR/VR project.
* Add Embed Component: Locate and add the embed component from Framer's component library.
* Paste Embed Code: Seamlessly integrate your SwiftXR project by pasting the copied embed code into the HTML field within Framer.

<figure><img src="https://docs.swiftxr.io/img/plugins/framer/step-5.png" alt=""><figcaption></figcaption></figure>

### Viewing your Scene in the Web, AR or VR <a href="#viewing-your-scene-in-the-web-ar-or-vr" id="viewing-your-scene-in-the-web-ar-or-vr"></a>

Save and publish the Framer website and view the link on any device to explore it immersively.

<figure><img src="https://docs.swiftxr.io/img/plugins/framer/step-6.png" alt=""><figcaption></figcaption></figure>

### Conclusion <a href="#conclusion" id="conclusion"></a>

By integrating SwiftXR with Framer, you can seamlessly blend 3D elements into your web prototypes, creating more engaging and interactive experiences for your users. Explore the possibilities of using SwiftXR to enhance your Framer prototypes and bring your ideas to life in an immersive and interactive way.


# Google sites

Add or embed 3D, Augmented Reality (AR) and Virtual Reality (VR) content/design to your Google sites.

## Introduction

SwiftXR is a powerful platform for creating and sharing interactive 3D, augmented reality (AR), and virtual reality (VR) experiences on the web. With the SwiftXR (3D/AR/VR) Integration for Bigcommerce, you can easily integrate SwiftXR Projects into your Bigcommerce stores/websites, enabling you to create immersive  and interactive web experiences.

## Creating a Project in SwiftXR

* Navigate to the SwiftXR Hub: Begin by visiting the SwiftXR Hub, or alternatively click on this link: <https://swiftxr.io/hub>&#x20;
* Initiate Project Creation: Once on Hub, click the “Create Project” button and enter your desired project name.
* Design or Develop: Utilize the intuitive editor to effortlessly add and customize SwiftXR components, bringing your 3D vision to life

<figure><img src="https://564713456-files.gitbook.io/~/files/v0/b/gitbook-x-prod.appspot.com/o/spaces%2FKNcXDcNRYHUBsVw12Dii%2Fuploads%2FH7IJUJuO60WHVQn14yqn%2FScreenshot%202025-08-27%20190839.png?alt=media&amp;token=e120178a-2d70-4f38-8264-c4930e3cf0c5" alt=""><figcaption></figcaption></figure>

## Publishing your SwiftXR Project

Utilize the editor to create your 3D vision using the SwiftXR components. Once satisfied with your creation, press the “Publish” or “Update” button to make your project live.

<figure><img src="https://564713456-files.gitbook.io/~/files/v0/b/gitbook-x-prod.appspot.com/o/spaces%2FKNcXDcNRYHUBsVw12Dii%2Fuploads%2F0NML0M7iRKIvpQOBxma6%2FScreenshot%202025-08-27%20190950.png?alt=media&amp;token=b65a0f84-5520-4cce-a7bb-da9ca557d877" alt=""><figcaption></figcaption></figure>

## Copy Embed Code

After publishing, click the dropdown button beside the “Update” button and select “Share.” Within the Share modal, click the “Copy Embed” button to copy the embed code for your project.

<figure><img src="https://564713456-files.gitbook.io/~/files/v0/b/gitbook-x-prod.appspot.com/o/spaces%2FKNcXDcNRYHUBsVw12Dii%2Fuploads%2Fy3cJca2vR53YYaLvHRNO%2FScreenshot%202025-08-27%20191453.png?alt=media&amp;token=9ec83b4a-c46e-45a1-80b0-14bae0f73858" alt=""><figcaption></figcaption></figure>

## Integrating SwiftXR into Bigcommerce Store

* Go to Google Sites
* Click on “Blank Site” if you do not have an existing project

<figure><img src="https://564713456-files.gitbook.io/~/files/v0/b/gitbook-x-prod.appspot.com/o/spaces%2FKNcXDcNRYHUBsVw12Dii%2Fuploads%2Fa8O6uJzCtobsupRopFuP%2FScreenshot%202025-08-27%20191644.png?alt=media&amp;token=09f5c283-d1c4-4321-9478-787242d1bbbe" alt=""><figcaption></figcaption></figure>

#### Insert the SwiftXR Embed Code

* In the right hand menu, click “Embed”
* Choose the Embed Code tab
* Paste the SwiftXR iframe code you copied earlier
* Click on Next

<figure><img src="https://564713456-files.gitbook.io/~/files/v0/b/gitbook-x-prod.appspot.com/o/spaces%2FKNcXDcNRYHUBsVw12Dii%2Fuploads%2FK9Yc0B1nB2WUH4GctlkC%2FScreenshot%202025-08-27%20192013.png?alt=media&amp;token=d524145d-c902-452b-b72d-30faedbb47a4" alt=""><figcaption></figcaption></figure>

After Clicking on **Next**, it would bring you to the page below, when it does, you click on **Insert** in the bottom right corner

<br>

<figure><img src="https://564713456-files.gitbook.io/~/files/v0/b/gitbook-x-prod.appspot.com/o/spaces%2FKNcXDcNRYHUBsVw12Dii%2Fuploads%2Fqa3Fix9EiFvv4vxbDV2l%2FScreenshot%202025-08-27%20192300.png?alt=media&amp;token=09cd2bea-ec82-45ae-995f-8a57c42b0efd" alt=""><figcaption></figcaption></figure>

## Viewing your Scene in the Web, AR or V

* Click “Publish” in the top right corner (if it is a new site) and confirm. Your SwiftXR project should now be live on your Google Site.

<figure><img src="https://564713456-files.gitbook.io/~/files/v0/b/gitbook-x-prod.appspot.com/o/spaces%2FKNcXDcNRYHUBsVw12Dii%2Fuploads%2FRaeDll2y5MpFe0S2BTnT%2FScreenshot%202025-08-27%20192605.png?alt=media&amp;token=23df36a0-3b35-4788-aaec-a288883801bb" alt=""><figcaption></figcaption></figure>

## Conclusion

Integrating SwiftXR into Google Sites is a quick and effective way to showcase interactive 3D, AR, and VR experiences directly on your website. By embedding the SwiftXR iframe code, you can provide visitors with immersive content without needing complex coding or additional tools. Once published, your Google Site will serve as an accessible platform for sharing engaging XR projects with anyone, anywhere.


# GoDaddy

Add or embed 3D, Augmented Reality (AR), and Virtual Reality (VR) content/design to your GoDaddy website.

<figure><img src="https://docs.swiftxr.io/img/plugins/godaddy/step-0.png" alt=""><figcaption></figcaption></figure>

### Introduction <a href="#introduction" id="introduction"></a>

SwiftXR is a powerful platform for creating and sharing interactive 3D, augmented reality (AR), and virtual reality (VR) experiences on the web. With the SwiftXR (3D/AR/VR) Integration for GoDaddy, you can easily integrate SwiftXR Projects into your GoDaddy prototypes/websites, enabling you to create immersive and interactive web experiences.

Creating a Project in SwiftXR

* Navigate to the SwiftXR Hub: Begin by visiting the [SwiftXR Hub](https://swiftxr.io/hub).
* Initiate Project Creation: Once on Hub, click the "Create Project" button and enter your desired project name.
* Design and Develop: Utilize the intuitive editor to effortlessly add and customize SwiftXR components, bringing your 3D vision to life.

<figure><img src="https://docs.swiftxr.io/img/plugins/godaddy/step-1.png" alt=""><figcaption></figcaption></figure>

### Publishing Your SwiftXR Project <a href="#publishing-your-swiftxr-project" id="publishing-your-swiftxr-project"></a>

Utilize the editor to create your 3D vision using the SwiftXR components. Once satisfied with your creation, press the "Publish" or "Update" button to make your project live.

<figure><img src="https://docs.swiftxr.io/img/plugins/godaddy/step-2.png" alt=""><figcaption></figcaption></figure>

### Copy Embed Code <a href="#copy-embed-code" id="copy-embed-code"></a>

After publishing, click the dropdown button beside the "Update" button and select "Share." Within the Share modal, click the "Copy Embed" button to copy the embed code for your project.

<figure><img src="https://docs.swiftxr.io/img/plugins/godaddy/step-3.png" alt=""><figcaption></figcaption></figure>

### Integrating SwiftXR into GoDaddy Websites <a href="#integrating-swiftxr-into-godaddy-websites" id="integrating-swiftxr-into-godaddy-websites"></a>

* Go to your GoDaddy product page.
* Scroll to Websites + Marketing and select Manage next to your website to open your site.
* Select Edit Website or Edit Site to open your website builder.
* Go to the page and location you want to add your custom code, and add a section.

<figure><img src="https://docs.swiftxr.io/img/plugins/godaddy/step-4.png" alt=""><figcaption></figcaption></figure>

* Search for the HTML section and select Add.

<figure><img src="https://docs.swiftxr.io/img/plugins/godaddy/step-5.png" alt=""><figcaption></figcaption></figure>

* Paste or write your custom code into the Custom Code field.

<figure><img src="https://docs.swiftxr.io/img/plugins/godaddy/step-6.png" alt=""><figcaption></figcaption></figure>

* Use Preview to see the results and when you're ready to make the changes public, publish your site."

### Viewing your scene in the Web, VR or AR <a href="#viewing-your-scene-in-the-web-vr-or-ar" id="viewing-your-scene-in-the-web-vr-or-ar"></a>

Save and publish the GoDaddy website and view the link on any device to explore it immersively.

### Conclusion <a href="#conclusion" id="conclusion"></a>

By integrating SwiftXR with GoDaddy, you can seamlessly blend 3D elements into your web prototypes, creating more engaging and interactive experiences for your users. Explore the possibilities of using SwiftXR to enhance your GoDaddy prototypes and bring your ideas to life in an immersive and interactive way.


# HubSpot CMS

Add or embed 3D, Augmented Reality (AR), and Virtual Reality (VR) content/design to your HubSpot website.

<figure><img src="https://564713456-files.gitbook.io/~/files/v0/b/gitbook-x-prod.appspot.com/o/spaces%2FKNcXDcNRYHUBsVw12Dii%2Fuploads%2FSjVSOGk3V3VYMKfd11fM%2FScreenshot%202024-09-18%20at%2012.38.19.png?alt=media&amp;token=72f7c819-8113-4a77-aba9-51c549806979" alt=""><figcaption></figcaption></figure>

### Introduction <a href="#introduction" id="introduction"></a>

SwiftXR is a powerful platform for creating and sharing interactive 3D, augmented reality (AR), and virtual reality (VR) experiences on the web. With the SwiftXR (3D/AR/VR) Integration for HubSpot CMS, you can easily integrate SwiftXR Projects into your Hubspot webistes, enabling you to create immersive and interactive web experiences.

### Creating a Project in SwiftXR <a href="#creating-a-project-in-swiftxr" id="creating-a-project-in-swiftxr"></a>

* Navigate to the SwiftXR Hub: Begin by visiting the [SwiftXR Hub](https://swiftxr.io/hub).
* Initiate Project Creation: Once on Hub, click the "Create Project" button and enter your desired project name.
* Design and Develop: Utilize the intuitive editor to effortlessly add and customize SwiftXR components, bringing your 3D vision to life.

<figure><img src="https://docs.swiftxr.io/img/plugins/framer/step-1.png" alt=""><figcaption></figcaption></figure>

### Publishing Your SwiftXR Project <a href="#publishing-your-swiftxr-project" id="publishing-your-swiftxr-project"></a>

Utilize the editor to create your 3D vision using the SwiftXR components. Once satisfied with your creation, press the "Publish" or "Update" button to make your project live.

<figure><img src="https://564713456-files.gitbook.io/~/files/v0/b/gitbook-x-prod.appspot.com/o/spaces%2FKNcXDcNRYHUBsVw12Dii%2Fuploads%2FjSQtdDEb6mmjmK6g92oh%2FScreenshot%202024-09-17%20at%2014.08.22(1).png?alt=media&amp;token=8c8dadd3-6e29-4a3c-9521-cf9094360533" alt=""><figcaption></figcaption></figure>

### Copy Embed Code <a href="#copy-embed-code" id="copy-embed-code"></a>

After publishing, click the dropdown button beside the "Update" button and select "Share." Within the Share modal, click the "Copy Embed" button to copy the embed code for your project.

<figure><img src="https://564713456-files.gitbook.io/~/files/v0/b/gitbook-x-prod.appspot.com/o/spaces%2FKNcXDcNRYHUBsVw12Dii%2Fuploads%2F8nL9dLa55hb1AhBW0cWZ%2FScreenshot%202024-09-17%20at%2014.10.41.png?alt=media&amp;token=1ec8d759-092c-45b3-856c-28f7ba806e79" alt=""><figcaption></figcaption></figure>

### Integrating SwiftXR into Hubspot CMS Websites <a href="#integrating-swiftxr-into-framer-websites" id="integrating-swiftxr-into-framer-websites"></a>

* Navigate: Launch HubSpot CMS and open the website where you want to integrate your 3D/AR/VR project.
* Copy the embed Html Code from SwiftXr.
* Import the Rich Text Editor module
* Click on Edit in Expanded View&#x20;
* Click on Insert on the Rich Text Editor

<figure><img src="https://564713456-files.gitbook.io/~/files/v0/b/gitbook-x-prod.appspot.com/o/spaces%2FKNcXDcNRYHUBsVw12Dii%2Fuploads%2Fxn02SUPLtUi1iFDpyiK8%2FScreenshot%202024-09-17%20at%2014.33.04.png?alt=media&amp;token=375cca78-ccb5-40b8-b537-8d1a62e880a6" alt=""><figcaption></figcaption></figure>

* Paste Embed Code: Seamlessly integrate your SwiftXR project by pasting the copied embed code into the HTML field within the Editor.&#x20;
* Preview and Insert.

<figure><img src="https://564713456-files.gitbook.io/~/files/v0/b/gitbook-x-prod.appspot.com/o/spaces%2FKNcXDcNRYHUBsVw12Dii%2Fuploads%2FcOvlbC2AF8YjEfDahn4G%2FScreenshot%202024-09-17%20at%2014.32.40.png?alt=media&amp;token=e6a9946d-7987-403f-8b7c-c84cbed5e02e" alt=""><figcaption></figcaption></figure>

### Viewing your Scene in the Web, AR or VR <a href="#viewing-your-scene-in-the-web-ar-or-vr" id="viewing-your-scene-in-the-web-ar-or-vr"></a>

Save and publish your HubSpot website and view the link on any device to explore it immersively.

<figure><img src="https://564713456-files.gitbook.io/~/files/v0/b/gitbook-x-prod.appspot.com/o/spaces%2FKNcXDcNRYHUBsVw12Dii%2Fuploads%2FSjVSOGk3V3VYMKfd11fM%2FScreenshot%202024-09-18%20at%2012.38.19.png?alt=media&amp;token=72f7c819-8113-4a77-aba9-51c549806979" alt=""><figcaption></figcaption></figure>

### Conclusion <a href="#conclusion" id="conclusion"></a>

By integrating SwiftXR with HubSpot you can seamlessly blend 3D elements into your web prototypes, creating more engaging and interactive experiences for your users. Explore the possibilities of using SwiftXR to enhance your HubSpot Websites and bring your ideas to life in an immersive and interactive way.


# Jimdo

Add or embed 3D, Augmented Reality (AR) and Virtual Reality (VR) content/design to your Jimdo website

## Introduction

SwiftXR is a powerful platform for creating and sharing interactive 3D, augmented reality (AR), and virtual reality (VR) experiences on the web. With the SwiftXR (3D/AR/VR) Integration for Jimdo, you can easily integrate SwiftXR Projects into your Jimdo website, enabling you to create immersive  and interactive web experiences.

Creating a Project in SwiftXR

* Navigate to the SwiftXR Hub: Begin by visiting the SwiftXR Hub, or alternatively click on this link: <https://swiftxr.io/hub>&#x20;
* Initiate Project Creation: Once on Hub, click the “Create Project” button and enter your desired project name.
* Design or Develop: Utilize the intuitive editor to effortlessly add and customize SwiftXR components, bringing your 3D vision to life.

<figure><img src="https://564713456-files.gitbook.io/~/files/v0/b/gitbook-x-prod.appspot.com/o/spaces%2FKNcXDcNRYHUBsVw12Dii%2Fuploads%2Frm8ZVQ8wjIB33JFLAa9n%2FScreenshot%202025-08-27%20184324.png?alt=media&amp;token=e7ed9c12-bb48-4187-b28c-791ee1567ab9" alt=""><figcaption></figcaption></figure>

## Publishing your SwiftXR Project

* Utilize the editor to create your 3D vision using the SwiftXR components. Once satisfied with your creation, press the “Publish” or “Update” button to make your project live

<figure><img src="https://564713456-files.gitbook.io/~/files/v0/b/gitbook-x-prod.appspot.com/o/spaces%2FKNcXDcNRYHUBsVw12Dii%2Fuploads%2FWw6HyZFDAKwEet9PXEpE%2FScreenshot%202025-08-27%20185204.png?alt=media&amp;token=a815cd0a-9dd8-4bf6-8f20-0fb435ddc385" alt=""><figcaption></figcaption></figure>

## Copy Embed Code

* After publishing, click the dropdown button beside the “Update” button and select “Share.” Within the Share modal, click the “Copy Embed” button to copy the embed code for your project

<figure><img src="https://564713456-files.gitbook.io/~/files/v0/b/gitbook-x-prod.appspot.com/o/spaces%2FKNcXDcNRYHUBsVw12Dii%2Fuploads%2FVuB2ntQHEzoEvBJgvaa9%2FScreenshot%202025-08-27%20185337.png?alt=media&amp;token=373c83e9-9b45-447e-a1d5-c851c8e33856" alt=""><figcaption></figcaption></figure>

## Integrating SwiftXR into Jimdo Website

* Go to <https://www.jimdo.com/login/> and “Log In” if you already have an account, If you do not have an account yet, simply “Create an account”
* Select a site you want to edit: Choose a site from the various sites below  to edit

<figure><img src="https://564713456-files.gitbook.io/~/files/v0/b/gitbook-x-prod.appspot.com/o/spaces%2FKNcXDcNRYHUBsVw12Dii%2Fuploads%2FdB3WamYutexALCtTuudK%2FScreenshot%202025-08-27%20185500.png?alt=media&amp;token=fb9af37b-6b4e-4d9a-beb0-437ac0edce70" alt=""><figcaption></figcaption></figure>

## Choose the Page & Section

* From the left Navigation Menu, pick the page where you want the 3D/AR model to appear

<figure><img src="https://564713456-files.gitbook.io/~/files/v0/b/gitbook-x-prod.appspot.com/o/spaces%2FKNcXDcNRYHUBsVw12Dii%2Fuploads%2FdB3WamYutexALCtTuudK%2FScreenshot%202025-08-27%20185500.png?alt=media&amp;token=fb9af37b-6b4e-4d9a-beb0-437ac0edce70" alt=""><figcaption></figcaption></figure>

## Select the site you want to edit

* Hover over the section where you want to place the model and click “Add Element”

<figure><img src="https://564713456-files.gitbook.io/~/files/v0/b/gitbook-x-prod.appspot.com/o/spaces%2FKNcXDcNRYHUBsVw12Dii%2Fuploads%2FSGFHyIASxlVIydmItJQm%2FScreenshot%202025-08-27%20185823.png?alt=media&amp;token=65cec661-b278-4d9f-8cd2-f8f90a86ab32" alt=""><figcaption></figcaption></figure>

## Add an Embed/HTML Widget

* In the element list, search for “Widget/HTML” (or custom code) and click on it to insert it into the page

<figure><img src="https://564713456-files.gitbook.io/~/files/v0/b/gitbook-x-prod.appspot.com/o/spaces%2FKNcXDcNRYHUBsVw12Dii%2Fuploads%2FvdsZ8Xzttz8WiSJRwlse%2FScreenshot%202025-08-27%20185941.png?alt=media&amp;token=52509d18-fb14-4dbf-976b-bf6a2f551424" alt=""><figcaption></figcaption></figure>

## Paste your SwiftXR Code

* Inside the HTML widget editor, paste your SwiftXR “iframe code” and click on “Save” in the bottom right corner.

<figure><img src="https://564713456-files.gitbook.io/~/files/v0/b/gitbook-x-prod.appspot.com/o/spaces%2FKNcXDcNRYHUBsVw12Dii%2Fuploads%2F4FYnmiZqSCDgAkuEI4bP%2FScreenshot%202025-08-27%20190043.png?alt=media&amp;token=e5b1cfac-0a3c-4180-9010-1b48766996a5" alt=""><figcaption></figcaption></figure>

## Viewing your Scene in the Web, AR or VR

* Save and publish the Jimdo website and view the link on any device to explore it immersively

<figure><img src="https://564713456-files.gitbook.io/~/files/v0/b/gitbook-x-prod.appspot.com/o/spaces%2FKNcXDcNRYHUBsVw12Dii%2Fuploads%2FAMCmjVMTBCU4zGBmk9Lu%2FScreenshot%202025-08-27%20190417.png?alt=media&amp;token=a9b8fc30-d8d5-4df2-a7c0-be1a063bf527" alt=""><figcaption></figcaption></figure>

## Conclusion

Integrating SwiftXR into your Jimdo website allows you to showcase products in 3D and AR directly on your pages. With just a simple iframe embed, you can provide visitors with an interactive and engaging shopping experience. This not only helps customers better understand your products but also builds trust, reduces uncertainty, and can lead to higher sales and lower return rates

<br>


# Notion

Add or embed 3D, Augmented Reality (AR), and Virtual Reality (VR) content/design to your  Notion Site.

<figure><img src="https://564713456-files.gitbook.io/~/files/v0/b/gitbook-x-prod.appspot.com/o/spaces%2FKNcXDcNRYHUBsVw12Dii%2Fuploads%2FHlZabTUVQOyw0TYWbocb%2FScreenshot%202025-06-17%20131205.png?alt=media&amp;token=a82c8fed-7f39-4fe1-86f1-07d0fbb0ee2c" alt=""><figcaption></figcaption></figure>

## Introduction

SwiftXR is a powerful platform for creating and sharing interactive 3D, augmented reality (AR), and virtual reality (VR) experiences on the web. With the SwiftXR (3D/AR/VR) Integration for Notion, you can easily integrate SwiftXR Projects into your Notion sites, enabling you to create immersive and interactive web experiences.

## Creating a Project on SwiftXR

* Navigate to the SwiftXR Hub: Begin by visiting the [SwiftXR Hub](https://swiftxr.io/hub).
* Initiate Project Creation: Once on Hub, click the "Create Project" button and enter your desired project name.
* Design and Develop: Utilize the intuitive editor to effortlessly add and customize SwiftXR components, bringing your 3D vision to life.

<figure><img src="https://564713456-files.gitbook.io/~/files/v0/b/gitbook-x-prod.appspot.com/o/spaces%2FKNcXDcNRYHUBsVw12Dii%2Fuploads%2F1XhsLgI2hcen9OBkPpgK%2Fnotion%201.jpg?alt=media&amp;token=6fd0ccce-6eed-4b25-bb4e-04204774c10b" alt=""><figcaption></figcaption></figure>

## Publishing your SwiftXR Project

Utilize the editor to create your 3D vision using the SwiftXR components. Once satisfied with your creation, press the "Publish" or "Update" button to make your project live.

<figure><img src="https://564713456-files.gitbook.io/~/files/v0/b/gitbook-x-prod.appspot.com/o/spaces%2FKNcXDcNRYHUBsVw12Dii%2Fuploads%2FrAIfrdaZet3RfWawCHvY%2FScreenshot%202025-06-17%20133113.png?alt=media&amp;token=e213ef28-7939-4c18-8649-d2abbfcd8fbc" alt=""><figcaption></figcaption></figure>

## Copy your Project URL

After publishing copy your project URL&#x20;

<figure><img src="https://564713456-files.gitbook.io/~/files/v0/b/gitbook-x-prod.appspot.com/o/spaces%2FKNcXDcNRYHUBsVw12Dii%2Fuploads%2FRtU99PmCPRsj3WUQLy08%2Fnotion%202.jpg?alt=media&amp;token=8d8456c5-1c1d-469b-ad00-9706afb93c77" alt=""><figcaption></figcaption></figure>

## Integrating SwiftXR on Notion

* Log in to your Notion account
* Create a page&#x20;

<figure><img src="https://564713456-files.gitbook.io/~/files/v0/b/gitbook-x-prod.appspot.com/o/spaces%2FKNcXDcNRYHUBsVw12Dii%2Fuploads%2FwrjLuDAzSjwImi8xS1Xp%2Fnotion%203.jpg?alt=media&amp;token=365f2312-5c19-41a9-93f9-1a1925f0d8d0" alt=""><figcaption></figcaption></figure>

* Name your page, then click on the + sign on your page, scroll down to Embed

<figure><img src="https://564713456-files.gitbook.io/~/files/v0/b/gitbook-x-prod.appspot.com/o/spaces%2FKNcXDcNRYHUBsVw12Dii%2Fuploads%2FCsqinr7bGNPtO5OUtJVW%2Fnotion%204.jpg?alt=media&amp;token=b7ba3960-4b3d-4166-86be-fbe2e650037c" alt=""><figcaption></figcaption></figure>

* Paste your project URL then click on Embed code

<figure><img src="https://564713456-files.gitbook.io/~/files/v0/b/gitbook-x-prod.appspot.com/o/spaces%2FKNcXDcNRYHUBsVw12Dii%2Fuploads%2FJGOqB21OG78CA6AuHM8I%2Fnotion%205.jpg?alt=media&amp;token=b2dcac72-0a1b-4c93-be5a-2aa8fbfea340" alt=""><figcaption></figcaption></figure>

## View your scene in  the Web, AR, VR&#x20;

Save and publish your Notion site and view the link on any device to explore it immersively

<figure><img src="https://564713456-files.gitbook.io/~/files/v0/b/gitbook-x-prod.appspot.com/o/spaces%2FKNcXDcNRYHUBsVw12Dii%2Fuploads%2FpXYpDMGQXv0ws7J04wAC%2FScreenshot%202025-06-17%20141103.png?alt=media&amp;token=4ad94da2-0c9e-4346-b65e-4f7af573577d" alt=""><figcaption></figcaption></figure>

## Conclusion

By integrating SwiftXR with Notion you can seamlessly blend 3D elements into your web prototypes, creating more engaging and interactive experiences for your users. Explore the possibilities of using SwiftXR to enhance your Notion sites and bring your ideas to life in an immersive and interactive way.


# Neocities

Add or embed 3D, Augmented Reality (AR) and Virtual Reality (VR) content/design to your Neocities website

## Introduction

SwiftXR is a powerful platform for creating and sharing interactive 3D, augmented reality (AR), and virtual reality (VR) experiences on the web. With the SwiftXR (3D/AR/VR) Integration for Neocities, you can easily integrate SwiftXR Projects into your Neocities website, enabling you to create immersive  and interactive web experiences.

**Creating a Project in SwiftXR**

* Navigate to the SwiftXR Hub: Begin by visiting the SwiftXR Hub, or alternatively click on this link: <https://swiftxr.io/hub>&#x20;
* Initiate Project Creation: Once on Hub, click the “Create Project” button and enter your desired project name.
* Design or Develop: Utilize the intuitive editor to effortlessly add and customize SwiftXR components, bringing your 3D vision to life.

<figure><img src="https://564713456-files.gitbook.io/~/files/v0/b/gitbook-x-prod.appspot.com/o/spaces%2FKNcXDcNRYHUBsVw12Dii%2Fuploads%2FBSDoU9kBB4bkDIcKfjjR%2Fimage.png?alt=media&amp;token=9d9f442f-e526-400a-8bb6-cce02df79206" alt=""><figcaption></figcaption></figure>

**Publishing your SwiftXR Project**

* Utilize the editor to create your 3D vision using the SwiftXR components. Once satisfied with your creation, press the “Publish” or “Update” button to make your project live.

<figure><img src="https://564713456-files.gitbook.io/~/files/v0/b/gitbook-x-prod.appspot.com/o/spaces%2FKNcXDcNRYHUBsVw12Dii%2Fuploads%2FnmwmXDSySL59Eq1k2TM3%2Fimage.png?alt=media&amp;token=93da0769-f78a-431b-90d4-1656d302881b" alt=""><figcaption></figcaption></figure>

**Copy Embed Code**

* After publishing, click the dropdown button beside the “Update” button and select “Share.” Within the Share modal, click the “Copy Embed” button to copy the embed code for your project

<figure><img src="https://564713456-files.gitbook.io/~/files/v0/b/gitbook-x-prod.appspot.com/o/spaces%2FKNcXDcNRYHUBsVw12Dii%2Fuploads%2FnWwYllkrhAwwNFXL6I6v%2Fimage.png?alt=media&amp;token=f19a9c54-8553-4af2-b405-3cda9e4bc065" alt=""><figcaption></figcaption></figure>

**Integrating SwiftXR into Neocities Website**

* In the Home screen, click on index.html (the first file in your list), this will open Neocities’ built in editor.

<figure><img src="https://564713456-files.gitbook.io/~/files/v0/b/gitbook-x-prod.appspot.com/o/spaces%2FKNcXDcNRYHUBsVw12Dii%2Fuploads%2FbEulOZOE86rvgFxnmejl%2Fimage.png?alt=media&amp;token=3628ccd5-fdd3-41c1-94ce-dddd6d2f842b" alt=""><figcaption></figcaption></figure>

* In the editor, scroll until you find the \<body> section of the HTML and paste your SwiftXR iframe code there.
* Click “Save”

<figure><img src="https://564713456-files.gitbook.io/~/files/v0/b/gitbook-x-prod.appspot.com/o/spaces%2FKNcXDcNRYHUBsVw12Dii%2Fuploads%2F9Ca5lv8aPRU5KSQAgzcg%2Fimage.png?alt=media&amp;token=d440446d-e8d9-44a0-b696-4cbc7d3ace2b" alt=""><figcaption></figcaption></figure>

**Viewing your Scene in the Web, AR or VR**

* Right beside the “Save” button in the image above is the “View” button, you will click on the “View” button to experience your product immersively.

<figure><img src="https://564713456-files.gitbook.io/~/files/v0/b/gitbook-x-prod.appspot.com/o/spaces%2FKNcXDcNRYHUBsVw12Dii%2Fuploads%2FwzR5vyVnzApIM6vWVZXr%2Fimage.png?alt=media&amp;token=eac9e07f-c8e3-4966-acd8-3f088db9a53a" alt=""><figcaption></figcaption></figure>

## Conclusion

Integrating SwiftXR into Neocities is simple and does not require any paid plan. By pasting the embed code directly into your index.html (or any page), you can display interactive 3D and AR experiences on your live site at “yourdomain.neocities.org”. Since Neocities gives you full control over your HTML, you have the flexibility to customize and update your SwiftXR projects anytime. This makes it a great free option for showcasing immersive 3D content online

<br>


# Mozello

Add or embed 3D, Augmented Reality (AR) and Virtual Reality (VR) content/design to your Mozello website

SwiftXR is a powerful platform for creating and sharing interactive 3D, augmented reality (AR), and virtual reality (VR) experiences on the web. With the SwiftXR (3D/AR/VR) Integration for Mozello, you can easily integrate SwiftXR Projects into your Mozello website, enabling you to create immersive and interactive web experiences

## Creating a Project in SwiftXR

* Navigate to the SwiftXR Hub: Begin by visiting the SwiftXR Hub, or alternatively click on this link: <https://swiftxr.io/hub>&#x20;
* Initiate Project Creation: Once on Hub, click the “Create Project” button and enter your desired project name.
* Design or Develop: Utilize the intuitive editor to effortlessly add and customize SwiftXR components, bringing your 3D vision to life.

<figure><img src="https://564713456-files.gitbook.io/~/files/v0/b/gitbook-x-prod.appspot.com/o/spaces%2FKNcXDcNRYHUBsVw12Dii%2Fuploads%2F8LI4PsIKQXBHKhN4BHmM%2FScreenshot%202025-09-10%20091147.png?alt=media&amp;token=17d1a8ae-ed2c-409b-897c-32b5cc59b150" alt=""><figcaption></figcaption></figure>

## Publishing your SwiftXR Project

* Utilize the editor to create your 3D vision using the SwiftXR components. Once satisfied with your creation, press the “Publish” or “Update” button to make your project live.

<figure><img src="https://564713456-files.gitbook.io/~/files/v0/b/gitbook-x-prod.appspot.com/o/spaces%2FKNcXDcNRYHUBsVw12Dii%2Fuploads%2FCtmlKao4UNf8F1ypoBb8%2FScreenshot%202025-09-10%20091258.png?alt=media&amp;token=91acec12-590e-4735-bf78-891a68b5c902" alt=""><figcaption></figcaption></figure>

## Copy Embed Code

* After publishing, click the dropdown button beside the “Update” button and select “Share.” Within the Share modal, click the “Copy Embed” button to copy the embed code for your project.

<figure><img src="https://564713456-files.gitbook.io/~/files/v0/b/gitbook-x-prod.appspot.com/o/spaces%2FKNcXDcNRYHUBsVw12Dii%2Fuploads%2Fm3lIQFdgzrzuUXR6xjYk%2FScreenshot%202025-09-10%20091641.png?alt=media&amp;token=65af452f-0f9c-4e7e-ab65-52428478be48" alt=""><figcaption></figcaption></figure>

## Integrating SwiftXR into Mozello Website

* Go to [Mozello.com](http://mozello.com) and “Log In” if you already have an account, If you do not have an account yet, simply “Create an account”
* Select a site you want to edit: Choose a template from the various templates below  to edit.

<figure><img src="https://564713456-files.gitbook.io/~/files/v0/b/gitbook-x-prod.appspot.com/o/spaces%2FKNcXDcNRYHUBsVw12Dii%2Fuploads%2FmDmfREZW4T7YheHDlijx%2FScreenshot%202025-09-10%20091904.png?alt=media&amp;token=26406911-fc84-420e-ae4b-f5bca5b9cccc" alt=""><figcaption></figcaption></figure>

## Edit the Page Content

* Navigate to the Page where you want the SwiftXR viewer to appear
* Place your cursor where you want to insert the 3D/AR experience

<figure><img src="https://564713456-files.gitbook.io/~/files/v0/b/gitbook-x-prod.appspot.com/o/spaces%2FKNcXDcNRYHUBsVw12Dii%2Fuploads%2Fv1aSO82EbuPAcLMbVDS6%2Fimage.png?alt=media&amp;token=61612799-4af0-475f-884c-0ed704d82516" alt=""><figcaption></figcaption></figure>

**Insert the Embed Code**

* In the editor toolbar, click the “\</>” insert code button
* Paste your SwiftXR iframe embed code
* Click on “Apply”

<figure><img src="https://564713456-files.gitbook.io/~/files/v0/b/gitbook-x-prod.appspot.com/o/spaces%2FKNcXDcNRYHUBsVw12Dii%2Fuploads%2FFwNwe9KNxBlsmAo6w16k%2Fimage.png?alt=media&amp;token=450a5e8c-b28a-49f0-8522-d6eafe3a2661" alt=""><figcaption></figcaption></figure>

**Viewing your Scene in the Web, AR or VR**

* Save and publish the Jimdo website and view the link on any device to explore it immersively

<figure><img src="https://564713456-files.gitbook.io/~/files/v0/b/gitbook-x-prod.appspot.com/o/spaces%2FKNcXDcNRYHUBsVw12Dii%2Fuploads%2FrHHhYnwM6IMfnUygmgB0%2Fimage.png?alt=media&amp;token=e63bf6dd-4074-4935-a3a6-457e3ff3c0b9" alt=""><figcaption></figcaption></figure>

## Conclusion

Integrating SwiftXR into your Mozello website is quick and straightforward. Since Mozello supports custom HTML embedding even on the free plan, you can easily showcase interactive 3D and AR models by pasting the SwiftXR iframe code into any content block. This makes Mozello a great option for displaying products, portfolios, or immersive experiences directly on your site without needing extra plugins or upgrades.


# Style3d

Export and Embed Style3D Clothing Designs in 3D, AR, and VR Experiences

<figure><img src="https://564713456-files.gitbook.io/~/files/v0/b/gitbook-x-prod.appspot.com/o/spaces%2FKNcXDcNRYHUBsVw12Dii%2Fuploads%2FGBqnUAIbHFAmpoIKr7G8%2Fimage.png?alt=media&amp;token=9681c585-935c-46e9-9987-5a0829e4f18b" alt=""><figcaption></figcaption></figure>

This guide will walk you through the process of exporting your Clothing from Style3D to SwiftXR for VR and AR experiences. Each step is explained in detail to help both beginners and experienced user

Before starting, ensure you have:

\- Style3D Studio installed (They have a free version as well as a 30 free version for the complete software) <https://www.linctex.com/products/studio>

\- [SwiftXR account](/) [ https://home.swiftxr.io/](https://home.swiftxr.io/)

## Step-by-Step Process

### 1. Once you are done with your cloth creations, please check the following below.

* If you have trims that you use the topstitch functions to create. Please make sure the type is OBJ for the front,Leave the back on check and make sure the type is TEXTURE.

<figure><img src="https://lh7-rt.googleusercontent.com/docsz/AD_4nXesK7MKMbZY3WGsshoTnle_uQAiHf1OmsmHzjuoqn12HTiV5afbzqtNqbWsv7EkbLVFrG06LZfDHKpcWsXDs31-rhec_M0LtAjPtSjvp9gqBuF8vkfrop5EbsaGB-LJZLZnoFyL?key=X8Z6fmL6za6DIb9T_XfQABvf" alt=""><figcaption></figcaption></figure>

<figure><img src="https://lh7-rt.googleusercontent.com/docsz/AD_4nXf9WYKIgEnMuoFMI6r9DYyOkgyzTrhML7WgsXGCdwkIMs4ApkKCsnL8ZRKPQcqqFf1U7e3DEUn2jHvXPUi5q1RlcKqtzIXiPxXYyrbgugjjdQCcQYu-hyWWIE8b841ToKVYdOYgYg?key=X8Z6fmL6za6DIb9T_XfQABvf" alt=""><figcaption></figcaption></figure>

<br>

* If you have topstitch that are just topstitch and not trims, please make sure the type is TEXTURE for the front and check same as front for the back

<figure><img src="https://lh7-rt.googleusercontent.com/docsz/AD_4nXeZUGVNjpYCoeHkJm414BH6VaFoAizrkM6pj4ZfwdC0VtrSlkq_kYHOt1ouKZ26NA75XC-4ohWllCSJ9DJmEs6DhC6Zzd8VC9_2zeTmlgu-wJ91hZF1Th6T3vqcu-pdY8pPcBjSRg?key=X8Z6fmL6za6DIb9T_XfQABvf" alt=""><figcaption></figcaption></figure>

<figure><img src="https://lh7-rt.googleusercontent.com/docsz/AD_4nXexYYzgJjfSkOJJLwXnHf_uT1hyCDHzGcihx2OQ1v5fYyAOlhJlMG4YS3yHGhVMtXkBKEYWTzqGfcgVKFZjuUxyH2aUlkA0W_cOBe4QDwnRgPKjvLf-druWjU_RCpxnK7PF1GJbhQ?key=X8Z6fmL6za6DIb9T_XfQABvf" alt=""><figcaption></figcaption></figure>

\ <br>

### &#x20;2. Uv Setting

* Go to Tools on the upper part of your screen > then click on the UV editor.You should have something like this, see image below

<figure><img src="https://lh7-rt.googleusercontent.com/docsz/AD_4nXen96W3idjlvv_KFN_YcpLKlq-aBqpRvym8lGReSZ8ly6ILP93aki7-Zoc68WtImaCOT30D9Wn4-0KMIqCQEdHJ_71oGobHBTcQOOuyYLQzFaW9hToLI2gLYvT4BiYa1Zz06M6aTg?key=X8Z6fmL6za6DIb9T_XfQABvf" alt=""><figcaption></figcaption></figure>

* You need to arrange the UV into one single UV tile, there are three methods

1. Method One - Manual select all the UV patterns, scale and resize to fit one Uv box, make sure they are scaled all at ones and noon is outside the UV tile or touching each other within the tile.

<figure><img src="https://lh7-rt.googleusercontent.com/docsz/AD_4nXcgqJqSjnCr2FgOYxT5WGbrdtmXoXZoTZu1Mu1Ut1054PG6ppp3sOfFYRIGg4rRQ5-HsXOw8XaZFOIVyUppTNcbYIr5f9Bc4MPYoI8YljzEm__l0Rdj1UyajDJNge-QFUuApXUD?key=X8Z6fmL6za6DIb9T_XfQABvf" alt=""><figcaption></figcaption></figure>

<figure><img src="https://lh7-rt.googleusercontent.com/docsz/AD_4nXe9vi50Q--x9zbHj9Klk00WO3V-4d3143akG0ZYRPyUJW4N96mBq9ucbKIzZT76VmFteODIVENfR5YwVOi3kgV2h1M_KhWyWTU4MYkYjZ9mdL3nbYOky_TjtnKZuwcLhdvFK-v7?key=X8Z6fmL6za6DIb9T_XfQABvf" alt=""><figcaption></figcaption></figure>

2. Method Two - Go the upper part of your UV editor and click on Layout, see image below.

<figure><img src="https://lh7-rt.googleusercontent.com/docsz/AD_4nXfUAki2KfnTlyk796x8hWSbvpisax4bhO4s1MScl_VyOiWXwLVHFINsBV0CV94umMhBiZN3QxGmg993gn8mGalGhEQnkBIpsJo3CX9IsLZxhZ-grNvIzz0wKkZWRlWh7TUlK_ZW8g?key=X8Z6fmL6za6DIb9T_XfQABvf" alt=""><figcaption></figcaption></figure>

3. Method Three - Right click on your UV editor window and click fit all uv to 0-1.

   <figure><img src="https://lh7-rt.googleusercontent.com/docsz/AD_4nXdtrTg9YLZ99LnbWs5pnF5m7iYoL1hllkKG7v26gNY3qPM6TLdEdGee9kzTkM5A0dBfkO9ZV_gNEWH234fYFCmLZDZVGkjYSyaZp2YkzDQLBE8pmGkwLJVRfWP_8lfXSn6Supv6Vw?key=X8Z6fmL6za6DIb9T_XfQABvf" alt=""><figcaption></figcaption></figure>

<figure><img src="https://lh7-rt.googleusercontent.com/docsz/AD_4nXc674ja6DCWPgxZsXzLzvk_OMsLDVqN2-F3zcLJvZiy-LYJrnKDNRD7ZLvJ7tieoYEGkiw8bbi0lf0WlNQIDP8W-CBKC7fWAQOxUtTLVaOBf7bGhQhT8itByLYNo7pm-D9L0EBxKQ?key=X8Z6fmL6za6DIb9T_XfQABvf" alt=""><figcaption></figcaption></figure>

## 3.  Export as GLB

* &#x20;Go to File > Export > GLB, Choose where to save and give it a name.

<figure><img src="https://lh7-rt.googleusercontent.com/docsz/AD_4nXd6fr2ExMbclh2_pWp8ZBaXGUDSbIHyaQ4GDxgo2DWbL85g1Q00rpNZhb0JrB83zXojIaBHIgD0H973QvxZS9qDuFHgpSWLR0jY_fpKcPSuYYwgVPiEnM8NXoGb_5pzR1hsDWst5A?key=X8Z6fmL6za6DIb9T_XfQABvf" alt=""><figcaption></figcaption></figure>

* The GLB export settings will poop out, check out
* * Check out all props and all avatar
  * Make sure it is set to Thin
  * Under option choose Simplify Mesh
  * Check unified UV Coordinates
  * Check baking all map, for the size it is advisable you use 1k so as to export a low poly mesh
  * Make the scale CM and 1.00%
  * Check save with Texture Files (ZIP)

<figure><img src="https://lh7-rt.googleusercontent.com/docsz/AD_4nXeNVF05Dt8oyAUnjYkkaTQfURQoS-E77_IlAu_iNeyVwladdJQRYbrfwj7i6chLOTW0Ajy8-vBB0NLtssCXOV4IxiZKPTebfWDTzp8fB2dOK4q8KkTu7z4t9RDDGqU8d2pEFLXPnQ?key=X8Z6fmL6za6DIb9T_XfQABvf" alt=""><figcaption></figcaption></figure>

<br>

<figure><img src="https://lh7-rt.googleusercontent.com/docsz/AD_4nXdHyoT-j66IjMHE_DYvNY_9VKPs62a20T8MNZieyIG-xFmN4Amd6r4PXt4_94Axgd6Bc_6Z64CvNSv9pbID0bfdEwyhbL4rSnTcSjPibG3pzSo0jQzc-JavMbRD7GoXUzlNoWMGxA?key=X8Z6fmL6za6DIb9T_XfQABvf" alt=""><figcaption></figcaption></figure>

* After making sure the settings are similar to the above, click Ok and export.&#x20;
* Go to where it exported and unzip to see your GLB

<figure><img src="https://lh7-rt.googleusercontent.com/docsz/AD_4nXdQmzftfW_IfqmpTOclnj0yU3UXVq7-jgYqY_6TjdjbRlqqtU1K1NfA1jcMr3LrDJ7zZA8gcrLX31sSctOC2O1gXWiHFJtZgrCZKlM0WaNOujP4nv5eFwvwm6Jz7C6uSPHg0YiuVA?key=X8Z6fmL6za6DIb9T_XfQABvf" alt=""><figcaption></figcaption></figure>

4\. Import to SwiftXR

* [Create a new project](/creating-a-project) in SwiftXR, see how to create a project [here](/creating-a-project)&#x20;
* You can either Drag your model and drop it on the SwiftXR Canvas or you go to File > Upload&#x20;

<figure><img src="https://lh7-rt.googleusercontent.com/docsz/AD_4nXcqRxntv7uf1Lsk4XP9_N8v6dwu4DtE4kdDpBip19H4qPZ5beM-Ikc4fFNcXbqrIkxcHfsSacEu56Pi5kL5FbfrrpxaW7acCZ_aCGw28LxRf5_5CJrnbMO6uA2KUrRw-N5NcJJ6wQ?key=X8Z6fmL6za6DIb9T_XfQABvf" alt=""><figcaption></figcaption></figure>

* You will get a warning sign if your model is more than 50mb so it advisable to keep it at 100mb so following the export setting from style3D is crucial to achieve this, Click on proceed.<br>

  <figure><img src="https://lh7-rt.googleusercontent.com/docsz/AD_4nXeB_vMsMgWRVHo5g1rEqb-yiotvX6mCGKedO0R--YUOJS9q2BmArCGkSQfCgUQ2ndRZExSjvL2QGKBeGzx0ukRSHJspC-hgjh96Z4dPvoQN-ZoQ-vwfMEqpCD-KyBiOlshd49Z8Fw?key=X8Z6fmL6za6DIb9T_XfQABvf" alt=""><figcaption></figcaption></figure>
* &#x20;Once imported, carefully check your model in SwiftXR. Verify that all parts, textures, and materials appear as expected.

<figure><img src="https://lh7-rt.googleusercontent.com/docsz/AD_4nXe3D_PQOwok2S-P_J7G7jBF0Y5JVBP9GdKNcVgOVOzwfN6K92AyIU_swpdCNKGoIULUw8Evd7wMyWDM0DASg8GLFrXyzv4xVlBxJXFZK2vi0frCFWkVsGLaGAlej3Q0yrgbqVNHAg?key=X8Z6fmL6za6DIb9T_XfQABvf" alt=""><figcaption></figcaption></figure>


# Shopify

Add or embed 3D, Augmented Reality (AR), and Virtual Reality (VR) content/design to your Shopify website.

[Install Shopify](https://apps.shopify.com/swiftxr-viewer)

## Step 1:  Add Your Product to Shopify (Skip if Already Added)"

After setting up your store on Shopify, you will need to add your custom products. If you have your products added you can  skip this part.

**To add your product:**

* Head over to "**Products**" on the left hand side of your store.
* Add in the necessary information down to price, name of products and an Image of your product
* Hit "**save**" when you are done.

<figure><img src="https://564713456-files.gitbook.io/~/files/v0/b/gitbook-x-prod.appspot.com/o/spaces%2FKNcXDcNRYHUBsVw12Dii%2Fuploads%2FdGErWfbWGisLxersBT1b%2Ffinal%201.jpg?alt=media&amp;token=c3aa6013-ed4f-4be5-af22-f209021cda5b" alt=""><figcaption></figcaption></figure>

## Step 2: Open Your Shopify Plugin; The SwiftXR (3D/AR/VR) Viewer App

Head over to the "**Apps**" section on your Shopify dashboard. Click on your already installed **SwiftXR (3D/AR/VR) app** to open it

<figure><img src="https://564713456-files.gitbook.io/~/files/v0/b/gitbook-x-prod.appspot.com/o/spaces%2FKNcXDcNRYHUBsVw12Dii%2Fuploads%2FxwgJUNy47ruMe1zrblhD%2FFinal%20shopify.jpg?alt=media&amp;token=3ca67312-7a01-4a65-9967-1a00574aa51c" alt=""><figcaption></figcaption></figure>

## Step 3: Link your Product to a 3D View&#x20;

To link your Product Click on "**Link a 3D Product view**". This action will make the page where you will select your product to pop up.

<figure><img src="https://564713456-files.gitbook.io/~/files/v0/b/gitbook-x-prod.appspot.com/o/spaces%2FKNcXDcNRYHUBsVw12Dii%2Fuploads%2Fg5ia5rCGXUdDpl9i3ggd%2Fxr%201.jpg?alt=media&amp;token=a4df0814-4468-4849-a368-90ae6053b759" alt=""><figcaption></figcaption></figure>

Then Click on  "**select a product**."&#x20;

(This will allow your 3D entry be linked to your selected product)

<figure><img src="https://564713456-files.gitbook.io/~/files/v0/b/gitbook-x-prod.appspot.com/o/spaces%2FKNcXDcNRYHUBsVw12Dii%2Fuploads%2FZ4AidQ7H3HNvuViuDCAh%2Fnew%201.jpg?alt=media&amp;token=f47178c6-037e-46bf-8a8d-e576df487d95" alt=""><figcaption></figcaption></figure>

## Step 4: Click ‘Open SwiftXR Hub’ to open your SwiftXR Account and Create Your 3D/AR/VR Project

After selecting a product, click on "**open SwiftXR hub**". This will take you to the SwiftXR hub where you will create your 3D/AR/VR entry.&#x20;

<figure><img src="https://564713456-files.gitbook.io/~/files/v0/b/gitbook-x-prod.appspot.com/o/spaces%2FKNcXDcNRYHUBsVw12Dii%2Fuploads%2FC7LHHHLfBpFwtYSeIUf3%2Fxr%202.jpg?alt=media&amp;token=328d113a-83c2-49d8-8b73-f3ccff7900b1" alt=""><figcaption></figcaption></figure>

## Step 5: Create a Project

In the SwiftXR hub, Click on "**Create projec**t", give your project a name, then click on "**create**"

N.B (You can make use of the free templates available but its optional)

<figure><img src="https://564713456-files.gitbook.io/~/files/v0/b/gitbook-x-prod.appspot.com/o/spaces%2FKNcXDcNRYHUBsVw12Dii%2Fuploads%2FboJvAoroVsox13OoMHKD%2Fnew%202.jpg?alt=media&amp;token=e0e1c2dd-eaef-4222-af78-92a3c5055adb" alt=""><figcaption></figcaption></figure>

## Step 6: Add a 3D Component and Upload your 3D Model

* From the component tab, click or drag and drop a AR component to add it to the white canvas.
* Select the "**Properties**" tab to **upload a 3D model**, import from a **3D store** or **Request a 3D mode**l from <support@swiftxr.io> or use our **AI image to 3D converter**

<figure><img src="https://564713456-files.gitbook.io/~/files/v0/b/gitbook-x-prod.appspot.com/o/spaces%2FKNcXDcNRYHUBsVw12Dii%2Fuploads%2FTBO3LLEyt2BO6PxWVSkw%2Fnew%204.jpg?alt=media&amp;token=8a771bcd-7861-430a-8941-13c87d0463cf" alt=""><figcaption></figcaption></figure>

## Step 5: Publish your Project

To publish your project, click the "**Publish**" button located at the top right corner of the SwiftXR Editor and then select "**Publish Project**".

(Optional) You can customise the project URL before you publish

## Step 6: Copy the Published Project URL&#x20;

After publishing your project, copy the published project URL, then close the SwiftXR dashboard

**Important**: Make sure that your project URL has the "swiftxr.app" domain, otherwise our servers will mark it as invalid. You can also view and share the project using the published project URL<br>

<figure><img src="https://564713456-files.gitbook.io/~/files/v0/b/gitbook-x-prod.appspot.com/o/spaces%2FKNcXDcNRYHUBsVw12Dii%2Fuploads%2FUNRmsoyCSLDwLAahSJNR%2Fnew%205.jpg?alt=media&amp;token=288c28bc-d213-4bce-adff-ee948c090822" alt=""><figcaption></figcaption></figure>

## Step 7: Paste your Project URL&#x20;

* Paste the published project URL you copied after publishing your project into the "**SwiftXR Published Project Link**" input field, then click on "**Save entry**"

(SwiftXR helps display different 3D/AR/VR project based on the Shopify product connected)

<figure><img src="https://564713456-files.gitbook.io/~/files/v0/b/gitbook-x-prod.appspot.com/o/spaces%2FKNcXDcNRYHUBsVw12Dii%2Fuploads%2FVVKVToPYIteQO4y70q8S%2FNEW%206.jpg?alt=media&amp;token=6ebe8c2c-8137-4e00-b568-5f495781a8c3" alt=""><figcaption></figcaption></figure>

## Step 7: Add the SwiftXR App Block to your Product Page (One Time)

To ensure your SwiftXR 3D rendering displays on your Shopify product page, make sure to add the SwiftXR App Block to a section.

\
&#x20;These simple steps allows SwiftXR to display the appropriate 3D rendering based on the Shopify product connected.

To do this;

* **Click on “Add to online store”**

<figure><img src="https://564713456-files.gitbook.io/~/files/v0/b/gitbook-x-prod.appspot.com/o/spaces%2FKNcXDcNRYHUBsVw12Dii%2Fuploads%2Fjm5QWv4xL3fLDTt5S6w3%2Fnew%208.jpg?alt=media&amp;token=48e4f688-29e4-42b2-baa4-7f1520afd891" alt=""><figcaption></figcaption></figure>

* **Navigate to the Product Page**

Click on the Home page drop down menu, select "Product", then select your product.

<figure><img src="https://564713456-files.gitbook.io/~/files/v0/b/gitbook-x-prod.appspot.com/o/spaces%2FKNcXDcNRYHUBsVw12Dii%2Fuploads%2FGpjRahl3nBmfrlxZF39C%2F9%20shopify.jpg?alt=media&amp;token=2543631d-6e53-448e-bf76-de86661fd3ae" alt=""><figcaption></figcaption></figure>

* **Add the SwiftXR (3D/AR/VR) App Block to your desired position on your Product Page**

Click on your preffered position to "Add to block". Select "Apps" and then click on "SwiftXR Viewer"

<figure><img src="https://564713456-files.gitbook.io/~/files/v0/b/gitbook-x-prod.appspot.com/o/spaces%2FKNcXDcNRYHUBsVw12Dii%2Fuploads%2FDoKKvHuvunx0jIax0LOh%2Ftoday%201.jpg?alt=media&amp;token=19eba748-f3fb-4b77-bf0d-431454547a80" alt=""><figcaption></figcaption></figure>

* **Click on "Save"**

<figure><img src="https://564713456-files.gitbook.io/~/files/v0/b/gitbook-x-prod.appspot.com/o/spaces%2FKNcXDcNRYHUBsVw12Dii%2Fuploads%2F0J4pYE9NJPrfyIseiHZs%2Ftoday%202.jpg?alt=media&amp;token=56dfa0c5-7a82-43c4-bd44-1046fa0c46f7" alt=""><figcaption></figcaption></figure>

## Step 8: Preview your store

Head back to your Shopify dashboard, click on "Themes" under "Online store". Click on "view your store"

<figure><img src="https://564713456-files.gitbook.io/~/files/v0/b/gitbook-x-prod.appspot.com/o/spaces%2FKNcXDcNRYHUBsVw12Dii%2Fuploads%2FYqWeBxP8B1SuBonC38kE%2Fnew%207.jpg?alt=media&amp;token=f1ba989b-e720-4403-8d95-2b6b5eba7964" alt=""><figcaption></figcaption></figure>

## Congratulations! You have successfully added 3D/AR/VR views to your shop Enjoy exploring your products in a whole new way!

<figure><img src="https://564713456-files.gitbook.io/~/files/v0/b/gitbook-x-prod.appspot.com/o/spaces%2FKNcXDcNRYHUBsVw12Dii%2Fuploads%2FwqFYvU12gDIM5QtxkuRG%2FScreenshot%202025-05-28%20163634.png?alt=media&amp;token=ca07698c-4791-4a88-b518-4ccefa2aaaf0" alt=""><figcaption></figcaption></figure>

## Optional - Add 3D/AR/VR Views to your Homepage

SwiftXR's Website Mode lets you seamlessly embed 3D/AR/VR experiences on any page of your Shopify store.

Tip: Adding 3D/AR/VR content across your Shopify Store can help increase customer browsing time and number of items viewed.<br>

\ <br>


# Squarespace

Add or embed 3D, Augmented Reality (AR), and Virtual Reality (VR) content/design to your Squarespace website.

<figure><img src="https://docs.swiftxr.io/img/plugins/squarespace/step-0.png" alt=""><figcaption></figcaption></figure>

### Introduction <a href="#introduction" id="introduction"></a>

SwiftXR is a powerful platform for creating and sharing interactive 3D, augmented reality (AR), and virtual reality (VR) experiences on the web. With the SwiftXR (3D/AR/VR) Integration for Squarespace, you can easily integrate SwiftXR Projects into your Squarespace prototypes/websites, enabling you to create immersive and interactive web experiences.

Creating a Project in SwiftXR

* Navigate to the SwiftXR Hub: Begin by visiting the [SwiftXR Hub](https://swiftxr.io/hub).
* Initiate Project Creation: Once on Hub, click the "Create Project" button and enter your desired project name.
* Design and Develop: Utilize the intuitive editor to effortlessly add and customize SwiftXR components, bringing your 3D vision to life.

<figure><img src="https://docs.swiftxr.io/img/plugins/squarespace/step-1.png" alt=""><figcaption></figcaption></figure>

### Publishing Your SwiftXR Project <a href="#publishing-your-swiftxr-project" id="publishing-your-swiftxr-project"></a>

Utilize the editor to create your 3D vision using the SwiftXR components. Once satisfied with your creation, press the "Publish" or "Update" button to make your project live.

<figure><img src="https://docs.swiftxr.io/img/plugins/squarespace/step-2.png" alt=""><figcaption></figcaption></figure>

### Copy Embed Code <a href="#copy-embed-code" id="copy-embed-code"></a>

After publishing, click the dropdown button beside the "Update" button and select "Share." Within the Share modal, click the "Copy Embed" button to copy the embed code for your project.

<figure><img src="https://docs.swiftxr.io/img/plugins/squarespace/step-3.png" alt=""><figcaption></figcaption></figure>

### Integrating SwiftXR into Squarespace Websites <a href="#integrating-swiftxr-into-squarespace-websites" id="integrating-swiftxr-into-squarespace-websites"></a>

* Hover around the section where you would prefer your SwiftXR project to appear on and click Add Block

<figure><img src="https://docs.swiftxr.io/img/plugins/squarespace/step-4.png" alt=""><figcaption></figcaption></figure>

* Click Embed

<figure><img src="https://docs.swiftxr.io/img/plugins/squarespace/step-5.png" alt=""><figcaption></figcaption></figure>

* Click Code Snippet followed by Embed data
* Paste copied HTML code into the box

<figure><img src="https://docs.swiftxr.io/img/plugins/squarespace/step-6.png" alt=""><figcaption></figcaption></figure>

### Viewing your scene in the Web, VR or AR <a href="#viewing-your-scene-in-the-web-vr-or-ar" id="viewing-your-scene-in-the-web-vr-or-ar"></a>

Save and publish the Squarespace website and view the link on any device to explore it immersively.

### Conclusion <a href="#conclusion" id="conclusion"></a>

By integrating SwiftXR with Squarespace, you can seamlessly blend 3D elements into your web prototypes, creating more engaging and interactive experiences for your users. Explore the possibilities of using SwiftXR to enhance your Squarespace prototypes and bring your ideas to life in an immersive and interactive way.


# SILEX

Add or embed 3D, Augmented Reality (AR), and Virtual Reality (VR) content/design to your SILEX website.

**Introduction**

SwiftXR is a powerful platform for creating and sharing interactive 3D, augmented reality (AR), and virtual reality (VR) experiences on the web. With the SwiftXR (3D/AR/VR) Integration for Silex, you can easily integrate SwiftXR Projects into your Silex website, enabling you to create immersive and interactive web experiences.

**Creating a Project in SwiftXR**

* Navigate to the SwiftXR Hub: Begin by visiting the SwiftXR Hub, or alternatively click on this link: <https://swiftxr.io/hub>&#x20;
* Initiate Project Creation: Once on Hub, click the “Create Project” button and enter your desired project name.
* Design or Develop: Utilize the intuitive editor to effortlessly add and customize SwiftXR components, bringing your 3D vision to life

<figure><img src="https://564713456-files.gitbook.io/~/files/v0/b/gitbook-x-prod.appspot.com/o/spaces%2FKNcXDcNRYHUBsVw12Dii%2Fuploads%2FFpRKbC3augw81Ox7hcw0%2Fimage.png?alt=media&amp;token=2f82b192-099e-432f-82de-6508bbf580b5" alt=""><figcaption></figcaption></figure>

Publishing your SwiftXR Project

* Utilize the editor to create your 3D vision using the SwiftXR components. Once satisfied with your creation, press the “Publish” or “Update” button to make your project live.

<figure><img src="https://564713456-files.gitbook.io/~/files/v0/b/gitbook-x-prod.appspot.com/o/spaces%2FKNcXDcNRYHUBsVw12Dii%2Fuploads%2F7xFvEaRFfpGqTy254sqF%2Fimage.png?alt=media&amp;token=08bc3d25-6a0c-43b4-9292-7153afbbe995" alt=""><figcaption></figcaption></figure>

**Copy Embed Code**

* After publishing, click the dropdown button beside the “Update” button and select “Share.” Within the Share modal, click the “Copy Embed” button to copy the embed code for your project.

<figure><img src="https://564713456-files.gitbook.io/~/files/v0/b/gitbook-x-prod.appspot.com/o/spaces%2FKNcXDcNRYHUBsVw12Dii%2Fuploads%2FxMXHv7iaOmRPyQmAT1Rh%2Fimage.png?alt=media&amp;token=00e38e0a-f595-43f7-814c-7ff0d1954079" alt=""><figcaption></figcaption></figure>

**Integrating SwiftXR into Silex Website**

* Go to [Silex.com](http://silex.com) and create an account or log in if you already have one.
* After creating an account, click on the button that says “Create website”.

<figure><img src="https://564713456-files.gitbook.io/~/files/v0/b/gitbook-x-prod.appspot.com/o/spaces%2FKNcXDcNRYHUBsVw12Dii%2Fuploads%2FPJGWefyikzffh44ppYy3%2Fimage.png?alt=media&amp;token=7edebbc6-294d-4a49-94b7-612e5b014d7d" alt=""><figcaption></figcaption></figure>

* Give your website a name (e.g SwiftXR)

<figure><img src="https://564713456-files.gitbook.io/~/files/v0/b/gitbook-x-prod.appspot.com/o/spaces%2FKNcXDcNRYHUBsVw12Dii%2Fuploads%2FRZsjVZZSY9YOCtJdCFjx%2Fimage.png?alt=media&amp;token=58313e3e-d49d-4642-be45-b98b1d98ccc9" alt=""><figcaption></figcaption></figure>

* Click on your website name to access your dashboard

<figure><img src="https://564713456-files.gitbook.io/~/files/v0/b/gitbook-x-prod.appspot.com/o/spaces%2FKNcXDcNRYHUBsVw12Dii%2Fuploads%2FCF3zTOEStgc48V9KVM9Q%2Fimage.png?alt=media&amp;token=b3ab1db3-d88f-44dc-92df-d99db2e08f2e" alt=""><figcaption></figcaption></figure>

**Add an HTML Block**

* Click on the plus icon and choose the HTML tag under “Components”
* This block allows you to paste raw HTML/iframe code.

<figure><img src="https://564713456-files.gitbook.io/~/files/v0/b/gitbook-x-prod.appspot.com/o/spaces%2FKNcXDcNRYHUBsVw12Dii%2Fuploads%2F9icikK1CFq1c3mE838Ii%2Fimage.png?alt=media&amp;token=c3444e0c-80f8-4e1e-8384-958553b4917c" alt=""><figcaption></figcaption></figure>

* When you click on the HTML tag, an editor would appear for you to paste your SwiftXR iframe embed code.
* After pasting the code, click on “Save”

<figure><img src="https://564713456-files.gitbook.io/~/files/v0/b/gitbook-x-prod.appspot.com/o/spaces%2FKNcXDcNRYHUBsVw12Dii%2Fuploads%2FBRonRYs1zYtc3OqCrW6n%2Fimage.png?alt=media&amp;token=a1a5c5b8-c5ec-467b-a6a8-6b4332f40387" alt=""><figcaption></figcaption></figure>

**Viewing your product in your website**

* After clicking on “Save”, your SwiftXR product should appear on your website.

<figure><img src="https://564713456-files.gitbook.io/~/files/v0/b/gitbook-x-prod.appspot.com/o/spaces%2FKNcXDcNRYHUBsVw12Dii%2Fuploads%2FvpYWQRhtK8F1lQJbvEVZ%2Fimage.png?alt=media&amp;token=3683351f-f1ab-4b9c-a584-ba9d2b623e4e" alt=""><figcaption></figcaption></figure>

**Publishing your Project**\
Click on “Publish” in the top right corner of your screen. It would bring a variety of options of how you would wish to publish, click on “[GitLab.com](http://gitlab.com)”.

<br>

<figure><img src="https://564713456-files.gitbook.io/~/files/v0/b/gitbook-x-prod.appspot.com/o/spaces%2FKNcXDcNRYHUBsVw12Dii%2Fuploads%2FcilDcYLMS0edR4j2VsjJ%2Fimage.png?alt=media&amp;token=d78aaf4c-f7d5-4f25-93f7-9389bd18ca55" alt=""><figcaption></figcaption></figure>

**Viewing your Scene in the Web, AR or VR**\
After clicking on “[GitLab.com](http://gitlab.com)” as the publish option you’d be redirected to a page where you would view your product immersively.

<figure><img src="https://564713456-files.gitbook.io/~/files/v0/b/gitbook-x-prod.appspot.com/o/spaces%2FKNcXDcNRYHUBsVw12Dii%2Fuploads%2F5T7S9TSlzDY13g1WLDfm%2Fimage.png?alt=media&amp;token=e6858a8b-8087-4ccc-a3a3-ed0f755a0e4a" alt=""><figcaption></figcaption></figure>

**Conclusion**

Integrating SwiftXR with Silex allows users to seamlessly embed immersive 3D and AR experiences directly into their Silex websites. The process is straightforward, requiring only the addition of the provided embed code into the site’s editor. Once integrated, SwiftXR enhances user engagement by offering interactive and visually rich content, making websites more dynamic and appealing. This integration demonstrates how modern web platforms like Silex can easily leverage cutting-edge technologies to deliver enhanced experiences without the need for complex development.

<br>


# Teleporthq

Add or embed 3D, Augmented Reality (AR), and Virtual Reality (VR) content/design to your Teleporthq website.

**Introduction**

SwiftXR is a powerful platform for creating and sharing interactive 3D, augmented reality (AR), and virtual reality (VR) experiences on the web. With the SwiftXR (3D/AR/VR) Integration for TeleportHQ, you can easily integrate SwiftXR Projects into your TeleportHQ website, enabling you to create immersive and interactive web experiences.

**Creating a Project in SwiftXR**

* Navigate to the SwiftXR Hub: Begin by visiting the SwiftXR Hub, or alternatively click on this link: <https://swiftxr.io/hub>&#x20;
* Initiate Project Creation: Once on Hub, click the “Create Project” button and enter your desired project name.
* Design or Develop: Utilize the intuitive editor to effortlessly add and customize SwiftXR components, bringing your 3D vision to life.

<figure><img src="https://564713456-files.gitbook.io/~/files/v0/b/gitbook-x-prod.appspot.com/o/spaces%2FKNcXDcNRYHUBsVw12Dii%2Fuploads%2FjAEBjtS8udIgufLdbEr9%2Fimage.png?alt=media&amp;token=4ca4a0d4-eb6b-44a7-a0bb-e604a5c3b94e" alt=""><figcaption></figcaption></figure>

**Publishing your SwiftXR Project**

* Utilize the editor to create your 3D vision using the SwiftXR components. Once satisfied with your creation, press the “Publish” or “Update” button to make your project live.

<figure><img src="https://564713456-files.gitbook.io/~/files/v0/b/gitbook-x-prod.appspot.com/o/spaces%2FKNcXDcNRYHUBsVw12Dii%2Fuploads%2FB8t6xRtbvOiAAozEHpi1%2Fimage.png?alt=media&amp;token=632bf6a7-bb6b-4dd0-aa07-1cc9ad1c35cf" alt=""><figcaption></figcaption></figure>

**Copy Embed Code**

* After publishing, click the dropdown button beside the “Update” button and select “Share.” Within the Share modal, click the “Copy Embed” button to copy the embed code for your project.

<figure><img src="https://564713456-files.gitbook.io/~/files/v0/b/gitbook-x-prod.appspot.com/o/spaces%2FKNcXDcNRYHUBsVw12Dii%2Fuploads%2F3y9ndsrEB9KRGCNMOJrQ%2Fimage.png?alt=media&amp;token=9db84b59-bbf6-4e5e-9e30-a86a3ee08df4" alt=""><figcaption></figcaption></figure>

**Integrating SwiftXR into TeleportHQ Website**

* Go to <https://play.teleporthq.io/> and create an account or log in if you already have one.
* In the TeleportHQ homepage, choose the project that says “Blank(Start from scratch)”

<figure><img src="https://564713456-files.gitbook.io/~/files/v0/b/gitbook-x-prod.appspot.com/o/spaces%2FKNcXDcNRYHUBsVw12Dii%2Fuploads%2F5ES1ydC5HYd4i9lRNmjm%2Fimage.png?alt=media&amp;token=e34e20d3-13e7-4a08-9601-e67ed8687447" alt=""><figcaption></figcaption></figure>

**Add an HTML Element**

* After selecting the blank project, you would be taken to the page editor.
* In the top left corner of your page, click on the “plus icon (+)”, and scroll down and click on the “code embed (<>)” in the “Elements” drop down

<figure><img src="https://564713456-files.gitbook.io/~/files/v0/b/gitbook-x-prod.appspot.com/o/spaces%2FKNcXDcNRYHUBsVw12Dii%2Fuploads%2FMdl5NRXASB1xVJz1I8u8%2Fimage.png?alt=media&amp;token=4f00b21a-941f-402e-b1f2-70ca44bd3571" alt=""><figcaption></figcaption></figure>

**Insert Your SwiftXR Embed Code**

* After clicking on the “Code Embed (<>)” icon, a code editor page would appear on your screen.
* Paste your SwiftXR iframe embed code in the code editor and click on the “Save” button below.

<figure><img src="https://564713456-files.gitbook.io/~/files/v0/b/gitbook-x-prod.appspot.com/o/spaces%2FKNcXDcNRYHUBsVw12Dii%2Fuploads%2FqzdoJpu2bRiZ8apXy4lW%2Fimage.png?alt=media&amp;token=32a9fe21-2ef5-4f5f-8cf0-aa47cd08fce4" alt=""><figcaption></figcaption></figure>

**Viewing your Product in the Website**

* After clicking the “Save” button in the code editor, your product would be live on your website.
* Resize and position the embed element as needed to fit your design

<figure><img src="https://564713456-files.gitbook.io/~/files/v0/b/gitbook-x-prod.appspot.com/o/spaces%2FKNcXDcNRYHUBsVw12Dii%2Fuploads%2FPxc9zUSgwkiQNFMWspsS%2Fimage.png?alt=media&amp;token=5b7f6276-2db2-41cb-8253-201e8ddce9bc" alt=""><figcaption></figcaption></figure>

**Publishing your Website**

After clicking on the “Publish” button, you would be taken to a page where you would copy the link to your website.\
Click on the copy to clipboard icon beside the link and paste the link in a different tab.

<figure><img src="https://564713456-files.gitbook.io/~/files/v0/b/gitbook-x-prod.appspot.com/o/spaces%2FKNcXDcNRYHUBsVw12Dii%2Fuploads%2FgkY31wp6X9UkNFIwngp8%2Fimage.png?alt=media&amp;token=73b3e3f9-625d-41f5-8ec6-7580323ef899" alt=""><figcaption></figcaption></figure>

* After pasting the link in a different tab, a page would show up asking you for a password authentication.
* Below the link you copied earlier, you would see below the “Password Protection” password, copy and paste it inside and click on the “Unlock” button right beside it.

<figure><img src="https://564713456-files.gitbook.io/~/files/v0/b/gitbook-x-prod.appspot.com/o/spaces%2FKNcXDcNRYHUBsVw12Dii%2Fuploads%2FtMforBcPAhXXqurIePqu%2Fimage.png?alt=media&amp;token=c89e844b-b263-4f44-896d-718a53ce079d" alt=""><figcaption></figcaption></figure>

**Viewing your Scene in the Web, AR or VR**

* After clicking on the “Unlock” button, you would see you live product and explore it immersively.

<figure><img src="https://564713456-files.gitbook.io/~/files/v0/b/gitbook-x-prod.appspot.com/o/spaces%2FKNcXDcNRYHUBsVw12Dii%2Fuploads%2FkVnmXt9UONK3CIm0sTVW%2Fimage.png?alt=media&amp;token=1305bff8-cf0a-438e-8da4-19a0301a7893" alt=""><figcaption></figcaption></figure>

**Conclusion**

Integrating SwiftXR into TeleportHQ is a simple and effective way to add immersive 3D, AR, and VR experiences to your projects. By creating and publishing your SwiftXR project, then embedding the generated code into TeleportHQ through the Embed element, you can seamlessly combine SwiftXR’s interactive content with TeleportHQ’s flexible, no-code website builder. This allows you to enhance your site’s design with engaging, responsive, and futuristic experiences, all without writing complex code

<br>


# Tinkercad

Create and Export your Tinkercad Designs for 3D, AR and VR experiences with SwiftXR

<figure><img src="https://564713456-files.gitbook.io/~/files/v0/b/gitbook-x-prod.appspot.com/o/spaces%2FKNcXDcNRYHUBsVw12Dii%2Fuploads%2Fx8UHUVIzmbencuNgln6g%2FWhatsApp%20Image%202025-05-16%20at%2002.46.15%20(2).jpeg?alt=media&amp;token=721fffae-1d69-46c2-8bfe-3ad8ed001d8e" alt=""><figcaption></figcaption></figure>

## Introduction

SwiftXR is a powerful platform for creating and sharing interactive 3D, Augmented Reality (AR), and Virtual Reality (VR) experiences on the web. With SwiftXR, you can import your Tinkercad designs and view them in 3D, AR, or VR, allowing you to interact with your creations and even copy an embed code to use them on your website

## Step by Step

1\. Export Design

* Once your design is complete, click on the “Export” button
* Under the “include” option, select “Everything in the design.”
* In the “For 3D print” section, choose the “GLTF(.glb)” format.

<figure><img src="https://564713456-files.gitbook.io/~/files/v0/b/gitbook-x-prod.appspot.com/o/spaces%2FKNcXDcNRYHUBsVw12Dii%2Fuploads%2FqbrtpGEQP5VpEzBFwNG4%2FWhatsApp%20Image%202025-05-16%20at%2002.46.16.jpeg?alt=media&amp;token=942250cc-94d8-4cbb-8304-f0c276b1346c" alt=""><figcaption></figcaption></figure>

This ensures that your design is exported in the correct format and configuration making it suitable for integration into 3D, AR or VR experiences

## Creating a Project in SwiftXR

Before starting, ensure you have a [SwiftXR account](https://home.swiftxr.io/)

* Navigate to [SwiftXR Hub](https://swiftxr.io/hub)
* Once on Hub, click the "Create Project" button and enter your desired project name.

<figure><img src="https://564713456-files.gitbook.io/~/files/v0/b/gitbook-x-prod.appspot.com/o/spaces%2FKNcXDcNRYHUBsVw12Dii%2Fuploads%2FmGa9l9mmRe6Ot2YK9fiy%2FWhatsApp%20Image%202025-05-16%20at%2002.46.16%20(2).jpeg?alt=media&amp;token=d5a15fdf-9d67-4128-8297-3fad4f709ba1" alt=""><figcaption></figcaption></figure>

## 2. Import to SwiftXR

* Launch the SwiftXR editor for your project to begin creating your AR/VR experience.
* Drag and drop the 3D component into your scene

<figure><img src="https://564713456-files.gitbook.io/~/files/v0/b/gitbook-x-prod.appspot.com/o/spaces%2FKNcXDcNRYHUBsVw12Dii%2Fuploads%2F85bI7swK2aHLTz0Ms6fn%2FWhatsApp%20Image%202025-05-16%20at%2002.46.15%20(3).jpeg?alt=media&amp;token=7c157fc9-d249-491b-958e-d06f75ee19d1" alt=""><figcaption></figcaption></figure>

* Then select “Upload 3D Object” to upload your Tinkercad design into SwiftXR editor&#x20;
* Once uploaded, you can pan around the object, make edits, add more elements and build your interactive AR/VR environment.

## Viewing your Scenes in the Web, AR or VR

If you’d like to embed your design into a website:

* First, publish your project on SwiftXR
* Then, click the dropdown icon next to the “Update” button

<figure><img src="https://564713456-files.gitbook.io/~/files/v0/b/gitbook-x-prod.appspot.com/o/spaces%2FKNcXDcNRYHUBsVw12Dii%2Fuploads%2F9U7cFVIUNSGwsdmHq2Dm%2FWhatsApp%20Image%202025-05-16%20at%2002.46.15%20(1).jpeg?alt=media&amp;token=23faf903-06c4-4d4b-a2bd-3066c72a79be" alt=""><figcaption></figcaption></figure>

* From the options, select “Embed code”.
* Click the “Copy” button to copy the embed code to your clipboard

<figure><img src="https://564713456-files.gitbook.io/~/files/v0/b/gitbook-x-prod.appspot.com/o/spaces%2FKNcXDcNRYHUBsVw12Dii%2Fuploads%2FKsCfWtR8y7UfP9XDnPkL%2FWhatsApp%20Image%202025-05-16%20at%2002.46.16%20(1).jpeg?alt=media&amp;token=a654086c-65f1-4a81-9ef4-5d1f30496f3d" alt=""><figcaption></figcaption></figure>

You can now paste this code into your website to showcase your 3D/AR/VR experience

## Conclusion

By exporting your Tinkercad designs into SwiftXR, you unlock the ability to present your creations in dynamic 3D, AR, and VR formats. This integration makes it easy to transform simple models into immersive experiences that can be shared on the web or embedded into other platforms. Combining Tinkercad with SwiftXR brings your designs to life beyond the screen


# UCraft

Add or embed 3D, Augmented Reality (AR), and Virtual Reality (VR) content/design to your UCraft website.

<figure><img src="https://docs.swiftxr.io/img/plugins/ucraft/step-0.png" alt=""><figcaption></figcaption></figure>

### Introduction <a href="#introduction" id="introduction"></a>

SwiftXR is a powerful platform for creating and sharing interactive 3D, augmented reality (AR), and virtual reality (VR) experiences on the web. With the SwiftXR (3D/AR/VR) Integration for Ucraft, you can easily integrate SwiftXR Projects into your Ucraft prototypes/websites, enabling you to create immersive and interactive web experiences.

Creating a Project in SwiftXR

* Navigate to the SwiftXR Hub: Begin by visiting the [SwiftXR Hub](https://swiftxr.io/hub).
* Initiate Project Creation: Once on Hub, click the "Create Project" button and enter your desired project name.
* Design and Develop: Utilize the intuitive editor to effortlessly add and customize SwiftXR components, bringing your 3D vision to life.

<figure><img src="https://docs.swiftxr.io/img/plugins/ucraft/step-1.png" alt=""><figcaption></figcaption></figure>

### Publishing Your SwiftXR Project <a href="#publishing-your-swiftxr-project" id="publishing-your-swiftxr-project"></a>

Utilize the editor to create your 3D vision using the SwiftXR components. Once satisfied with your creation, press the "Publish" or "Update" button to make your project live.

<figure><img src="https://docs.swiftxr.io/img/plugins/ucraft/step-2.png" alt=""><figcaption></figcaption></figure>

### Copy Embed Code <a href="#copy-embed-code" id="copy-embed-code"></a>

After publishing, click the dropdown button beside the "Update" button and select "Share." Within the Share modal, click the "Copy Embed" button to copy the embed code for your project.

<figure><img src="https://docs.swiftxr.io/img/plugins/ucraft/step-3.png" alt=""><figcaption></figcaption></figure>

### Integrating SwiftXR into Ucraft Websites <a href="#integrating-swiftxr-into-ucraft-websites" id="integrating-swiftxr-into-ucraft-websites"></a>

* To get started, just drag and drop the Custom HTML icon from the Elements section to the crafting area

<figure><img src="https://docs.swiftxr.io/img/plugins/ucraft/step-4.png" alt=""><figcaption></figcaption></figure>

* Insert the desired HTML tags and fill in the HTML Code label field, afterwards, click the Embed Code button.

<figure><img src="https://docs.swiftxr.io/img/plugins/ucraft/step-5.png" alt=""><figcaption></figcaption></figure>

* Click the Save button once all the desired changes are made

### Viewing your scene in the Web, VR or AR <a href="#viewing-your-scene-in-the-web-vr-or-ar" id="viewing-your-scene-in-the-web-vr-or-ar"></a>

Save and publish the Ucraft website and view the link on any device to explore it immersively.

### Conclusion <a href="#conclusion" id="conclusion"></a>

By integrating SwiftXR with Ucraft, you can seamlessly blend 3D elements into your web prototypes, creating more engaging and interactive experiences for your users. Explore the possibilities of using SwiftXR to enhance your Ucraft prototypes and bring your ideas to life in an immersive and interactive way.


# UCOZ

Add or embed 3D, Augmented Reality (AR), and Virtual Reality (VR) content/design to your Ucoz website.

**Introduction**

SwiftXR is a powerful platform for creating and sharing interactive 3D, augmented reality (AR), and virtual reality (VR) experiences on the web. With the SwiftXR (3D/AR/VR) Integration for uCoz, you can easily integrate SwiftXR Projects into your uCoz website, enabling you to create immersive and interactive web experiences.

**Creating a Project in SwiftXR**

* Navigate to the SwiftXR Hub: Begin by visiting the SwiftXR Hub, or alternatively click on this link: <https://swiftxr.io/hub>&#x20;
* Initiate Project Creation: Once on Hub, click the “Create Project” button and enter your desired project name.
* Design or Develop: Utilize the intuitive editor to effortlessly add and customize SwiftXR components, bringing your 3D vision to life.

<figure><img src="https://564713456-files.gitbook.io/~/files/v0/b/gitbook-x-prod.appspot.com/o/spaces%2FKNcXDcNRYHUBsVw12Dii%2Fuploads%2FuARWbBieWjJlg3vX3sOG%2Fimage.png?alt=media&amp;token=ebf71b9d-cceb-474f-ad92-11c0016d32e1" alt=""><figcaption></figcaption></figure>

**Publishing your SwiftXR Project**

* Utilize the editor to create your 3D vision using the SwiftXR components. Once satisfied with your creation, press the “Publish” or “Update” button to make your project live.

<figure><img src="https://564713456-files.gitbook.io/~/files/v0/b/gitbook-x-prod.appspot.com/o/spaces%2FKNcXDcNRYHUBsVw12Dii%2Fuploads%2FuYmxrkwLUf8rGPSeLuhW%2Fimage.png?alt=media&amp;token=007829c5-71f2-4434-85ef-6662bae7df20" alt=""><figcaption></figcaption></figure>

**Copy Embed Code**

* After publishing, click the dropdown button beside the “Update” button and select “Share.” Within the Share modal, click the “Copy Embed” button to copy the embed code for your project.

<figure><img src="https://564713456-files.gitbook.io/~/files/v0/b/gitbook-x-prod.appspot.com/o/spaces%2FKNcXDcNRYHUBsVw12Dii%2Fuploads%2FqnDTuAvHDvO4I9S4U4Tz%2Fimage.png?alt=media&amp;token=04554ff1-a804-4ea0-b8f5-3e3562b339a1" alt=""><figcaption></figcaption></figure>

**Integrating SwiftXR into uCoz Website**

* Go to [uCoz.com](http://ucoz.com) and create an account or log in if you already have one.
* In the “Select site type” page, choose “Landing Page/ Promo Site”.

<figure><img src="https://564713456-files.gitbook.io/~/files/v0/b/gitbook-x-prod.appspot.com/o/spaces%2FKNcXDcNRYHUBsVw12Dii%2Fuploads%2FMbI532AyClgZJkIffjxM%2Fimage.png?alt=media&amp;token=9983b27d-e200-48aa-a891-b855d0156cc7" alt=""><figcaption></figcaption></figure>

**Name your site and click on “Create a website”**<br>

<figure><img src="https://564713456-files.gitbook.io/~/files/v0/b/gitbook-x-prod.appspot.com/o/spaces%2FKNcXDcNRYHUBsVw12Dii%2Fuploads%2Flr8r2BOp2gRYH1ibDdSr%2Fimage.png?alt=media&amp;token=9898ed39-545c-44d7-b88c-a8a631d80d8d" alt=""><figcaption></figcaption></figure>

**Go to the Page Editor**

* After naming your site, you would be directed to the admin control panel.
* From the control panel, click on “Page Editor” in the left hand side of your screen.

<figure><img src="https://564713456-files.gitbook.io/~/files/v0/b/gitbook-x-prod.appspot.com/o/spaces%2FKNcXDcNRYHUBsVw12Dii%2Fuploads%2F57KxKUgFrrvTj3fmttZz%2Fimage.png?alt=media&amp;token=1961404a-456b-4a6f-bd66-c8c32a67953a" alt=""><figcaption></figcaption></figure>

* In the page editor, click on “Add new page” in the top right corner of your screen.<br>

<figure><img src="https://564713456-files.gitbook.io/~/files/v0/b/gitbook-x-prod.appspot.com/o/spaces%2FKNcXDcNRYHUBsVw12Dii%2Fuploads%2Fp5w3UycdKRr4HV71FaTD%2Fimage.png?alt=media&amp;token=385d6587-de3d-451f-bdff-318cc5111792" alt=""><figcaption></figcaption></figure>

**Add an HTML Element**

* In your new page, in the toolbar above “Page Content”, click on the “Source” button.

<figure><img src="https://564713456-files.gitbook.io/~/files/v0/b/gitbook-x-prod.appspot.com/o/spaces%2FKNcXDcNRYHUBsVw12Dii%2Fuploads%2Fvn7LgY0b0Fpf7PId1tQF%2Fimage.png?alt=media&amp;token=51a1081d-55c5-4dc9-9545-5f09ff0e2984" alt=""><figcaption></figcaption></figure>

**Paste your SwiftXR Embed Code**

* Paste your SwiftXR iframe code in the blank editor box.
* Give your page a name i.e “SwiftXR Integration”

<figure><img src="https://564713456-files.gitbook.io/~/files/v0/b/gitbook-x-prod.appspot.com/o/spaces%2FKNcXDcNRYHUBsVw12Dii%2Fuploads%2Fz4DldML10zHOyRJAR83X%2Fimage.png?alt=media&amp;token=e1ac463e-31ad-4a26-bcef-e2e0686b8702" alt=""><figcaption></figcaption></figure>

Scroll down and click on “Save”

<figure><img src="https://564713456-files.gitbook.io/~/files/v0/b/gitbook-x-prod.appspot.com/o/spaces%2FKNcXDcNRYHUBsVw12Dii%2Fuploads%2FjR2mseisCRxZYIwUNZ9I%2Fimage.png?alt=media&amp;token=e723f53e-e018-4a43-878b-bdf398aa9a0f" alt=""><figcaption></figcaption></figure>

* After clicking on “Save”, a tiny page with the name “Adding Page” would pop up.&#x20;
* Click on the blue bottom link “Go to the page”

<figure><img src="https://564713456-files.gitbook.io/~/files/v0/b/gitbook-x-prod.appspot.com/o/spaces%2FKNcXDcNRYHUBsVw12Dii%2Fuploads%2FvZreG9ZWtvjyNVHidT1q%2Fimage.png?alt=media&amp;token=ff8026a4-7432-489f-8fe3-545ef11f6198" alt=""><figcaption></figcaption></figure>

Viewing your Scene in the Web, AR or VR

* After clicking on the link, you now have your SwiftXR project live on the uCoz platform.

<figure><img src="https://564713456-files.gitbook.io/~/files/v0/b/gitbook-x-prod.appspot.com/o/spaces%2FKNcXDcNRYHUBsVw12Dii%2Fuploads%2FnZTGNYTwdcPNtuJUnhHv%2Fimage.png?alt=media&amp;token=15a7759f-d664-4ed9-b569-18292993d353" alt=""><figcaption></figcaption></figure>

**Conclusion**

Integrating SwiftXR into your uCoz website is simple and does not require advanced coding skills. By using the HTML Source editor, you can embed your 3D/AR project with just an iframe snippet. Once saved, your visitors can interact with the 3D content directly on your site, whether on desktop or mobile.

This integration makes it possible to showcase products, models, or interactive experiences seamlessly within a uCoz page, enhancing engagement and providing a modern, immersive experience for your audience.

<br>


# Webstudio

Add or embed 3D, Augmented Reality (AR), and Virtual Reality (VR) content/design to your Webstudio website.

**Introduction**

SwiftXR is a powerful platform for creating and sharing interactive 3D, augmented reality (AR), and virtual reality (VR) experiences on the web. With the SwiftXR (3D/AR/VR) Integration for Webstudio, you can easily integrate SwiftXR Projects into your Webstudio website, enabling you to create immersive and interactive web experiences.

**Creating a Project in SwiftXR**

* Navigate to the SwiftXR Hub: Begin by visiting the SwiftXR Hub, or alternatively click on this link: <https://swiftxr.io/hub>&#x20;
* Initiate Project Creation: Once on Hub, click the “Create Project” button and enter your desired project name.
* Design or Develop: Utilize the intuitive editor to effortlessly add and customize SwiftXR components, bringing your 3D vision to life

<figure><img src="https://564713456-files.gitbook.io/~/files/v0/b/gitbook-x-prod.appspot.com/o/spaces%2FKNcXDcNRYHUBsVw12Dii%2Fuploads%2Fr5Au137PQFfEa9L29dWz%2Fimage.png?alt=media&amp;token=97b07b75-6f25-4bbb-a6e6-0bf78fafb3f3" alt=""><figcaption></figcaption></figure>

**Publishing your SwiftXR Project**

* Utilize the editor to create your 3D vision using the SwiftXR components. Once satisfied with your creation, press the “Publish” or “Update” button to make your project live.

<figure><img src="https://564713456-files.gitbook.io/~/files/v0/b/gitbook-x-prod.appspot.com/o/spaces%2FKNcXDcNRYHUBsVw12Dii%2Fuploads%2F9rCazfB6rZ5tJRXRazNE%2Fimage.png?alt=media&amp;token=fd738508-fd77-4601-a7f7-5c910055524f" alt=""><figcaption></figcaption></figure>

**Copy Embed Code**

* After publishing, click the dropdown button beside the “Update” button and select “Share.” Within the Share modal, click the “Copy Embed” button to copy the embed code for your project

<figure><img src="https://564713456-files.gitbook.io/~/files/v0/b/gitbook-x-prod.appspot.com/o/spaces%2FKNcXDcNRYHUBsVw12Dii%2Fuploads%2FunGcbOw4WxvEFkno3LSV%2Fimage.png?alt=media&amp;token=9c43ed0d-fd11-47b7-83fb-e0857a8ee4b8" alt=""><figcaption></figcaption></figure>

**Integrating SwiftXR into Webstudio Website**

* Go to [webstudio.is](http://webstudio.is) and create an account or log in if you already have one.
* In the webstudio homepage, choose the option that says “New blank project” in the top right corner of your page.

<figure><img src="https://564713456-files.gitbook.io/~/files/v0/b/gitbook-x-prod.appspot.com/o/spaces%2FKNcXDcNRYHUBsVw12Dii%2Fuploads%2FqC0NmeKgVvU39bmPeao5%2Fimage.png?alt=media&amp;token=e937007c-02c0-4bc3-8524-3970cd621726" alt=""><figcaption></figcaption></figure>

* After clicking on the “New blank page” button, a page would show up asking you to name your website, give it a name “e.g SwiftXR embedding”.
* Click on “Create Project”.

<figure><img src="https://564713456-files.gitbook.io/~/files/v0/b/gitbook-x-prod.appspot.com/o/spaces%2FKNcXDcNRYHUBsVw12Dii%2Fuploads%2FVRTsAAAQs977P6i47un7%2Fimage.png?alt=media&amp;token=410d0734-4577-4af3-bb09-256811e9ba24" alt=""><figcaption></figcaption></figure>

**Add an HTML Element**

* After clicking on the “Create Project” button, you would be taken to the Webstudio editor.
* In the editor,click on the plus (+) icon in the top left corner of your page and click on the HTML Embed (\</>) under the “Components”.

<figure><img src="https://564713456-files.gitbook.io/~/files/v0/b/gitbook-x-prod.appspot.com/o/spaces%2FKNcXDcNRYHUBsVw12Dii%2Fuploads%2Fy3xan7t0r2FfK9s4ANL0%2Fimage.png?alt=media&amp;token=fb12986d-5259-4b05-ac0f-80fb37602b6c" alt=""><figcaption></figcaption></figure>

**Insert Your SwiftXR Embed Code**

* After clicking on the “HTML Embed”, click on “Settings” in the top right corner of your page.
* You would see a tiny code editor right below the “Settings” panel where you can paste your SwiftXR Embed Code

<figure><img src="https://564713456-files.gitbook.io/~/files/v0/b/gitbook-x-prod.appspot.com/o/spaces%2FKNcXDcNRYHUBsVw12Dii%2Fuploads%2F2eSD5PMFxeLqXW8hg0uH%2Fimage.png?alt=media&amp;token=4aad51bd-953e-4cac-a0e8-c993dc2668ea" alt=""><figcaption></figcaption></figure>

**Viewing your Product in the Website**

* After pasting your SwiftXR iframe embed code in the editor, you would automatically see your live product in your website

<figure><img src="https://564713456-files.gitbook.io/~/files/v0/b/gitbook-x-prod.appspot.com/o/spaces%2FKNcXDcNRYHUBsVw12Dii%2Fuploads%2FY96qLbGENdYNv8T4GPCw%2Fimage.png?alt=media&amp;token=9213a61a-afe1-40e8-b103-42dc596678e1" alt=""><figcaption></figcaption></figure>

**Publishing your Website**

* In the top right corner of your page you would see a “Publish” button, click on it to publish your website.

<figure><img src="https://564713456-files.gitbook.io/~/files/v0/b/gitbook-x-prod.appspot.com/o/spaces%2FKNcXDcNRYHUBsVw12Dii%2Fuploads%2FFCpZMYhN6xmvz3sbpo7K%2Fimage.png?alt=media&amp;token=4270e2ef-5fb9-495a-8a57-388859575726" alt=""><figcaption></figcaption></figure>

**Viewing your Scene in the Web, AR or VR**

* After clicking on the “Publish” button, you would see your SwiftXR experience displayed directly inside your Webstudio site

<figure><img src="https://564713456-files.gitbook.io/~/files/v0/b/gitbook-x-prod.appspot.com/o/spaces%2FKNcXDcNRYHUBsVw12Dii%2Fuploads%2FMt40PktSxxra9e5mq16X%2Fimage.png?alt=media&amp;token=8137cfff-4519-4000-8607-040571dd39a4" alt=""><figcaption></figcaption></figure>

**Conclusion**

Integrating SwiftXR into Webstudio is straightforward using the HTML Embed component. By copying your SwiftXR project’s embed code and pasting it into Webstudio, you can quickly bring interactive 3D and XR experiences into your site without extra plugins. Once embedded, you can customize its size, styling, and placement to match your design, then publish to share your XR project with your audience. This makes Webstudio a flexible option for showcasing immersive content powered by SwiftXR.

<br>


# Weebly

Add or embed 3D, Augmented Reality (AR), and Virtual Reality (VR) content/design to your Weebly website.

<figure><img src="https://564713456-files.gitbook.io/~/files/v0/b/gitbook-x-prod.appspot.com/o/spaces%2FKNcXDcNRYHUBsVw12Dii%2Fuploads%2F67ZDbKEf2XdVjomm9YZd%2FScreenshot%202024-09-23%20at%2017.40.07.png?alt=media&amp;token=a527526c-ded5-485b-a312-b418235091bd" alt=""><figcaption></figcaption></figure>

### Introduction <a href="#introduction" id="introduction"></a>

SwiftXR is a powerful platform for creating and sharing interactive 3D, augmented reality (AR), and virtual reality (VR) experiences on the web. With the SwiftXR (3D/AR/VR) Integration for Weebly, you can easily integrate SwiftXR Projects into your Weebly websites, enabling you to create immersive and interactive web experiences.

### Creating a Project in SwiftXR <a href="#creating-a-project-in-swiftxr" id="creating-a-project-in-swiftxr"></a>

* Navigate to the SwiftXR Hub: Begin by visiting the [SwiftXR Hub](https://swiftxr.io/hub).
* Initiate Project Creation: Once on Hub, click the "Create Project" button and enter your desired project name.
* Design and Develop: Utilize the intuitive editor to effortlessly add and customize SwiftXR components, bringing your 3D vision to life.

<figure><img src="https://docs.swiftxr.io/img/plugins/framer/step-1.png" alt=""><figcaption></figcaption></figure>

### Publishing Your SwiftXR Project <a href="#publishing-your-swiftxr-project" id="publishing-your-swiftxr-project"></a>

Utilize the editor to create your 3D vision using the SwiftXR components. Once satisfied with your creation, press the "Publish" or "Update" button to make your project live.

<figure><img src="https://564713456-files.gitbook.io/~/files/v0/b/gitbook-x-prod.appspot.com/o/spaces%2FKNcXDcNRYHUBsVw12Dii%2Fuploads%2FsFiuq4AhA1dCX4ER4Ikv%2Fupdatecouch.png?alt=media&amp;token=70f02e82-9ab5-4e2e-bb54-8c69b96b878e" alt=""><figcaption></figcaption></figure>

### Copy Embed Code <a href="#copy-embed-code" id="copy-embed-code"></a>

After publishing, click the dropdown button beside the "Update" button and select "Share." Within the Share modal, click the "Copy Embed" button to copy the embed code for your project.

<figure><img src="https://564713456-files.gitbook.io/~/files/v0/b/gitbook-x-prod.appspot.com/o/spaces%2FKNcXDcNRYHUBsVw12Dii%2Fuploads%2FRwuclUbRiBW3jTaZVG4W%2Fadjusted.png?alt=media&amp;token=b68e992b-314a-47dd-9d6a-adca7ca78d49" alt=""><figcaption></figcaption></figure>

### Integrating SwiftXR into  Weebly Websites <a href="#integrating-swiftxr-into-framer-websites" id="integrating-swiftxr-into-framer-websites"></a>

* Navigate: Launch Weebly and open the website where you want to integrate your 3D/AR/VR project.
* Copy the embed Html Code from SwiftXr.
* Add the Embed code Widget to your site editor.

<figure><img src="https://564713456-files.gitbook.io/~/files/v0/b/gitbook-x-prod.appspot.com/o/spaces%2FKNcXDcNRYHUBsVw12Dii%2Fuploads%2FthHN9bwBqTvqTbZuAI0q%2FScreenshot%202024-09-18%20at%2013.09.55.png?alt=media&amp;token=c96da2a9-0f57-4ed8-acf6-0484467b7cd6" alt=""><figcaption></figcaption></figure>

* Paste Embed Code: Seamlessly integrate your SwiftXR project by pasting the copied embed code into the HTML field within the Editor.&#x20;

<figure><img src="https://564713456-files.gitbook.io/~/files/v0/b/gitbook-x-prod.appspot.com/o/spaces%2FKNcXDcNRYHUBsVw12Dii%2Fuploads%2FjKjp67vJTCRqcPvdbbOY%2FScreenshot%202024-09-23%20at%2017.41.20.png?alt=media&amp;token=f2a03d0b-3d08-4401-8a15-f6d06d90b2fa" alt=""><figcaption></figcaption></figure>

### Viewing your Scene in the Web, AR or VR <a href="#viewing-your-scene-in-the-web-ar-or-vr" id="viewing-your-scene-in-the-web-ar-or-vr"></a>

Save and publish the Weebly website and view the link on any device to explore it immersively.

<figure><img src="https://564713456-files.gitbook.io/~/files/v0/b/gitbook-x-prod.appspot.com/o/spaces%2FKNcXDcNRYHUBsVw12Dii%2Fuploads%2F67ZDbKEf2XdVjomm9YZd%2FScreenshot%202024-09-23%20at%2017.40.07.png?alt=media&amp;token=a527526c-ded5-485b-a312-b418235091bd" alt=""><figcaption></figcaption></figure>

### Conclusion <a href="#conclusion" id="conclusion"></a>

By integrating SwiftXR with Weebly you can seamlessly blend 3D elements into your web prototypes, creating more engaging and interactive experiences for your users. Explore the possibilities of using SwiftXR to enhance your Weebly Websites and bring your ideas to life in an immersive and interactive way.


# WiX

Add or embed 3D, Augmented Reality (AR), and Virtual Reality (VR) content/design to your Wix website or store.

**Add Your Product to Your WiX Store (Skip if Already Added)"**

After setting up your store on Wix, you will need to add your custom products. If you have your products added you can  skip this part.

**To add your product:**

* Head over to "**Set up**" on the left hand side of your dashboard.
* Under Set up, click on **Add your first product**
* Add your product image and every other details
* Hit **save** when you are done.

<figure><img src="https://564713456-files.gitbook.io/~/files/v0/b/gitbook-x-prod.appspot.com/o/spaces%2FKNcXDcNRYHUBsVw12Dii%2Fuploads%2FQWKUVKxACz2c4O6C7K4C%2Fwix%201.jpg?alt=media&amp;token=b1c80ed2-8aa8-4665-b11b-73bba0e6294e" alt=""><figcaption></figcaption></figure>

### (One time) Add the SwiftXR Widget to your Product Page

To add the 3D/AR/VR view to your product page:

1. Go to WiX Website Editor and switch to the product page

<figure><img src="https://564713456-files.gitbook.io/~/files/v0/b/gitbook-x-prod.appspot.com/o/spaces%2FKNcXDcNRYHUBsVw12Dii%2Fuploads%2FfREf8YoMhRiZvnaMdftV%2Fwix%202.jpg?alt=media&amp;token=7ffc4b71-8f6b-48a2-8818-db429bc86697" alt=""><figcaption></figcaption></figure>

2. Click on "Apps" and select "SwiftXR Viewer" and add the widget to your page.

<figure><img src="https://564713456-files.gitbook.io/~/files/v0/b/gitbook-x-prod.appspot.com/o/spaces%2FKNcXDcNRYHUBsVw12Dii%2Fuploads%2FI6iTaKI0RS2Pa8sV4t8r%2Fwix%203.jpg?alt=media&amp;token=d5287cb1-82dd-48de-a0b0-b2b355376822" alt=""><figcaption></figcaption></figure>

3. Move the widget to your desired position. We suggest placing it at the top of the product page for visibility.&#x20;

<figure><img src="https://564713456-files.gitbook.io/~/files/v0/b/gitbook-x-prod.appspot.com/o/spaces%2FKNcXDcNRYHUBsVw12Dii%2Fuploads%2FNPv19D8fUmmUFPF1Nln3%2FScreenshot%202025-06-26%20083407.png?alt=media&amp;token=e8eb4dca-bc92-4615-8615-8852473fd1ac" alt=""><figcaption></figcaption></figure>

The viewer will be automatically hidden if there is no corresponding SwiftXR URL for the product.

Important: SwiftXR does not change the look of your website. You can add the SwiftXR Viewer to different parts of your page by opening the widget settings and turning on the optional link feature.

## Step 1 - Go to the SwiftXR Hub and Create a Project

To create a SwiftXR project and publish your 3D Model, visit the SwiftXR Hub. SwiftXR accepts multiple file formats such as fbx, obj, stl, gltf, and images.

(Optional) You can also use templates for quick starts

<figure><img src="https://564713456-files.gitbook.io/~/files/v0/b/gitbook-x-prod.appspot.com/o/spaces%2FKNcXDcNRYHUBsVw12Dii%2Fuploads%2FvElFZ4OANwMKDcChraat%2FScreenshot%202025-06-27%20093610.png?alt=media&amp;token=f545c274-9597-4392-9b17-f7fea7db00db" alt=""><figcaption></figcaption></figure>

### Step 2 - Add a 3D Component and Upload your 3D Model

From the component tab, click or drag and drop a 3D viewer component to add it to the white canvas. Select the "Properties" tab to upload a 3D model, import from a 3D store or Request a 3D model from <support@swiftxr.io>.

(Optional) To make sure that only your 3D model is visible, make sure to remove any other components on the SwiftXR Canvas.

<figure><img src="https://564713456-files.gitbook.io/~/files/v0/b/gitbook-x-prod.appspot.com/o/spaces%2FKNcXDcNRYHUBsVw12Dii%2Fuploads%2Fh9GmgNmVBf3lYK1H5k8F%2Fwix%205.jpg?alt=media&amp;token=4a618ce9-e9d2-46a2-abe1-eb4af3d479ea" alt=""><figcaption></figcaption></figure>

### Step 3 - Publish your Project

To publish your project, click the "Publish" button located at the top right corner of the SwiftXR Editor and then select "Publish Project".

(Optional) You can customise the project URL before you publish.

<figure><img src="https://564713456-files.gitbook.io/~/files/v0/b/gitbook-x-prod.appspot.com/o/spaces%2FKNcXDcNRYHUBsVw12Dii%2Fuploads%2FQdr0lluCxvnvm7fWn71n%2Fwix%206.jpg?alt=media&amp;token=dec63c06-4e68-4085-a3b5-42d2d02f5bbc" alt=""><figcaption></figcaption></figure>

### Step 4 - Copy the Published Project URL&#x20;

***

After publishing your project, copy the published project URL then close editor

**Important:** Make sure that your project URL has the "swiftxr.app" domain, otherwise our servers will mark it as invalid. You can also view and share the project using the published project URL

### Step 5 -  Paste your Published Project URL  and Publish your Website

<figure><img src="https://564713456-files.gitbook.io/~/files/v0/b/gitbook-x-prod.appspot.com/o/spaces%2FKNcXDcNRYHUBsVw12Dii%2Fuploads%2FT4GKYoOJzOC7DqBC86TS%2Fwix%207.jpg?alt=media&amp;token=61a286d4-eedc-43da-a4bb-75eea74e341d" alt=""><figcaption></figcaption></figure>

### Congratulations! You have successfully added 3D/AR/VR views to your shop. Enjoy exploring your products in a whole new way!

***

Visit your published site after publishing, head over to that particular product to view your 3D entry

<figure><img src="https://564713456-files.gitbook.io/~/files/v0/b/gitbook-x-prod.appspot.com/o/spaces%2FKNcXDcNRYHUBsVw12Dii%2Fuploads%2FB7H5qWub23PH6RszfZo0%2FScreenshot%202025-06-27%20103727.png?alt=media&amp;token=85889eb0-7d02-417d-92e8-5e9edc74d53f" alt=""><figcaption></figcaption></figure>

SwiftXR automatically switches between different views depending on the product and shows the correct link as specified in the product dashboard.

Note: Keep adding your 3D models to your store to make it more interactive.


# WordPress

Add or embed 3D, Augmented Reality (AR), and Virtual Reality (VR) content/design to your WordPress website.

<figure><img src="https://564713456-files.gitbook.io/~/files/v0/b/gitbook-x-prod.appspot.com/o/spaces%2FKNcXDcNRYHUBsVw12Dii%2Fuploads%2Fzn0BRyHUF8tUffT3BP8d%2FScreenshot%202024-09-24%20at%2013.09.19.png?alt=media&amp;token=79d3fa1a-470b-4dfd-842b-5f00e3e4c6ee" alt=""><figcaption></figcaption></figure>

### (One time) Add the SwiftXR Plugin to your Wordpress Site

To add the 3D/AR/VR view to your product page:

1. Go to Wordpress Website Editor and click on plugin
2. Click on add new plugin and search for SwiftXr
3. Click on "Install now" to install plugin
4. After installing, Click on the Plugin from your menu.

Important: SwiftXR does not change the look of your website. You can add the SwiftXR Viewer to different parts of your page by opening the widget settings and turning on the optional link feature.

Once you have added the plugin you can now embed your 3D project by following the steps below.

### Step 1 - Go to the SwiftXR Hub and Create a Project

To create a SwiftXR project and publish your 3D Model, visit the SwiftXR Hub. SwiftXR accepts multiple file formats such as fbx, obj, stl, gltf, and images.

(Optional) You can also use templates for quick starts

<figure><img src="https://w-viewer.swiftxr.io/step-2-min.1fd721fa.png" alt=""><figcaption></figcaption></figure>

### Step 2 - Add a 3D Component and Upload your 3D Model

From the component tab, click or drag and drop a 3D viewer component to add it to the white canvas. Select the "Properties" tab to upload a 3D model, import from a 3D store or Request a 3D model from <support@swiftxr.io>.

(Optional) To make sure that only your 3D model is visible, make sure to remove any other components on the SwiftXR Canvas.

### Step 3 - Publish/Update your Project

To publish or update  your project, click the "Publish" button or "Update"  if it is an existing project which is located at the top right corner of the SwiftXR Editor".

(Optional) You can customise the project URL before you publish.

<figure><img src="https://564713456-files.gitbook.io/~/files/v0/b/gitbook-x-prod.appspot.com/o/spaces%2FKNcXDcNRYHUBsVw12Dii%2Fuploads%2FZu6ol5Wixq98kR9hX3lV%2Feditorcushion.png?alt=media&amp;token=dcf5f260-ee81-4fa5-acbf-e1296b1c403c" alt=""><figcaption></figcaption></figure>

### Step 4 - Copy the Published Project URL&#x20;

After publishing your project, copy the published project URL'

Important: Make sure that your project URL has the "swiftxr.app" domain, otherwise our servers will mark it as invalid. You can also view and share the project using the published project URL

<figure><img src="https://564713456-files.gitbook.io/~/files/v0/b/gitbook-x-prod.appspot.com/o/spaces%2FKNcXDcNRYHUBsVw12Dii%2Fuploads%2FdPatEJ3x6ahE7r2eMWfN%2FScreenshot%202024-09-23%20at%2018.07.47.png?alt=media&amp;token=15361bc9-5afd-4f2a-abe9-297fd0673653" alt=""><figcaption></figcaption></figure>

### Step 5 - Link SwiftXR Published Project to WordPress

***

1. To add published project to your WordPress, Click on the plugin from your WordPress Menu
2. Click on "Add New Entry"

<figure><img src="https://564713456-files.gitbook.io/~/files/v0/b/gitbook-x-prod.appspot.com/o/spaces%2FKNcXDcNRYHUBsVw12Dii%2Fuploads%2F5MPAtmh8RaQdCpPlGYRV%2FScreenshot%202024-09-23%20at%2017.57.55.png?alt=media&amp;token=0d1fcb58-17a8-43d1-854b-554bf29227ca" alt=""><figcaption></figcaption></figure>

3. Enter the published url from SwiftXR
4. Adjust your dimensions (this is for the embed object)
5. Click on "Add Entry"

<figure><img src="https://564713456-files.gitbook.io/~/files/v0/b/gitbook-x-prod.appspot.com/o/spaces%2FKNcXDcNRYHUBsVw12Dii%2Fuploads%2F7YLBsTU42bqEmRTlCivY%2FScreenshot%202024-09-23%20at%2017.18.56.png?alt=media&amp;token=3991be4d-4509-4cae-bd9a-ad362b095beb" alt=""><figcaption></figcaption></figure>

6. After Adding Entry copy the short code. This will be needed to display product in your WordPress Site.

<figure><img src="https://564713456-files.gitbook.io/~/files/v0/b/gitbook-x-prod.appspot.com/o/spaces%2FKNcXDcNRYHUBsVw12Dii%2Fuploads%2FiIDonvfogiMeQ9OMZ7Jd%2FScreenshot%202024-09-23%20at%2018.32.42.png?alt=media&amp;token=f5efe060-6b47-4961-98e5-8e6836185f35" alt=""><figcaption></figcaption></figure>

### Using the generated ShortCode on your WordPress site

To use the generated short code on your WordPress Site, follow the steps below

* Open the page you want to edit, and Click to add a block.
* Search for ShortCode on the block search input, then drag and add to page.
*

```
<figure><img src="/files/Zuz80xFupTkNb9JAzqjK" alt=""><figcaption></figcaption></figure>
```

* Paste the ShortCode generated from the SwiftXr plugin before now.

<figure><img src="https://564713456-files.gitbook.io/~/files/v0/b/gitbook-x-prod.appspot.com/o/spaces%2FKNcXDcNRYHUBsVw12Dii%2Fuploads%2FwPljX3VXPYWqIhN1fBOe%2Fsave.png?alt=media&amp;token=cb1f4f93-c98f-4ee9-bac9-ac3f8b1191a1" alt=""><figcaption></figcaption></figure>

* Click on Save

<figure><img src="https://564713456-files.gitbook.io/~/files/v0/b/gitbook-x-prod.appspot.com/o/spaces%2FKNcXDcNRYHUBsVw12Dii%2Fuploads%2Fzn0BRyHUF8tUffT3BP8d%2FScreenshot%202024-09-24%20at%2013.09.19.png?alt=media&amp;token=79d3fa1a-470b-4dfd-842b-5f00e3e4c6ee" alt=""><figcaption></figcaption></figure>

### Congratulations! You have successfully added 3D/AR/VR. Enjoy exploring your products in a whole new way!

***

Note: Keep adding your 3D models to your store to make it more interactive.

Tip: Adding 3D/AR/VR content across your WordPress can help increase customer browsing time and number of items viewed.<br>


# WooCommerce

Add or embed 3D, Augmented Reality (AR), and Virtual Reality (VR) content/design to your WooCommerce store.

<figure><img src="https://564713456-files.gitbook.io/~/files/v0/b/gitbook-x-prod.appspot.com/o/spaces%2FKNcXDcNRYHUBsVw12Dii%2Fuploads%2F9J4w168F1uvDY9A6Elu2%2FScreenshot%202024-09-24%20at%2012.14.38.png?alt=media&amp;token=745e4bf6-1c43-45fd-ba1d-d472d6c2a99b" alt=""><figcaption></figcaption></figure>

### (One time) Add the SwiftXR Plugin using Wordpress Hosting

To add the 3D/AR/VR view to your product page:

1. Go to Wordpress Website Editor and click on plugin
2. Click on add new plugin and search for SwiftXr
3. Click on "Install now" to install plugin
4. After installing, Click on the Plugin from your menu.

Important: SwiftXR does not change the look of your website. You can add the SwiftXR Viewer to different parts of your page by opening the widget settings and turning on the optional link feature.

Once you have added the plugin you can now embed your 3D project by following the steps below.

### Step 1 - Go to the SwiftXR Hub and Create a Project

To create a SwiftXR project and publish your 3D Model, visit the SwiftXR Hub. SwiftXR accepts multiple file formats such as fbx, obj, stl, gltf, and images.

(Optional) You can also use templates for quick starts

<figure><img src="https://w-viewer.swiftxr.io/step-2-min.1fd721fa.png" alt=""><figcaption></figcaption></figure>

### Step 2 - Add a 3D Component and Upload your 3D Model

From the component tab, click or drag and drop a 3D viewer component to add it to the white canvas. Select the "Properties" tab to upload a 3D model, import from a 3D store or Request a 3D model from <support@swiftxr.io>.

(Optional) To make sure that only your 3D model is visible, make sure to remove any other components on the SwiftXR Canvas.

### Step 3 - Publish/Update your Project

To publish or update  your project, click the "Publish" button or "Update"  if it is an existing project which is located at the top right corner of the SwiftXR Editor".

(Optional) You can customise the project URL before you publish.

<figure><img src="https://564713456-files.gitbook.io/~/files/v0/b/gitbook-x-prod.appspot.com/o/spaces%2FKNcXDcNRYHUBsVw12Dii%2Fuploads%2FZu6ol5Wixq98kR9hX3lV%2Feditorcushion.png?alt=media&amp;token=dcf5f260-ee81-4fa5-acbf-e1296b1c403c" alt=""><figcaption></figcaption></figure>

### Step 4 - Copy the Published Project URL&#x20;

After publishing your project, copy the published project URL'

Important: Make sure that your project URL has the "swiftxr.app" domain, otherwise our servers will mark it as invalid. You can also view and share the project using the published project URL

<figure><img src="https://564713456-files.gitbook.io/~/files/v0/b/gitbook-x-prod.appspot.com/o/spaces%2FKNcXDcNRYHUBsVw12Dii%2Fuploads%2FdPatEJ3x6ahE7r2eMWfN%2FScreenshot%202024-09-23%20at%2018.07.47.png?alt=media&amp;token=15361bc9-5afd-4f2a-abe9-297fd0673653" alt=""><figcaption></figcaption></figure>

### Step 5 - Link SwiftXR Published Project to WooCommerce Store

***

1. To add published project to your Store, Click on the plugin from your WordPress Menu
2. Click on "Add New Entry"

<figure><img src="https://564713456-files.gitbook.io/~/files/v0/b/gitbook-x-prod.appspot.com/o/spaces%2FKNcXDcNRYHUBsVw12Dii%2Fuploads%2F5MPAtmh8RaQdCpPlGYRV%2FScreenshot%202024-09-23%20at%2017.57.55.png?alt=media&amp;token=0d1fcb58-17a8-43d1-854b-554bf29227ca" alt=""><figcaption></figcaption></figure>

3. Enter the published url from SwiftXR.
4. Switch to E-Commerce Mode.

<figure><img src="https://564713456-files.gitbook.io/~/files/v0/b/gitbook-x-prod.appspot.com/o/spaces%2FKNcXDcNRYHUBsVw12Dii%2Fuploads%2FIBrtrz4KhfW5Yp6WM8Lt%2FScreenshot%202024-09-24%20at%2011.55.19.png?alt=media&amp;token=1fa217ad-7582-43de-bbae-d95d2e938b21" alt=""><figcaption></figcaption></figure>

5. Choose the product you want to link the 3D object to.

<figure><img src="https://564713456-files.gitbook.io/~/files/v0/b/gitbook-x-prod.appspot.com/o/spaces%2FKNcXDcNRYHUBsVw12Dii%2Fuploads%2FsvSRkJDZ4g9AN1HSDToK%2FScreenshot%202024-09-24%20at%2011.55.27.png?alt=media&amp;token=59cfa2ad-d906-49c4-8861-76ec095e5555" alt=""><figcaption></figcaption></figure>

6. Click on "Add"
7. On add the product preview will be generated.

<figure><img src="https://564713456-files.gitbook.io/~/files/v0/b/gitbook-x-prod.appspot.com/o/spaces%2FKNcXDcNRYHUBsVw12Dii%2Fuploads%2FSqOSKSHvrdfqs14123VG%2FScreenshot%202024-09-24%20at%2011.55.59.png?alt=media&amp;token=07248461-5d26-4152-a10f-1fdc07ae3bc9" alt=""><figcaption></figcaption></figure>

### Congratulations! You have successfully added 3D/AR/VR to your product. Enjoy and keep exploring your products in a whole new way!

Note: Keep adding your 3D models to your store to make it more interactive.

Tip: Adding 3D/AR/VR content across your WordPress can help increase customer browsing time and number of items viewed.<br>

<figure><img src="https://564713456-files.gitbook.io/~/files/v0/b/gitbook-x-prod.appspot.com/o/spaces%2FKNcXDcNRYHUBsVw12Dii%2Fuploads%2F9J4w168F1uvDY9A6Elu2%2FScreenshot%202024-09-24%20at%2012.14.38.png?alt=media&amp;token=745e4bf6-1c43-45fd-ba1d-d472d6c2a99b" alt=""><figcaption></figcaption></figure>


# Webflow

Add or embed 3D, Augmented Reality (AR), and Virtual Reality (VR) content/design to your Webflow website.

<figure><img src="https://docs.swiftxr.io/img/plugins/webflow/webflow-cover.png" alt=""><figcaption></figcaption></figure>

### Introduction <a href="#introduction" id="introduction"></a>

SwiftXR is a robust platform designed for building and sharing engaging 3D, augmented reality (AR), and virtual reality (VR) encounters on the internet without writing a single line of code. Using the SwiftXR (3D/AR/VR) Integration for Webflow, you can seamlessly incorporate SwiftXR Projects into your Webflow prototypes/websites, allowing the smooth creation of immersive and interactive web experiences.

### Create a Project in SwiftXR <a href="#create-a-project-in-swiftxr" id="create-a-project-in-swiftxr"></a>

* Navigate to the SwiftXR Hub: Begin by visiting the [SwiftXR Hub](https://swiftxr.io/hub).
* Initiate Project Creation: Once on Hub, click the "Create Project" button and enter your desired project name.
* Design and Develop: Utilize the intuitive editor to effortlessly add and customize SwiftXR components, bringing your 3D vision to life.

<figure><img src="https://docs.swiftxr.io/img/plugins/webflow/webflow-step-1.png" alt=""><figcaption></figcaption></figure>

### Import your 3D asset <a href="#import-your-3d-asset" id="import-your-3d-asset"></a>

* Navigate to the side menu bar, click on the "Files" button and click on the "Import Files" button to import your 3D model.

<figure><img src="https://docs.swiftxr.io/img/plugins/webflow/webflow-step-2.png" alt=""><figcaption></figcaption></figure>

* Alternatively, you can navigate to the side menu bar, click on the "Components" button and click on the "Stores" button to import your 3D model from our 3D marketplace.

<figure><img src="https://docs.swiftxr.io/img/plugins/webflow/webflow-step-3.png" alt=""><figcaption></figcaption></figure>

### Publish Your SwiftXR Project <a href="#publish-your-swiftxr-project" id="publish-your-swiftxr-project"></a>

Utilize the editor to create your 3D vision using the SwiftXR components. Once satisfied with yur creation, press the "Publish" or "Update" button to make your project live.

<figure><img src="https://docs.swiftxr.io/img/plugins/webflow/webflow-step-4.png" alt=""><figcaption></figcaption></figure>

### Copy Embed Code <a href="#copy-embed-code" id="copy-embed-code"></a>

After publishing, click the dropdown button beside the "Update" button and select "Share." Within the Share modal, click the "Copy Embed" button to copy the embed code for your project.

<figure><img src="https://docs.swiftxr.io/img/plugins/webflow/webflow-step-5.png" alt=""><figcaption></figcaption></figure>

### Integrate SwiftXR into Webflow Websites <a href="#integrate-swiftxr-into-webflow-websites" id="integrate-swiftxr-into-webflow-websites"></a>

* Go to Webflow Dashboard: Open your website where you want to integrate your 3D/AR/VR project.
* Add Embed Component: Locate and add the embed component from Webflow's Elements library.

<figure><img src="https://docs.swiftxr.io/img/plugins/webflow/webflow-step-6.png" alt=""><figcaption></figcaption></figure>

* Paste Embed Code: First, click on the "Settings" button to change the tag from "div" to "iframe". Then integrate your SwiftXR project by pasting the copied embed code into the "Attributes" field within Webflow.
* **NOTE**: Add each attrribute by clicking the plus button, enter the left hand side of the embed code lines in the **name** field and the right hand side of the embed code lines in the **value** field.

For example:

```
  <iframe 
  title="SwiftXR" 
  frameborder="0" 
  allowfullscreen 
  mozallowfullscreen="true" 
  webkitallowfullscreen="true" 
  allow="fullscreen; autoplay; xr-spatial-tracking; camera; midi; encrypted-media" execution-while-out-of-viewport 
  execution-while-not-rendered 
  web-share 
  width="100%" 
  height="100%" 
  src="https://aquatic-porcupine.swiftxr.app">
  </iframe>
</div>
```

* In the above code snippet:
  * The left-hand side of each line represents the attribute name before the '**=**' sign.
  * The right-hand side of each line represents the attribute value after the '**=**' sign.

<figure><img src="https://docs.swiftxr.io/img/plugins/webflow/webflow-step-7.png" alt=""><figcaption></figcaption></figure>

### Viewing your Scene in the Web, AR or VR <a href="#viewing-your-scene-in-the-web-ar-or-vr" id="viewing-your-scene-in-the-web-ar-or-vr"></a>

Save and publish the Webflow website and view the link on any device to explore it immersively.

<figure><img src="https://docs.swiftxr.io/img/plugins/webflow/webflow-step-8.png" alt=""><figcaption></figcaption></figure>

### Conclusion <a href="#conclusion" id="conclusion"></a>

Integrate SwiftXR with Webflow to effortlessly integrate 3D elements into your web prototypes, delivering heightened engagement and interactivity for your users. Uncover the potential of leveraging SwiftXR to elevate your Webflow prototypes, transforming your concepts into immersive and interactive realities.


# Webwave

Add or embed 3D, Augmented Reality (AR), and Virtual Reality (VR) content/design to your Webwave website.

**Introduction**

SwiftXR is a powerful platform for creating and sharing interactive 3D, augmented reality (AR), and virtual reality (VR) experiences on the web. With the SwiftXR (3D/AR/VR) Integration for WebWave, you can easily integrate SwiftXR Projects into your WebWave website, enabling you to create immersive and interactive web experiences.

**Creating a Project in SwiftXR**

* Navigate to the SwiftXR Hub: Begin by visiting the SwiftXR Hub, or alternatively click on this link: <https://swiftxr.io/hub>&#x20;
* Initiate Project Creation: Once on Hub, click the “Create Project” button and enter your desired project name.
* Design or Develop: Utilize the intuitive editor to effortlessly add and customize SwiftXR components, bringing your 3D vision to life.

<figure><img src="https://564713456-files.gitbook.io/~/files/v0/b/gitbook-x-prod.appspot.com/o/spaces%2FKNcXDcNRYHUBsVw12Dii%2Fuploads%2FFxFepXxvXrXZLTphDGQj%2Fimage.png?alt=media&amp;token=93d64438-12e2-4891-aea1-7f273a052215" alt=""><figcaption></figcaption></figure>

**Publishing your SwiftXR Project**

* Utilize the editor to create your 3D vision using the SwiftXR components. Once satisfied with your creation, press the “Publish” or “Update” button to make your project live

<figure><img src="https://564713456-files.gitbook.io/~/files/v0/b/gitbook-x-prod.appspot.com/o/spaces%2FKNcXDcNRYHUBsVw12Dii%2Fuploads%2FE8PpAq4C14pzVX4zHa6p%2Fimage.png?alt=media&amp;token=9db612ee-779a-4bdc-9b49-1e35fe86e9b7" alt=""><figcaption></figcaption></figure>

**Copy Embed Code**

* After publishing, click the dropdown button beside the “Update” button and select “Share.” Within the Share modal, click the “Copy Embed” button to copy the embed code for your project.

<figure><img src="https://564713456-files.gitbook.io/~/files/v0/b/gitbook-x-prod.appspot.com/o/spaces%2FKNcXDcNRYHUBsVw12Dii%2Fuploads%2FIW6IFNfFelMf151EoRQi%2Fimage.png?alt=media&amp;token=d1a9c7ef-90cd-4e01-82f3-c0f53b4abfb6" alt=""><figcaption></figcaption></figure>

**Integrating SwiftXR into WebWave Website**

* Go to [WebWave.com](http://webwave.com) and create an account or log in if you already have one.
* After you log in, you would see three options, choose the right option that says “Start with a blank page”.

<figure><img src="https://564713456-files.gitbook.io/~/files/v0/b/gitbook-x-prod.appspot.com/o/spaces%2FKNcXDcNRYHUBsVw12Dii%2Fuploads%2FY0DbStuzOrIo4IoPl0lX%2Fimage.png?alt=media&amp;token=c25a3581-3c9a-4a33-bf5b-66bebdd4f4db" alt=""><figcaption></figcaption></figure>

**Add an HTML Element**

* After clicking on “Start with a blank page”, it would take you to the page editor.
* In the editor, you would see an icon that looks like “...” in the last left corner of your page, hover over it, it would bring a new set of icons, choose the icon that looks like “<>”.

<figure><img src="https://564713456-files.gitbook.io/~/files/v0/b/gitbook-x-prod.appspot.com/o/spaces%2FKNcXDcNRYHUBsVw12Dii%2Fuploads%2FQhjRxpryOoEvEhdzkv3U%2Fimage.png?alt=media&amp;token=b8cdb609-3bcd-450c-801d-9308053fb9d8" alt=""><figcaption></figcaption></figure>

**Insert Your SwiftXR Embed Code**

* After clicking on the “<>” icon, a code editor page would appear on your screen.
* Erase the existing code and paste your SwiftXR iframe code in the code editor and click on the bottom right button that says “Change Code”.

  Insert Your SwiftXR Embed Code

<figure><img src="https://564713456-files.gitbook.io/~/files/v0/b/gitbook-x-prod.appspot.com/o/spaces%2FKNcXDcNRYHUBsVw12Dii%2Fuploads%2F7HIDKp8UAmMfPWQFxXoD%2Fimage.png?alt=media&amp;token=fe099a30-709a-492e-b3c9-bbe875ef2b03" alt=""><figcaption></figcaption></figure>

* After clicking on “Change Code”, your SwiftXR product would be live in your website.
* It would appear very little, but there is a scaleable tag attached to it, so you can scale it to your satisfaction

<figure><img src="https://564713456-files.gitbook.io/~/files/v0/b/gitbook-x-prod.appspot.com/o/spaces%2FKNcXDcNRYHUBsVw12Dii%2Fuploads%2Fde9IEmQ8HjD5iiGqe5Ls%2Fimage.png?alt=media&amp;token=7d808ed4-54f8-463b-b573-8cf105d51713" alt=""><figcaption></figcaption></figure>

**Publishing your Website**

Click on the publish button in the top right corner of your page.

* After clicking on it, you would see a message that says your website has been published, click on the “Close” button.

<figure><img src="https://564713456-files.gitbook.io/~/files/v0/b/gitbook-x-prod.appspot.com/o/spaces%2FKNcXDcNRYHUBsVw12Dii%2Fuploads%2FKh0f9sMyTdL4uuZ8It3o%2Fimage.png?alt=media&amp;token=4f016fd6-e58b-4c31-bbb4-61b3d1bcf838" alt=""><figcaption></figcaption></figure>

**Viewing your Scene in the Web, AR or VR**

* After clicking on the “Close” button, at the top right corner beside the eye icon, you would see an “earth” icon, click on it to view your published page live.\\

<figure><img src="https://564713456-files.gitbook.io/~/files/v0/b/gitbook-x-prod.appspot.com/o/spaces%2FKNcXDcNRYHUBsVw12Dii%2Fuploads%2FZ8yYWW7YL3jrz8IQEOhH%2Fimage.png?alt=media&amp;token=5efef247-d066-43c4-9ad7-209cd7039932" alt=""><figcaption></figcaption></figure>

**Conclusion**

Integrating SwiftXR into WebWave is straightforward and fully supported on the platform’s free plan. By using WebWave’s custom code block, developers and content creators can seamlessly embed SwiftXR’s interactive 3D experiences into their websites without needing a paid plan. This integration allows for enhanced user engagement, dynamic content presentation, and a smooth deployment process. Overall, WebWave provides a flexible and accessible environment to showcase SwiftXR content efficiently and effectively.<br>

<br>

<br>


# Zoho Commerce

Add or embed 3D, Augmented Reality (AR), and Virtual Reality (VR) content/design to your Zoho Commerce

<figure><img src="https://docs.swiftxr.io/img/plugins/zoho/swx/zoho-cover.png" alt=""><figcaption></figcaption></figure>

### Introduction <a href="#introduction" id="introduction"></a>

SwiftXR is a powerful platform for creating and sharing interactive 3D, augmented reality (AR), and virtual reality (VR) experiences on the web. With the SwiftXR (3D/AR/VR) Integration for Zoho, you can easily integrate SwiftXR Projects into your [zoho commerce](https://go.zoho.com/4si), enabling you to create immersive and interactive web experiences.

Creating a Project in SwiftXR

* Navigate to the SwiftXR Hub: Begin by visiting the [SwiftXR Hub](https://swiftxr.io/hub).
* Initiate Project Creation: Once on Hub, click the "Create Project" button and enter your desired project name.
* Design and Develop: Utilize the intuitive editor to effortlessly add and customize SwiftXR components, bringing your 3D vision to life.

<figure><img src="https://docs.swiftxr.io/img/plugins/zoho/swx/zoho-step-1.png" alt=""><figcaption></figcaption></figure>

### Publishing Your SwiftXR Project <a href="#publishing-your-swiftxr-project" id="publishing-your-swiftxr-project"></a>

Utilize the editor to create your 3D vision using the SwiftXR components. Once satisfied with your creation, press the "Publish" or "Update" button to make your project live.

<figure><img src="https://docs.swiftxr.io/img/plugins/zoho/swx/zoho-step-2.png" alt=""><figcaption></figcaption></figure>

### Copy Embed Code <a href="#copy-embed-code" id="copy-embed-code"></a>

After publishing, click the dropdown button beside the "Update" button and select "Share." Within the Share modal, click the "Copy Embed" button to copy the embed code for your project.

<figure><img src="https://docs.swiftxr.io/img/plugins/zoho/swx/zoho-step-3.png" alt=""><figcaption></figcaption></figure>

### Integrating SwiftXR into Zoho Websites <a href="#integrating-swiftxr-into-zoho-websites" id="integrating-swiftxr-into-zoho-websites"></a>

* To get started, just drag and drop the Custom HTML icon from the Elements section to the crafting area

<figure><img src="https://docs.swiftxr.io/img/plugins/zoho/swx/zoho-step-4.png" alt=""><figcaption></figcaption></figure>

* Insert the desired HTML tags and fill in the HTML Code label field, afterwards, click the Embed Code button.

<figure><img src="https://docs.swiftxr.io/img/plugins/zoho/swx/zoho-step-5.png" alt=""><figcaption></figcaption></figure>

* Click the Save button once all the desired changes are made

### Viewing your scene in the Web, VR or AR <a href="#viewing-your-scene-in-the-web-vr-or-ar" id="viewing-your-scene-in-the-web-vr-or-ar"></a>

Save and publish the  [Zoho Commerce](https://go.zoho.com/4si) and view the link on any device to explore it immersively.

### Conclusion <a href="#conclusion" id="conclusion"></a>

By integrating SwiftXR with Zoho, you can seamlessly blend 3D elements into your web prototypes, creating more engaging and interactive experiences for your users. Explore the possibilities of using SwiftXR to enhance your [Zoho Commerce ](https://go.zoho.com/4si) prototypes and bring your ideas to life in an immersive and interactive way.


# Zoho Sites

Add or embed 3D, Augmented Reality (AR), and Virtual Reality (VR) content/design to your Zoho Site.

## Introduction

SwiftXR is a powerful platform for creating and sharing interactive 3D, augmented reality (AR), and virtual reality (VR) experiences on the web. With the SwiftXR (3D/AR/VR) Integration for Zoho, you can easily integrate SwiftXR Projects into your Zoho prototypes/websites, enabling you to create immersive and interactive web experiences.

Creating a Project in SwiftXR

* Navigate to the SwiftXR Hub: Begin by visiting the [SwiftXR Hub](https://swiftxr.io/hub).
* Initiate Project Creation: Once on Hub, click the "Create Project" button and enter your desired project name.
* Design and Develop: Utilize the intuitive editor to effortlessly add and customize SwiftXR components, bringing your 3D vision to life.

<figure><img src="https://564713456-files.gitbook.io/~/files/v0/b/gitbook-x-prod.appspot.com/o/spaces%2FKNcXDcNRYHUBsVw12Dii%2Fuploads%2FlTnLDqdmYo9b2G5FzeyB%2Fzoho%201.jpg?alt=media&amp;token=4a90ae47-f52e-44fe-8d50-764a1248bab6" alt=""><figcaption></figcaption></figure>

### Publishing Your SwiftXR Project <a href="#publishing-your-swiftxr-project" id="publishing-your-swiftxr-project"></a>

Utilize the editor to create your 3D vision using the SwiftXR components. Once satisfied with your creation, press the "Publish" or "Update" button to make your project live.

<figure><img src="https://564713456-files.gitbook.io/~/files/v0/b/gitbook-x-prod.appspot.com/o/spaces%2FKNcXDcNRYHUBsVw12Dii%2Fuploads%2F3hmJib3TgtFaksfQzgMm%2FZoho%203.jpg?alt=media&amp;token=61fd06f0-d7a8-42c8-b634-b9cebbecc3ff" alt=""><figcaption></figcaption></figure>

### Copy Embed Code <a href="#copy-embed-code" id="copy-embed-code"></a>

After publishing, click the dropdown button beside the "Update" button and select "Share." Within the Share modal, click the "Copy Embed" button to copy the embed code for your project

<figure><img src="https://564713456-files.gitbook.io/~/files/v0/b/gitbook-x-prod.appspot.com/o/spaces%2FKNcXDcNRYHUBsVw12Dii%2Fuploads%2F5sWYgcGKuuuKtLssi8zX%2Fzoho%204.jpg?alt=media&amp;token=a41d3b8a-030b-43e8-a900-cebbf836d6eb" alt=""><figcaption></figcaption></figure>

### Integrating SwiftXR into Zoho Sites <a href="#integrating-swiftxr-into-zoho-websites" id="integrating-swiftxr-into-zoho-websites"></a>

* On your Zoho Site dashbord, click on **Edit Site**

<figure><img src="https://564713456-files.gitbook.io/~/files/v0/b/gitbook-x-prod.appspot.com/o/spaces%2FKNcXDcNRYHUBsVw12Dii%2Fuploads%2FUpoyfD0wDWE3c7tpMVOz%2Fzoho%205.jpg?alt=media&amp;token=b4131bb3-319a-4d66-95e9-11b460cddb0a" alt=""><figcaption></figcaption></figure>

* In your Editor, click on the plus size at the top left corner of your page, then select **Element**

<figure><img src="https://564713456-files.gitbook.io/~/files/v0/b/gitbook-x-prod.appspot.com/o/spaces%2FKNcXDcNRYHUBsVw12Dii%2Fuploads%2FyPnQnLpwIJhBo561CRgp%2Fzoho%206.jpg?alt=media&amp;token=3f2d627c-0251-49a1-9e93-cc1b8059414f" alt=""><figcaption></figcaption></figure>

* Under Elements, scroll down, select **Code Snippet**

<figure><img src="https://564713456-files.gitbook.io/~/files/v0/b/gitbook-x-prod.appspot.com/o/spaces%2FKNcXDcNRYHUBsVw12Dii%2Fuploads%2F5IY91rJ1hy84F4FPIr9p%2Fzoho%207.jpg?alt=media&amp;token=f1ad78b9-2191-44ba-a5a6-0584f14bfe70" alt=""><figcaption></figcaption></figure>

* Copy and Embed your project code

<figure><img src="https://564713456-files.gitbook.io/~/files/v0/b/gitbook-x-prod.appspot.com/o/spaces%2FKNcXDcNRYHUBsVw12Dii%2Fuploads%2FHDp8tqwiZFN8R37BRZ1M%2FScreenshot%202025-06-11%20153830.png?alt=media&amp;token=99593110-4e37-4f90-aac2-a55d7258df87" alt=""><figcaption></figcaption></figure>

* Click on and **OK** then publish your site

### Viewing your scene in the Web, VR or AR <a href="#viewing-your-scene-in-the-web-vr-or-ar" id="viewing-your-scene-in-the-web-vr-or-ar"></a>

Save and publish the Zoho site and view the link on any device to explore it immersively

<figure><img src="https://564713456-files.gitbook.io/~/files/v0/b/gitbook-x-prod.appspot.com/o/spaces%2FKNcXDcNRYHUBsVw12Dii%2Fuploads%2F2Ed3iCHOjTaHMeVpcLdm%2FScreenshot%202025-06-13%20151537.png?alt=media&amp;token=6fa3f12d-d459-4c34-87fb-8edc444ff558" alt=""><figcaption></figcaption></figure>

### Conclusion <a href="#conclusion" id="conclusion"></a>

By integrating SwiftXR with Zoho, you can seamlessly blend 3D elements into your web prototypes, creating more engaging and interactive experiences for your users. Explore the possibilities of using SwiftXR to enhance your Zoho prototypes and bring your ideas to life in an immersive and interactive way


# 🪢 Integrations

Embed SwiftXR’s 3D, AR, and VR experiences into HTML, React, Svelte, Angular, Vue, or any web projects effortlessly.


# HTML

Add or embed 3D, Augmented Reality (AR), and Virtual Reality (VR) content/design to your HTML website.

<figure><img src="https://564713456-files.gitbook.io/~/files/v0/b/gitbook-x-prod.appspot.com/o/spaces%2FKNcXDcNRYHUBsVw12Dii%2Fuploads%2FNuhmym29dTXrzqoa0D34%2Fhtml%20embed.PNG?alt=media&amp;token=b373bd54-b3cc-4977-98fc-01b5a2783016" alt=""><figcaption></figcaption></figure>

### Introduction <a href="#introduction" id="introduction"></a>

SwiftXR is a powerful platform for creating and sharing interactive 3D, augmented reality (AR), and virtual reality (VR) experiences on the web. With the SwiftXR (3D/AR/VR) Integration for HTML, you can easily integrate SwiftXR Projects into your HTML websites/webapps, enabling you to create immersive and interactive web experiences.

### Creating a Project in SwiftXR <a href="#creating-a-project-in-swiftxr" id="creating-a-project-in-swiftxr"></a>

* Navigate to the SwiftXR Hub: Begin by visiting the [SwiftXR Hub](https://swiftxr.io/hub).
* Initiate Project Creation: Once on Hub, click the "Create Project" button and enter your desired project name.
* Design and Develop: Utilize the intuitive editor to effortlessly add and customize SwiftXR components, bringing your 3D vision to life.

<figure><img src="https://564713456-files.gitbook.io/~/files/v0/b/gitbook-x-prod.appspot.com/o/spaces%2FKNcXDcNRYHUBsVw12Dii%2Fuploads%2Fc5eMmbN3gFUU2NLNwVfK%2FGuide%20Screenshots%20(16).png?alt=media&amp;token=b2520a00-ec26-411c-afd7-63c48b2ee3a5" alt=""><figcaption></figcaption></figure>

### Add a Component/Upload a 3D Model to the Canvas <a href="#add-a-componentupload-a-3d-model-to-the-canvas" id="add-a-componentupload-a-3d-model-to-the-canvas"></a>

* From the component tab, click or drag and drop a 3D viewer component to add it to the white canvas.
* Select the "Properties" tab to upload a 3D model, import from a 3D store or Request a 3D model from <support@swiftxr.io>.

<figure><img src="https://564713456-files.gitbook.io/~/files/v0/b/gitbook-x-prod.appspot.com/o/spaces%2FKNcXDcNRYHUBsVw12Dii%2Fuploads%2FlrDs2qAw8wTucJqFjals%2FGuide%20Screenshots%20(17).png?alt=media&amp;token=5a040e30-6084-4bca-8453-4e9f240075d7" alt=""><figcaption></figcaption></figure>

### Publishing Your SwiftXR Project <a href="#publishing-your-swiftxr-project" id="publishing-your-swiftxr-project"></a>

Utilize the editor to create your 3D vision using the SwiftXR components. Once satisfied with your creation, press the "Publish" or "Update" button to make your project live.

<figure><img src="https://564713456-files.gitbook.io/~/files/v0/b/gitbook-x-prod.appspot.com/o/spaces%2FKNcXDcNRYHUBsVw12Dii%2Fuploads%2FrPLnTfyYenLO2zWOz5Kc%2FGuide%20Screenshots%20(18).png?alt=media&amp;token=4fedd5d4-fe49-46e6-b24b-f21da0d66066" alt=""><figcaption></figcaption></figure>

### Copy Embed Code <a href="#copy-embed-code" id="copy-embed-code"></a>

After publishing, click the dropdown button beside the "Update" button and select "Share." Within the Share modal, click the "Copy Embed" button to copy the embed code for your project.

<figure><img src="https://564713456-files.gitbook.io/~/files/v0/b/gitbook-x-prod.appspot.com/o/spaces%2FKNcXDcNRYHUBsVw12Dii%2Fuploads%2FbxcHmeLtBUAydDaOPdMu%2FGuide%20Screenshots%20(20).png?alt=media&amp;token=1825110f-680b-4bee-ade3-4f0fd7820007" alt=""><figcaption></figcaption></figure>

<figure><img src="https://564713456-files.gitbook.io/~/files/v0/b/gitbook-x-prod.appspot.com/o/spaces%2FKNcXDcNRYHUBsVw12Dii%2Fuploads%2FvzzAoV79JoANRr9ctOsJ%2FGuide%20Screenshots%20(19).png?alt=media&amp;token=b388e8fb-b153-41f5-a90a-6834bf4f3295" alt=""><figcaption></figcaption></figure>

### Integrating SwiftXR into HTML Websites <a href="#integrating-swiftxr-into-html-websites" id="integrating-swiftxr-into-html-websites"></a>

* Simply paste the copied HTML embed code into the desired section of your website's HTML source code to seamlessly integrate and showcase the 3D/AR/VR view on your site

<figure><img src="https://564713456-files.gitbook.io/~/files/v0/b/gitbook-x-prod.appspot.com/o/spaces%2FKNcXDcNRYHUBsVw12Dii%2Fuploads%2FHpEaMlfGZyYk3pcNahY6%2Fhtml%20embed.PNG?alt=media&amp;token=2f4014fa-7489-4dfc-8456-186b32fc72b4" alt=""><figcaption></figcaption></figure>

### Viewing your Scene in the Web, AR or VR <a href="#viewing-your-scene-in-the-web-ar-or-vr" id="viewing-your-scene-in-the-web-ar-or-vr"></a>

Save and deploy the HTML website and view the link on any device to explore it immersively.

### Conclusion <a href="#conclusion" id="conclusion"></a>

By integrating SwiftXR with HTML, you can seamlessly blend 3D elements into your web prototypes, creating more engaging and interactive experiences for your users. Explore the possibilities of using SwiftXR to enhance your HTML prototypes and bring your ideas to life in an immersive and interactive way.


# React and Next.js

Add or embed 3D, Augmented Reality (AR), and Virtual Reality (VR) content/design to your React or Next.js website.

<figure><img src="https://564713456-files.gitbook.io/~/files/v0/b/gitbook-x-prod.appspot.com/o/spaces%2FKNcXDcNRYHUBsVw12Dii%2Fuploads%2FVsqfemC0ZV8Oz0s1K4BO%2FREACT%20JSX.PNG?alt=media&amp;token=e0ba3c5d-99e3-4e37-b87f-1017d9df953e" alt=""><figcaption></figcaption></figure>

### Introduction <a href="#introduction" id="introduction"></a>

SwiftXR is a powerful platform for creating and sharing interactive 3D, augmented reality (AR), and virtual reality (VR) experiences on the web. With the SwiftXR (3D/AR/VR) Integration for React, you can easily integrate SwiftXR Projects into your React websites/webapps, enabling you to create immersive and interactive web experiences.

### Creating a Project in SwiftXR <a href="#creating-a-project-in-swiftxr" id="creating-a-project-in-swiftxr"></a>

* Navigate to the SwiftXR Hub: Begin by visiting the [SwiftXR Hub](https://swiftxr.io/hub).
* Initiate Project Creation: Once on Hub, click the "Create Project" button and enter your desired project name.
* Design and Develop: Utilize the intuitive editor to effortlessly add and customize SwiftXR components, bringing your 3D vision to life.

  <figure><img src="https://564713456-files.gitbook.io/~/files/v0/b/gitbook-x-prod.appspot.com/o/spaces%2FKNcXDcNRYHUBsVw12Dii%2Fuploads%2F0qaB8Gd3W5eDbiO4Sux6%2FGuide%20Screenshots%20(16).png?alt=media&amp;token=ed6e403c-97f8-473b-9c4d-93eebf85c3f5" alt=""><figcaption></figcaption></figure>

### Add a Component/Upload a 3D Model to the Canvas <a href="#add-a-componentupload-a-3d-model-to-the-canvas" id="add-a-componentupload-a-3d-model-to-the-canvas"></a>

* From the component tab, click or drag and drop a 3D viewer component to add it to the white canvas.
* Select the "Properties" tab to upload a 3D model, import from a 3D store or Request a 3D model from <support@swiftxr.io>.

<figure><img src="https://564713456-files.gitbook.io/~/files/v0/b/gitbook-x-prod.appspot.com/o/spaces%2FKNcXDcNRYHUBsVw12Dii%2Fuploads%2FI2IwkTz2THVOCBNTOCee%2FGuide%20Screenshots%20(17).png?alt=media&amp;token=e7e773c7-1c86-496b-b7a2-4478546b89b2" alt=""><figcaption></figcaption></figure>

### Publishing Your SwiftXR Project <a href="#publishing-your-swiftxr-project" id="publishing-your-swiftxr-project"></a>

Utilize the editor to create your 3D vision using the SwiftXR components. Once satisfied with your creation, press the "Publish" or "Update" button to make your project live.

<figure><img src="https://564713456-files.gitbook.io/~/files/v0/b/gitbook-x-prod.appspot.com/o/spaces%2FKNcXDcNRYHUBsVw12Dii%2Fuploads%2F52qZKgJPckIIMcCZMNgJ%2FGuide%20Screenshots%20(18).png?alt=media&amp;token=aac8671b-20e4-4a10-8ad9-4ace8e9c0829" alt=""><figcaption></figcaption></figure>

### Copy Embed Code <a href="#copy-embed-code" id="copy-embed-code"></a>

After publishing, click the dropdown button beside the "Update" button and select "Share." Within the Share modal, click the "Copy Embed" button to copy the embed code for your project.

<figure><img src="https://564713456-files.gitbook.io/~/files/v0/b/gitbook-x-prod.appspot.com/o/spaces%2FKNcXDcNRYHUBsVw12Dii%2Fuploads%2FhsMQehlt6a6MG9mkzPyO%2FGuide%20Screenshots%20(20).png?alt=media&amp;token=d23f274d-0425-4040-a695-5f668a20739f" alt=""><figcaption></figcaption></figure>

<figure><img src="https://564713456-files.gitbook.io/~/files/v0/b/gitbook-x-prod.appspot.com/o/spaces%2FKNcXDcNRYHUBsVw12Dii%2Fuploads%2Fum627DCkjCyGptvd1WHO%2FGuide%20Screenshots%20(22).png?alt=media&amp;token=bbbf1c31-395a-4c2a-8d5e-9a378d991049" alt=""><figcaption></figcaption></figure>

### Integrating SwiftXR into React Websites <a href="#integrating-swiftxr-into-react-websites" id="integrating-swiftxr-into-react-websites"></a>

* Simply paste the copied React embed code into the desired section of your website's React source code to seamlessly integrate and showcase the 3D/AR/VR view on your site.

<figure><img src="https://564713456-files.gitbook.io/~/files/v0/b/gitbook-x-prod.appspot.com/o/spaces%2FKNcXDcNRYHUBsVw12Dii%2Fuploads%2Fk4Ml4F7qJAjJiFLNfRRN%2FREACTT.PNG?alt=media&amp;token=690da144-fcfd-4968-bf64-7effef4340b2" alt=""><figcaption></figcaption></figure>

### Viewing your Scene in the Web, AR or VR <a href="#viewing-your-scene-in-the-web-ar-or-vr" id="viewing-your-scene-in-the-web-ar-or-vr"></a>

Save and deploy the React website and view the link on any device to explore it immersively.

### Conclusion <a href="#conclusion" id="conclusion"></a>

By integrating SwiftXR with React, you can seamlessly blend 3D elements into your web prototypes, creating more engaging and interactive experiences for your users. Explore the possibilities of using SwiftXR to enhance your React prototypes and bring your ideas to life in an immersive and interactive way.


# Svelte

Add or embed 3D, Augmented Reality (AR), and Virtual Reality (VR) content/design to your Svelte website.

<figure><img src="https://564713456-files.gitbook.io/~/files/v0/b/gitbook-x-prod.appspot.com/o/spaces%2FKNcXDcNRYHUBsVw12Dii%2Fuploads%2FT1iax7s5mi6XDJaLD1i6%2FSvelte.PNG?alt=media&amp;token=5c386564-de63-41cc-9241-2d8db53f5b8b" alt=""><figcaption></figcaption></figure>

### Introduction <a href="#introduction" id="introduction"></a>

SwiftXR is a powerful platform for creating and sharing interactive 3D, augmented reality (AR), and virtual reality (VR) experiences on the web. With the SwiftXR (3D/AR/VR) Integration for Svelte, you can easily integrate SwiftXR Projects into your Svelte websites/webapps, enabling you to create immersive and interactive web experiences.

### Creating a Project in SwiftXR <a href="#creating-a-project-in-swiftxr" id="creating-a-project-in-swiftxr"></a>

* Navigate to the SwiftXR Hub: Begin by visiting the [SwiftXR Hub](https://swiftxr.io/hub).
* Initiate Project Creation: Once on Hub, click the "Create Project" button and enter your desired project name.
* Design and Develop: Utilize the intuitive editor to effortlessly add and customize SwiftXR components, bringing your 3D vision to life.

<figure><img src="https://564713456-files.gitbook.io/~/files/v0/b/gitbook-x-prod.appspot.com/o/spaces%2FKNcXDcNRYHUBsVw12Dii%2Fuploads%2FBUBSXNefSxP4kdo79FcR%2FGuide%20Screenshots%20(16).png?alt=media&amp;token=d31953f8-7da2-488d-b5df-e2d41a2f9ebd" alt=""><figcaption></figcaption></figure>

### Add a Component/Upload a 3D Model to the Canvas <a href="#add-a-componentupload-a-3d-model-to-the-canvas" id="add-a-componentupload-a-3d-model-to-the-canvas"></a>

* From the component tab, click or drag and drop a 3D viewer component to add it to the white canvas.
* Select the "Properties" tab to upload a 3D model, import from a 3D store or Request a 3D model from <support@swiftxr.io>.

<figure><img src="https://564713456-files.gitbook.io/~/files/v0/b/gitbook-x-prod.appspot.com/o/spaces%2FKNcXDcNRYHUBsVw12Dii%2Fuploads%2FP2p17C3S8bOT5ye3H7RW%2FGuide%20Screenshots%20(17).png?alt=media&amp;token=d47ba2f2-8464-4a4a-b86a-57b3f6ef17eb" alt=""><figcaption></figcaption></figure>

### Publishing Your SwiftXR Project <a href="#publishing-your-swiftxr-project" id="publishing-your-swiftxr-project"></a>

Utilize the editor to create your 3D vision using the SwiftXR components. Once satisfied with your creation, press the "Publish" or "Update" button to make your project live.

<figure><img src="https://564713456-files.gitbook.io/~/files/v0/b/gitbook-x-prod.appspot.com/o/spaces%2FKNcXDcNRYHUBsVw12Dii%2Fuploads%2FZ8JpBgBUwIOhMbdcwzOa%2FGuide%20Screenshots%20(18).png?alt=media&amp;token=57af1689-c43f-4903-acee-b75c128490ce" alt=""><figcaption></figcaption></figure>

### Copy Embed Code <a href="#copy-embed-code" id="copy-embed-code"></a>

After publishing, click the dropdown button beside the "Update" button and select "Share." Within the Share modal, click the "Copy Embed" button to copy the embed code for your project.

<figure><img src="https://564713456-files.gitbook.io/~/files/v0/b/gitbook-x-prod.appspot.com/o/spaces%2FKNcXDcNRYHUBsVw12Dii%2Fuploads%2FZKj855Z0AmCduJxXDfR8%2FGuide%20Screenshots%20(20).png?alt=media&amp;token=21f78dbb-9868-4d90-b3a2-d4c1a7acc1a3" alt=""><figcaption></figcaption></figure>

<figure><img src="https://564713456-files.gitbook.io/~/files/v0/b/gitbook-x-prod.appspot.com/o/spaces%2FKNcXDcNRYHUBsVw12Dii%2Fuploads%2FiTCTL9MZVVUQjcImtdbH%2FGuide%20Screenshots%20(23).png?alt=media&amp;token=80a34747-932e-4bf5-ae71-543f12da463c" alt=""><figcaption></figcaption></figure>

### Integrating SwiftXR into Svelte Websites <a href="#integrating-swiftxr-into-svelte-websites" id="integrating-swiftxr-into-svelte-websites"></a>

* Simply paste the copied Svelte embed code into the desired section of your website's Svelte source code to seamlessly integrate and showcase the 3D/AR/VR view on your site

<figure><img src="https://564713456-files.gitbook.io/~/files/v0/b/gitbook-x-prod.appspot.com/o/spaces%2FKNcXDcNRYHUBsVw12Dii%2Fuploads%2Fo8LC8KVHgLp0fPlxJsLl%2FSvelte.PNG?alt=media&amp;token=cea5f361-16cd-4b5a-8139-e2855efd74a0" alt=""><figcaption></figcaption></figure>

### Viewing your Scene in the Web, AR or VR <a href="#viewing-your-scene-in-the-web-ar-or-vr" id="viewing-your-scene-in-the-web-ar-or-vr"></a>

Save and deploy the Svelte website and view the link on any device to explore it immersively.

### Conclusion <a href="#conclusion" id="conclusion"></a>

By integrating SwiftXR with Svelte, you can seamlessly blend 3D elements into your web prototypes, creating more engaging and interactive experiences for your users. Explore the possibilities of using SwiftXR to enhance your Svelte prototypes and bring your ideas to life in an immersive and interactive way.


---

[Next Page](/llms-full.txt/1)